Virtual Microphone System
The Slate Digital Virtual Microphone System is a breakthrough product that brings a growing collection of world-class and indispensable microphone models to your studio at an extremely affordable price. This amazing experience is realized through a combination of a specially designed and optimized ML-series microphone along with our Virtual Microphone System software plug-in.
To fully understand and maximize the value of the VMS, please take the time to read through the contents of this user guide. While VMS is fairly straightforward and intuitive to use, there are some points in this guide that will ensure top performance and results.
Setup
Your new ML-series microphone is set up just like any other microphone you may own.
1. Mount the microphone to a microphone stand using the included mounting equipment. While it is possible to hold the microphone in your hand, mounting it will help ensure the microphone isn’t accidentally dropped and will also minimize undesirable physical noise that it could pick up due to handling and movement.
2. Identify the microphone input on your audio interface that you wish to use. Note that the audio interface must be capable of providing Phantom Power on the microphone input in order to provide the microphone with the power required to operate.
3. Turn down the Input Gain of the microphone input on the audio interface and ensure Phantom Power is off. This will help prevent loud noises when connecting the microphone. If needed, please consult the user manual of your audio interface to learn how to switch Phantom Power for the microphone input.
4. Connect the microphone to the microphone input on your audio interface using a high-quality XLR microphone cable. You can use any cable brand or length you choose.
5. Enable the Phantom Power on the audio interface. This will provide power to the microphone, and it will begin to operate.
6. While singing or playing into the microphone, slowly turn up the Input Gain on the audio interface. You should see the level meters on the audio interface begin to show an incoming audio level, though some audio interfaces simply have a single light that will illuminate when signal is present.
7. Create an audio track in your DAW/host software and select the audio interface’s microphone input as the input for the track. This is now the track where your singing or playing will be recorded. As all DAWs function a bit differently, please consult its user guide on how to create a channel and assign an audio input.
8. Load the Virtual Microphone System plug-in as an “insert” on the audio track. If you use other plug-ins on this audio track, ensure the Virtual Microphone System plug-in is loaded into the first position before the others.
9. In the Virtual Microphone System plug-in, select your microphone model as the “Source Mic” in the upper-left corner of the plug-in.
10. With headphones on, enable the audio track’s Input Monitoring. This will allow the audio being picked up by the mic to be heard in the headphones.
Usage
Now that the microphone is connected, operating, and the Virtual Microphone System plug-in is loaded in your DAW, you can begin to experiment with the various virtual microphone models available for your mic.
Initial Target Mic and Preamp Selection
Selecting a target microphone in the central area of the Virtual Microphone System plug-in will immediately apply that microphone’s characteristics to the incoming audio so you can judge how it affects the sound. You can easily switch to other mic models to compare their characteristics.
Clicking the central area of the microphone display will open a quick browser showing all microphone models available to you. Click outside the browser to close the window.
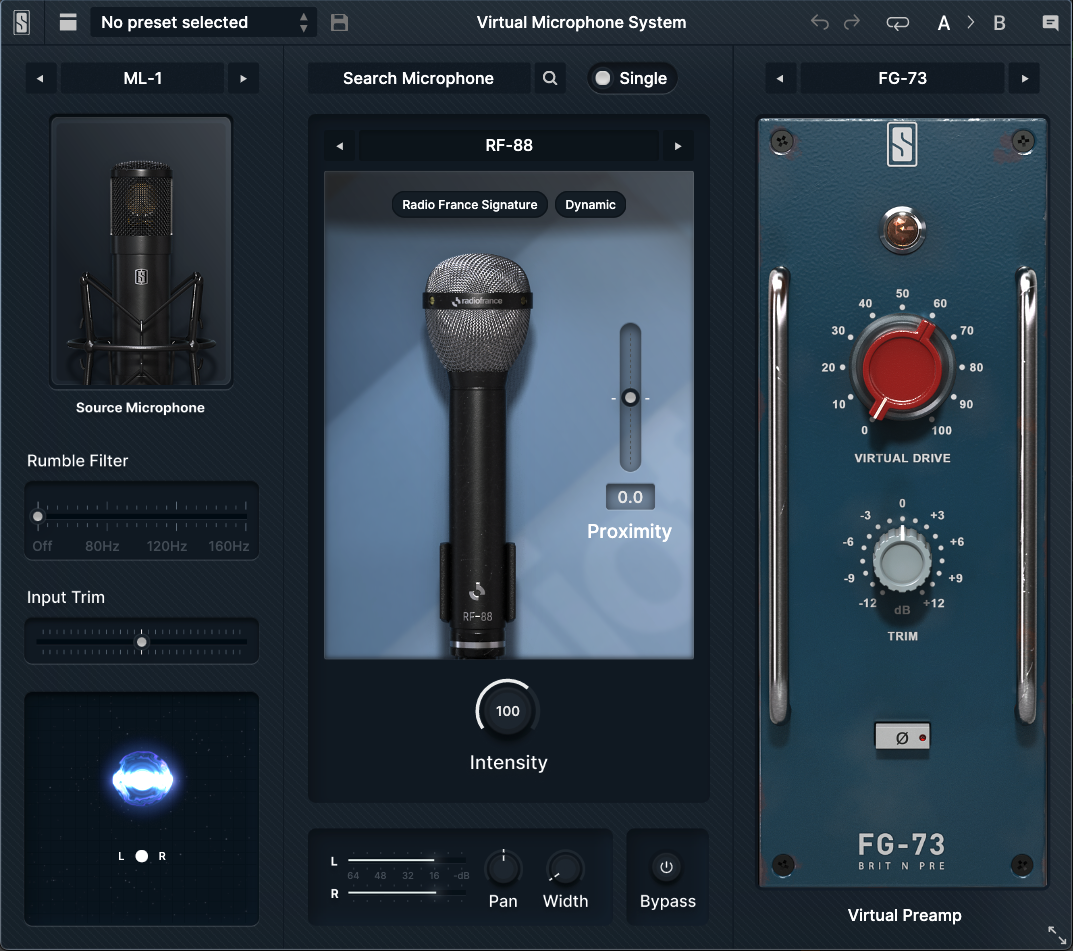
Above the image of the selected microphone model, you will see two tags relating to the selected microphone: Its Expansion Pack name and microphone Type. For example, this could be “Radio France Signature” as the Pack name and “Tube” as the microphone type. You can click these tags to toggle their selection on and off—when the selection is on, scrolling will be limited to microphones that fall within the selected tags. For example, if you enable the “Tube” tag, scrolling through mics will be limited to Tube types—the Dynamic, Condenser, and Ribbon mics will be skipped.
If you want to add further color and saturation to your recording, you can also choose to load one of the virtual preamp models in the right-most slot of the Virtual Microphone System plug-in. You can adjust the amount of virtual drive of the preamp, as well as flip the phase and adjust the output trim at this stage.
Recording
Once setup is complete, you can proceed to record as you normally would with your DAW. The workflow remains the same as with any other microphone you use to record.
Changing the Microphone and Preamp After Recording
One excellent benefit of the Virtual Microphone System is that you can change the microphone and preamp models and their settings after you’ve made your recordings!
Unlike using a normal microphone, you don’t need to worry about which microphone model you choose at the time of recording or how the preamp was set! Often times, what might sound good during the initial recording stages might not sound as appropriate during the mixdown stage of your project. If that’s the case, you can change the microphone and/or preamp model to something that is more complimentary to your final mix.
Simply re-open the Virtual Microphone System plug-in and change the microphone model and/or its settings and you’ll immediately hear the results of the new choices. Furthermore, since each audio track recorded with the Virtual Microphone System has its own, unique instance of the Virtual Microphone System plug-in loaded on it, you can choose different microphone models, preamps, and settings for all of them! Perhaps one microphone model gives the lead vocal the clarity and presence needed to sit in the front of the mix while another microphone model softens a background vocal to sit comfortably behind the lead vocal and provide support. Feel free to experiment—the Virtual Microphone System provides ultimate flexibility and choice right up until you bounce your final mix.
Tips and Tricks
Setting the Input Gain on your Audio Interface
When setting the Input Gain on your audio interface, do so when playing the loudest section of your performance. That is, a singer should try singing at the maximum volume or the instrumentalist should try playing as loudly as they intend.
While the performer is performing these loud sections, set the Input Gain such that the input audio level doesn’t ever exceed -12dBFS. While it is good to get the Input Gain set to a moderately high level, some amount of headroom should always be maintained as it is a common phenomenon that performers will still perform more loudly “in the heat of the moment” while recording compared to what they do during the initial practice and setup. Therefore, keeping some headroom during the initial setup will ensure that these louder performances aren’t ruined due to overload distortion during recording. If you’re recording in 24-bit format, you can even be more liberal with your headroom (for example, not exceeding -20dBFS) without sacrificing audio quality.
Furthermore, input meters are often “slow” and tend to show an average input level. Very sharp (short and loud) transients can be missed by the meters but still cause distortion when your audio interface converts the analog signal into digital. Preserving recording headroom will help ensure that these transients are captured cleanly and accurately without distortion.
Setting the INPUT and OUTPUT TRIM in the VMS Plug-in
Due to how some of the microphone models behave, the output signal from the Virtual Microphone System plug-in can actually be louder than the signal going in to it. Preserving some headroom when recording, as described in the previous section, will help prevent any overload in the plug-in.
However, if overloads do still occur even with the above precaution, you can reduce the INPUT TRIM slider in the Virtual Microphone System plug-in to add headroom and/or reduce the OUTPUT TRIM in the plug-in to reduce the level going in to subsequent plug-ins in your DAW.
Rumble Filter
The Rumble Filter can be used to remove extremely low frequencies that might be picked up by the microphone, depending on your recording environment (such as ventilation systems, outside road noise, etc.). You can either adjust this slider directly to dial in a specific frequency, or you can click on the OFF, 80Hz, 120Hz, and 160Hz labels to snap to these standard filter values.
Intensity
The Intensity knobs can be used to adjust how much of the selected microphone model is applied to the audio. At 100%, the model is applied accurately. With values less than 100%, more of the original characteristics of the input audio will be heard. With values over 100%, the unique characteristics of the microphone model will be exaggerated.
Proximity
The Proximity slider can be used to recreate the “proximity effect” which occurs when the microphone is placed close to a sound source. Increasing this value (moving the slider up) will typically add more bass frequencies as would happen when putting the mic close to the source. Conversely, decreasing the value (moving the slider down) will reduce frequencies as if the mic was moved farther from the source.
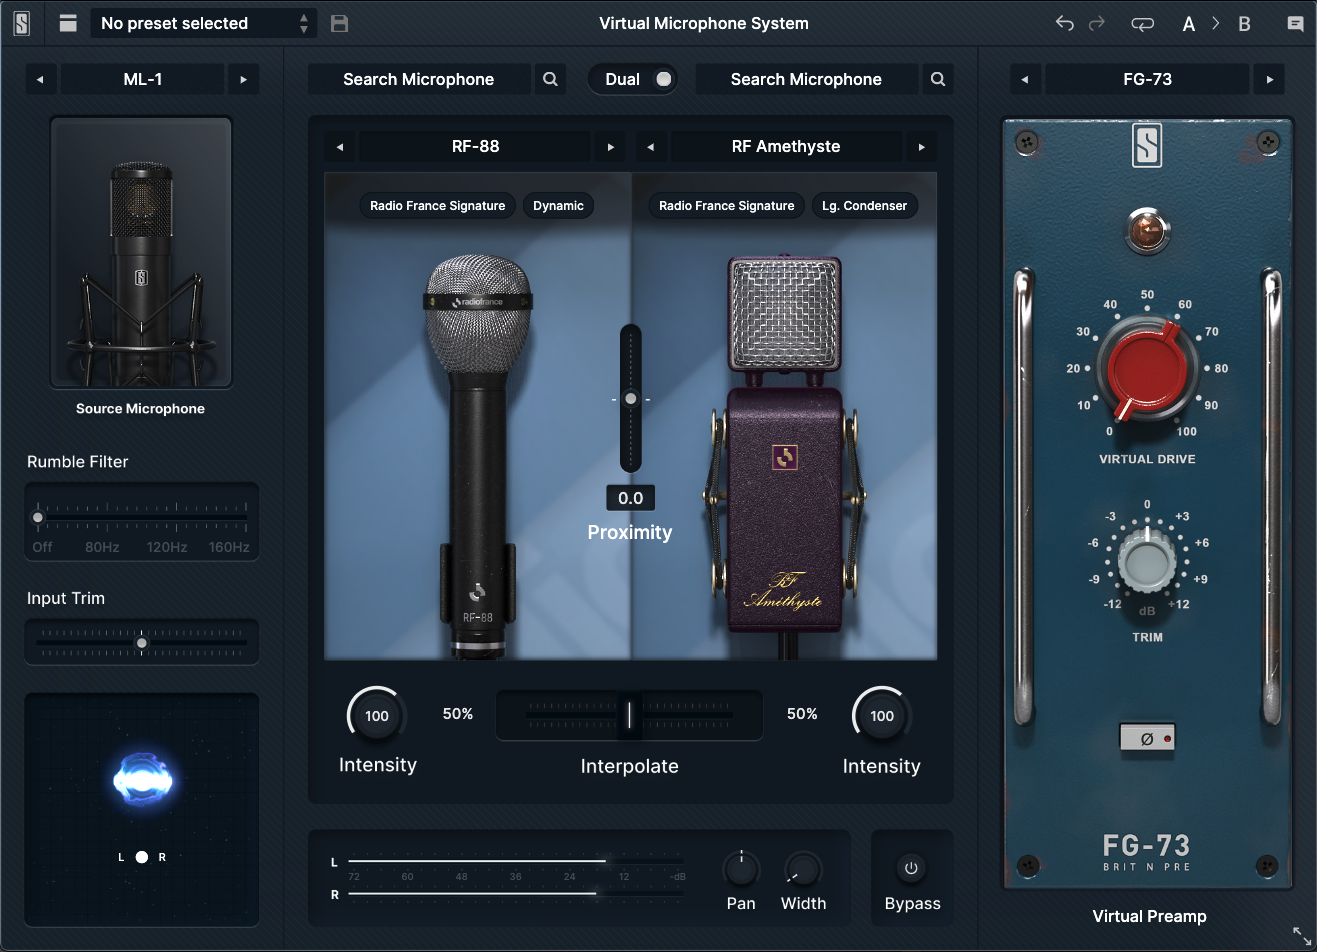
Dual Mic Mode
You can experiment with a virtually limitless number of microphone models by blending the characteristics of two different microphones to create a new hybrid behavior. Flip the “Single” switch over to the “Dual” position to expose a second microphone. Select another model for the right-hand microphone, and then use the Interpolate slider to “morph” the behavior between the two mic models.
Width
Turning up the Width knob will cause the sound to magically spread out in the stereo spectrum. This is an excellent trick to use on background vocals as you can then leave the lead vocals front and center in the mix; the extra width on the background vocals will help move them back a bit and provide the correct support to the lead without stealing the spotlight. And don’t be afraid to use this knob, even on some instruments! This particular width algorithm is designed to be mono-compatible so there won’t be any phasing or cancelation issues if your music ends up being played on a monaural system (phones, Bluetooth speakers, etc.).