FG-X 2
With the enormous number of music distribution channels and the variety of delivery standards, the mastering process brings new challenges and needs more attention than ever before. Introducing FG-X 2, a comprehensive mastering suite designed to deliver unprecedented control and transparency to the audio limiting process.
Taking its roots in the legacy of the first FG-X, which introduced new sonic possibilities in loudness and clarity, FG-X 2’s algorithm has been completely redesigned from the ground up. Transparent tone and overall loudness are at the core of the processing, along with a simple yet efficient set of parameters that allow you to finely adjust the behavior of the limiter.
You’re no longer forced to dial in specific settings to get your track sounding louder. All you need to do is choose a mode and adjust the gain. This gives you an unbelievable amount of control for a limiter while keeping things intuitive and simple. If you want to go even further, open up the Advanced View and play with the Transients, Drive and Balance.
FG-X 2 is made of two main processors, the FG-Comp and the FG-Level. The FG-Comp is a world-class mastering compressor that combines several different compression styles to create the best in class transparent dynamic control. This module is more faithful to the original, with additional control over the stereo field, a crucial feature at the mastering stage. The FG-Level is a True Peak loudness processor that adds level to the signal without adding degrading artifacts.
FG-X 2’s metering section offers everything that the most experienced mastering engineer would need: LUFS, RMS, Peak, histograms, VU meters, and more. Everything about FG-X 2 is designed to make you feel confident that you have all the visualization tools you need to feel at home and get the results you’re looking for.
Quick Start
Using the Easy view, adjust the Ratio of the FG-Comp to smoothly compress the dynamics of the full song, generally up to 3dB of Gain Reduction. Start with the Attack and Release at 5 and adjust from there, usually keeping the Attack slower and the Release faster.
To get your desired loudness level, simply adjust the Gain knob. Then, decrease the Ceiling to your distributor recommendation, select the mode that is best suited to your song, and adjust the LoPunch and Detail parameters to enhance the transient response.
That’s it!
Now you have a pro-sounding master, but if you want to take things further, you can open up the Advanced view to really get under the hood of FG-X 2.
Easy vs Advanced view
Easy view is the default view for FG-X 2, giving you instant access to the most important controls.
Advanced view gives you complete control over FG-X 2 by adding advanced features for the FG-Comp and FG-Level sections

Use the switch on the top bar to change between easy and advanced views.
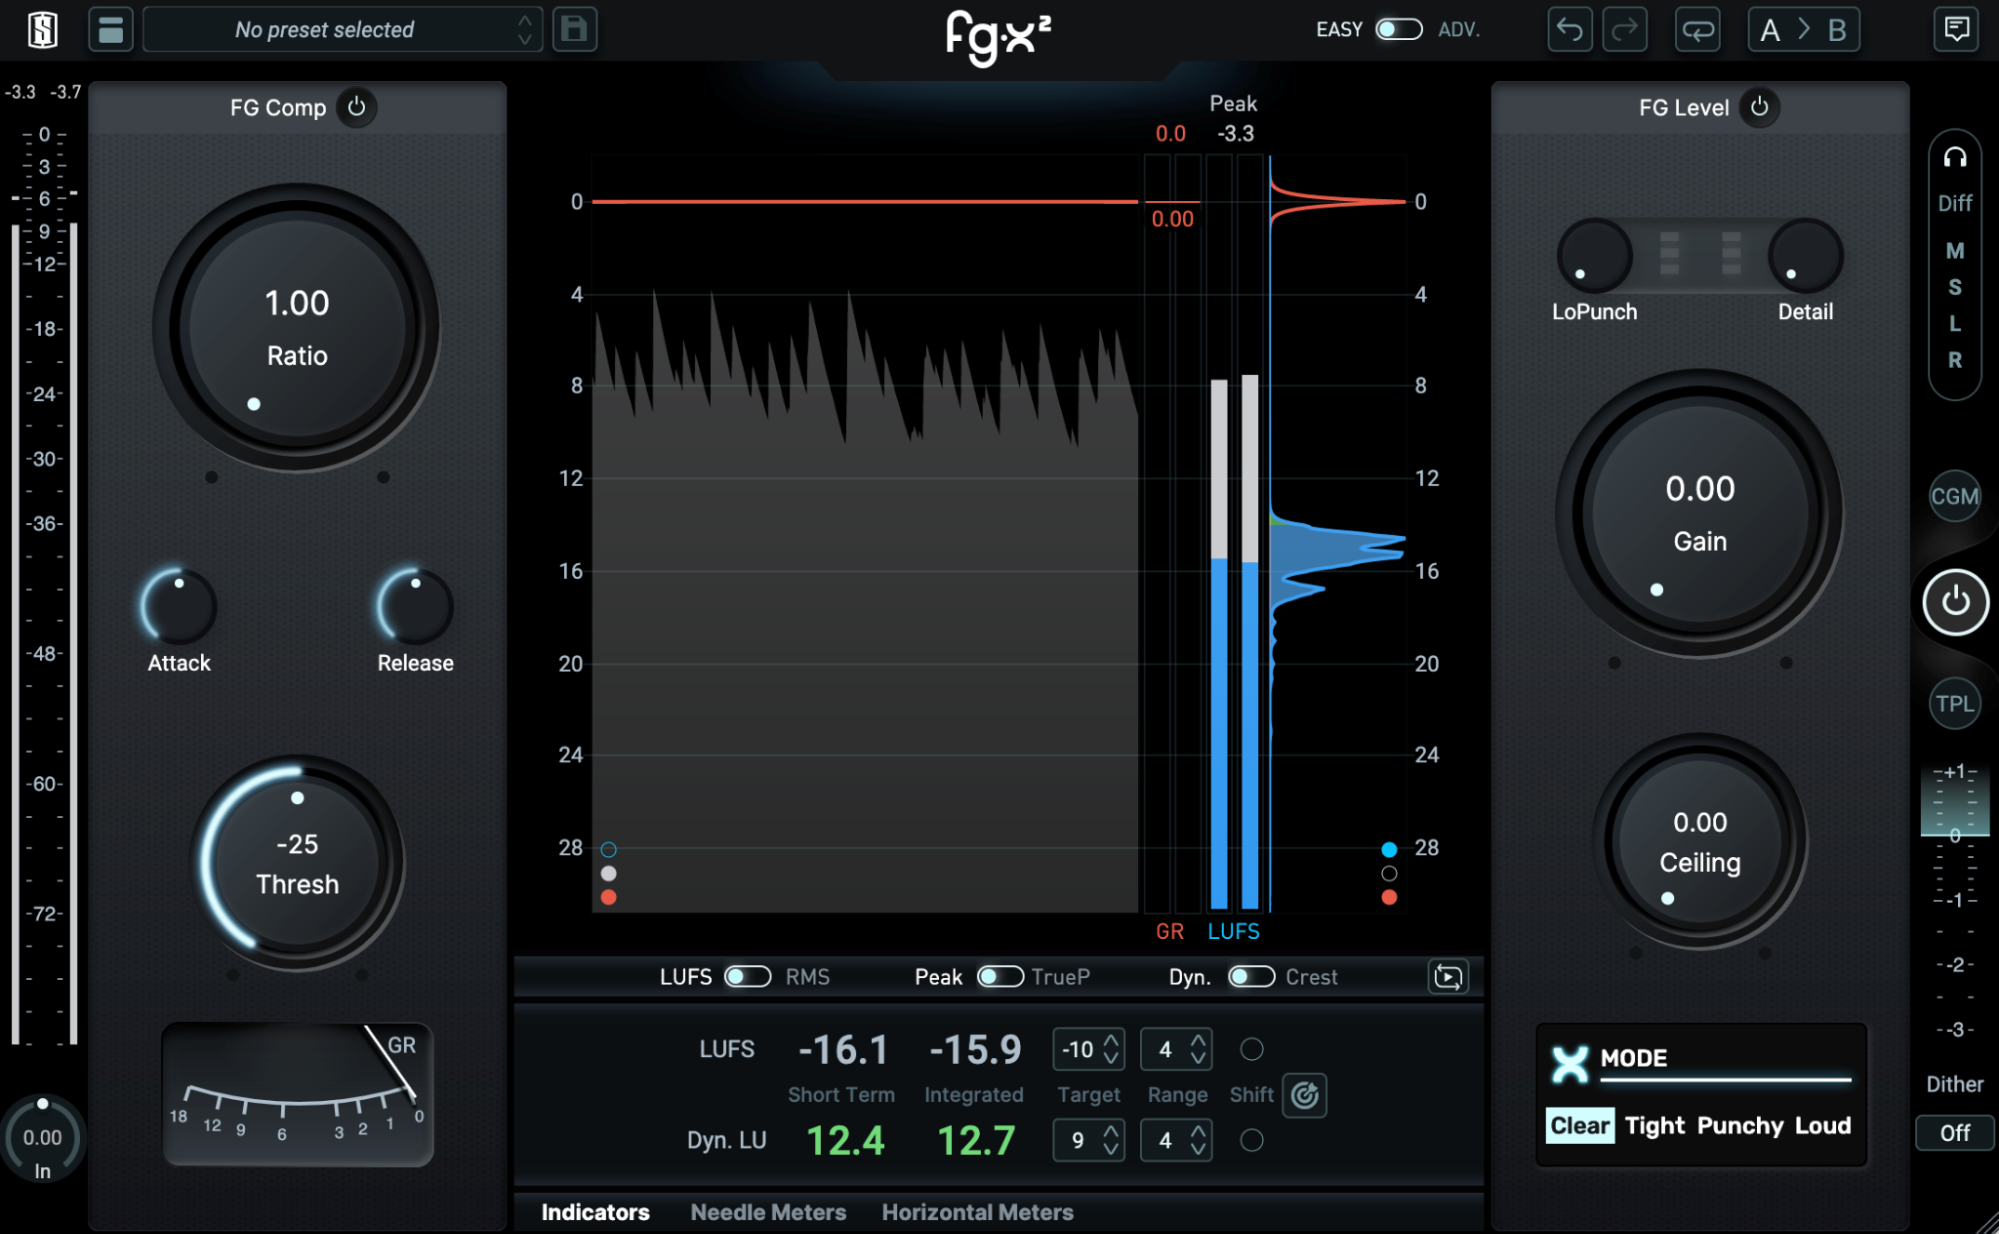
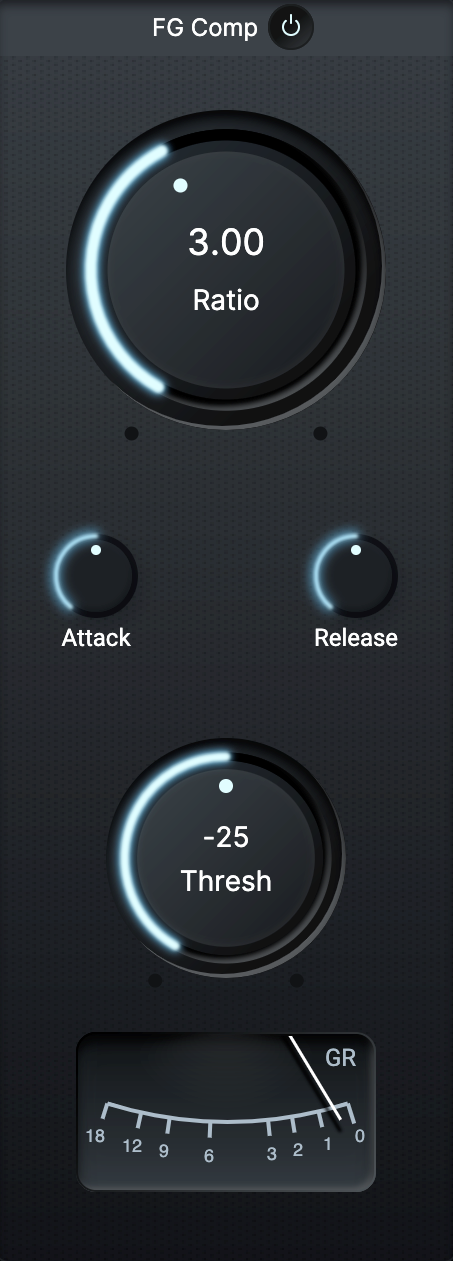
FG-Comp
The FG-Comp is a fully-transparent compressor dedicated to mixbus and mastering duties. Whether you want to strengthen the dynamics of the mix, have a more compact sound, add some glue, or control the dynamics of your signal before entering the limiter, the FG-Comp is ready for anything.
| Easy View | Advanced View |
|---|---|
 |
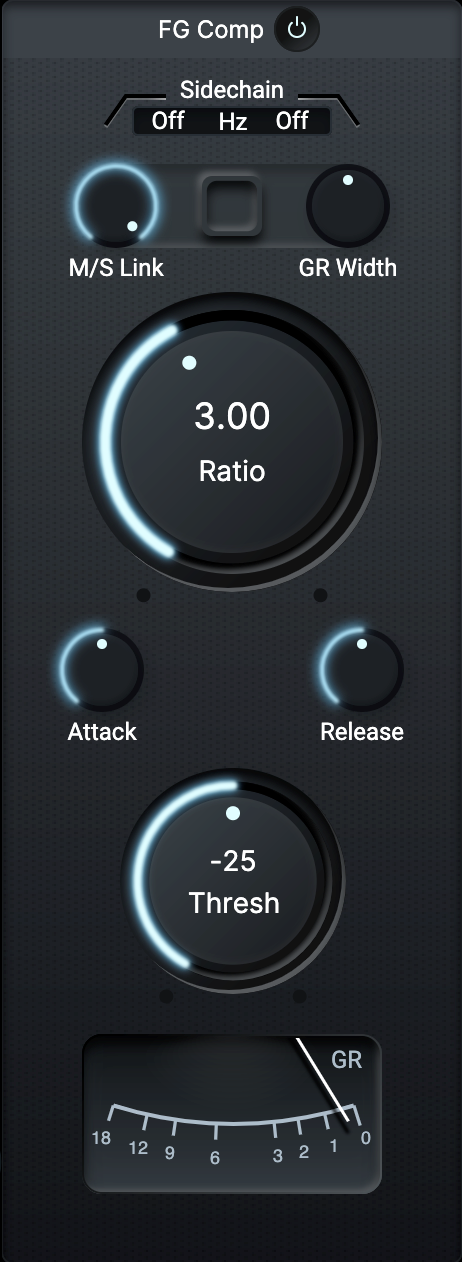 |
Ratio/Threshold
Ratio controls how much gain reduction is applied once the signal passes the threshold. Threshold sets the level above which compression is applied. Using these 2 controls is enough in most cases.
Attack/Release
Attack adjusts how fast the compression kicks in, while Release adjusts how fast the compression is reduced. With default settings, the FG-Comp offers a nice balance between a leveler and a traditional compressor. To add more punch, use a slower Attack and faster Release. For a more transparent response, slow down the release until the compression fits your song.
Using The FG-Comp as a Leveler
With very low Attack and Release values, the FG-Comp acts more like a leveler than a compressor. But even in those cases, the FG-Comp algorithm retains all the punch and transients of the original mix, while reacting intelligently to sudden loudness changes of the incoming audio.
The leveler mode can be used two ways:
- With a high ratio and threshold. This prevents loud moments of the sound from getting too extreme.
- With a low ratio and threshold. This will tame your dynamic peaks while maintaining clarity and providing a more well rounded signal to the FG-Level.
Sidechain Filters (Advanced Mode)
High Pass and Low Pass filters can be enabled on the sidechain of the compressor so that you can decide whether the FG-Comp reacts more to high or low frequency content.. Using default settings, both filters are disabled.
Mid/Side Link (Advanced Mode)
The M/S Link determines what percentage of the compression is linked between the mid and side signals. With M/S Link at the default 100, the same compression is applied to both mid and side. With M/S Link at 0, compression on mid and side are completely independent from each other.
GR Width (Advanced Mode)
GR Width adjusts the compression balance between Mid and Side. Positive values result in a wider sound and more compression on the mid channel.. Negative values result in a centered sound and more compression on the side channel.
Square Visualization
The Square Visualization helps you understand how the compression is affecting your mid and side channels:
The more compression that is applied, the smaller the square will be. The square turns into a rectangle as you adjust the M/S Link or GR Width controls.
- A narrow dark rectangle indicates a more centered signal with more compression applied on the sides.
- A wide dark rectangle indicates a wider signal with more compression applied to the center.
When mid and side compression are unlinked, the width and height of the rectangle move independently.
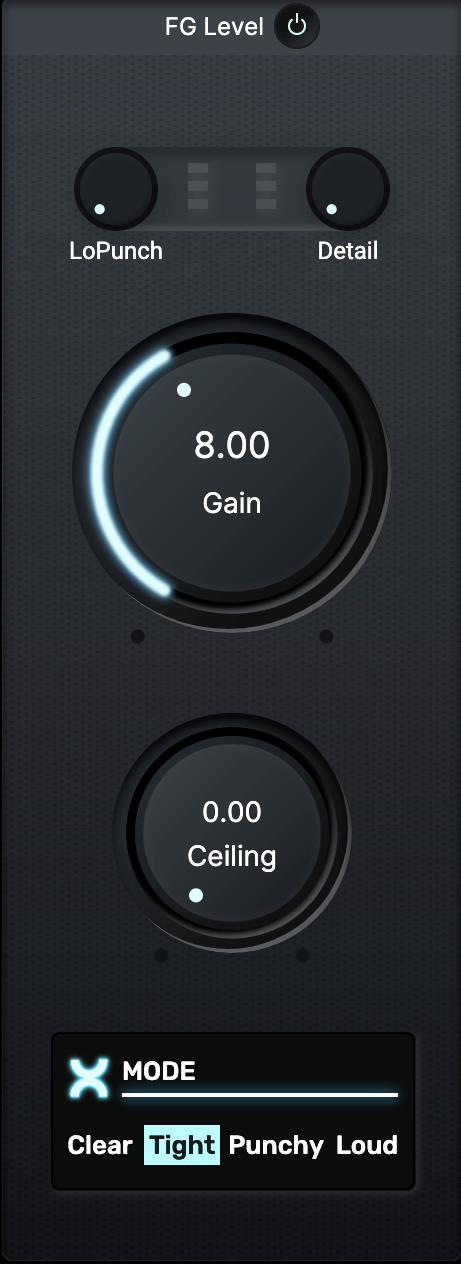
FG-Level
The FG-Level is an intelligent processor that mixes saturation and limiting, allowing you to maximize loudness while preserving the energy and impact of the original sound. Its algorithm analyzes the input signal to determine whether to apply saturation or limiting based on the frequency content.
| Easy View | Advanced View |
|---|---|
 |
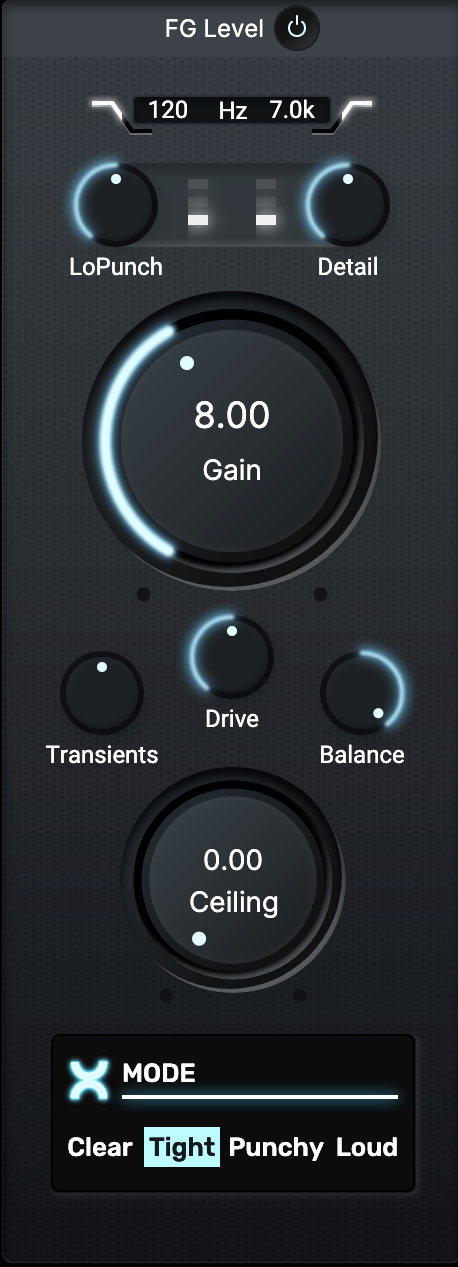 |
Gain
The Gain parameter adjusts the input gain of the limiter stage. Basically, the higher the Gain, the louder your track! It should be adjusted alongside the Modes (see below) to find your desired balance between loudness and transparency.
Modes
The four Modes offer four different ways for you to get the limiting you want, ranging from maximum transparency all the way to maximum loudness.
Clear
Maintains the output level and allows for the most transparent limiting, while preserving as much of the original dynamics possible. Compression is more focused on long-term dynamics which keeps short-term dynamics as intact as possible. Ideal when the mastering needs to be transparent and not too loud. (Jazz/Pop)
Tight
Allows for a more relaxed loudness control, with good transparency and short-term dynamics overall. Compared to Clear Mode, the resulting sound is tighter and a little more compact. Ideal when keeping the dynamics of a mix with some variations in loudness over time. (Pop/Rock)
Punchy
Designed to keep as many transients as possible while achieving higher loudness, and retaining more long-term dynamics. Ideal for mixes with loud, snappy transients and heavy bass dynamics. (Rock/EDM/Hip-Hop)
Loud
Allows for maximum loudness when the sound needs to be powerful and the original mix has a wide range of long-term dynamics. Ideal for songs with loud, squashed percussion elements and variations in loudness. (EDM/Hip-Hop)
Ceiling
The Ceiling knob determines the maximum output level for the limiter. The recommended value for most streaming services is -1dB True Peak.
LoPunch/Detail
The LoPunch and Detail knobs are used to boost transients before entering the limiter. LoPunch raises the level of the low-end punch of the mix, such as the kick, while Detail raises the level of the high-end punch, such as your snare drum. To get the most accurate results, leave them at 0, and only adjust them after dialing in your desired Gain.
LoPunch/Detail Frequencies (Advanced Mode)
By default, LoPunch boosts transients below 120Hz and Detail boosts transients above 7kHz. However, you can adjust these cutoff frequencies to shape your transients more precisely. (Keep in mind that these do not affect transient detection.)
Advanced Limiter Settings (Advanced Mode)
Though they only apply when FG-Level is actively limiting and gain reduction is happening, the following parameters allow for finer adjustments to the behavior of the module. They give you a lot of control over the sound of the limiter and the compromises made to reach the desired loudness. All while preventing peaks from going over the ceiling. You get a level of control unprecedented for a limiter. These functions enable you to intuitively shape your sound without having to deal with complex technical parameters.
Drive
The Drive setting affects how the limiter is being driven. This setting works with the Transients and Balance parameters to generate pleasing and controlled harmonics that add impact & presence to the bass, sharpness & power to the highs, and loudness & fullness to the mids.
The more Drive, the more reactive and aggressive the limiting becomes; there will also be more soft saturation applied when gain reduction is needed. This increases the track’s overall loudness and gives more grit to the overall sound.
Transients
The Transients setting adjusts how transients are processed by the limiting process:
- Transients at 0: Retains the original transients of the mix and avoids pumping artifacts. This setting will work for most applications.
- Transients between -10 and 0: Cleaner transients with slightly reduced sharpness and potential pumping. This range is good for solving distortion issues.
- Transients between 0 and 10: Punchier transients and more dynamics, but a potentially harsher and more distorted overall sound.
Balance
Balance adjusts the priority of the lower vs. higher frequencies in the limiting process:
- Balance at 0: Balanced limiting for high and low frequencies. Suitable for most cases.
- Balance between -10 and 0: More bass, less highs. Priority is given to bass by reducing the limiting priority and saturation of high frequencies. This range can be useful to avoid harsher higher frequencies and emphasize bass punch and loudness.
- Balance between 0 and 10: More highs, less bass. Priority is given to the high frequencies by reducing the limiting priority and saturation of bass frequencies. This range is best suited for songs whose master needs to retain high frequency sharpness & clarity.
Right Bar

Listen Section
The Listen section lets you isolate the signal components removed by the FG-Level with the Diff button. This setting can be combined with the Mid, Side, Left and Right solo buttons, which allow you to listen to specific output signals.
Constant Gain Monitoring
Constant Gain Monitoring decreases the output volume by the same amount added by the Gain knob. This means you can easily compare the original & processed mixes by toggling the power button on the FG-Level. This simple feature lets you hear exactly what FG-Level is doing without the added gain affecting your judgment.
Global bypass
The global bypass lets you bypass all audio processing (Input Gain, FG-Comp, FG-Level and Right Bar).
True Peak Limiting
In the digital domain, values between two samples can exceed the ceiling value—these are called inter-sample peaks. Inter-sample peaks can be an issue when converting from digital to analog. True Peak Limiting ensures that inter-sample peaks do not exceed the ceiling.
FG-X 2 True Peak Limiting complies with ITU-R BS.1770 and EBU R128 standards (by using 4x oversampling at 44.1kHz and 48kHz and 2x oversampling for 96kHz and above). Most streaming services follow these standards and recommend using true peak limiting with a -1dB ceiling.
Please note: Due to the fact the oversampling filters are not fully specified by the standards, the True Peak values displayed by different limiting or metering plugins complying with the standards can be different.
Output Meter
A simple meter to display the level at the output of the plugin and the ceiling.
Dithering
The Dither section allows you to adjust the Output Bit Resolution and Noise Shaping. Dithering is a process that reduces quantization artifacts by adding a small amount of noise to the audio. Depending on the noise floor already present in your recording, you may want to disable Dithering altogether. No Dithering happens if the Output Bit Resolution is set to Off. To enable Dithering, adjust the Bit Resolution to 16 or 24.
Noise Shaping can be set to Flat, Normal, Ultra or None. “Normal” and “UItra” will push the dithering noise at higher frequencies where they are less audible. “None” allows you to only hear the effect of the quantification made by the Output Bit Resolution, effectively turning both Noise Shaping and Dithering off.
Metering Section
The Metering section allows you to visualize your signal in different ways:
- Time graph, vertical meters and histograms
- Indicators (LUFS, Dynamics, etc)
- Needle Meters
- Horizontal Meters
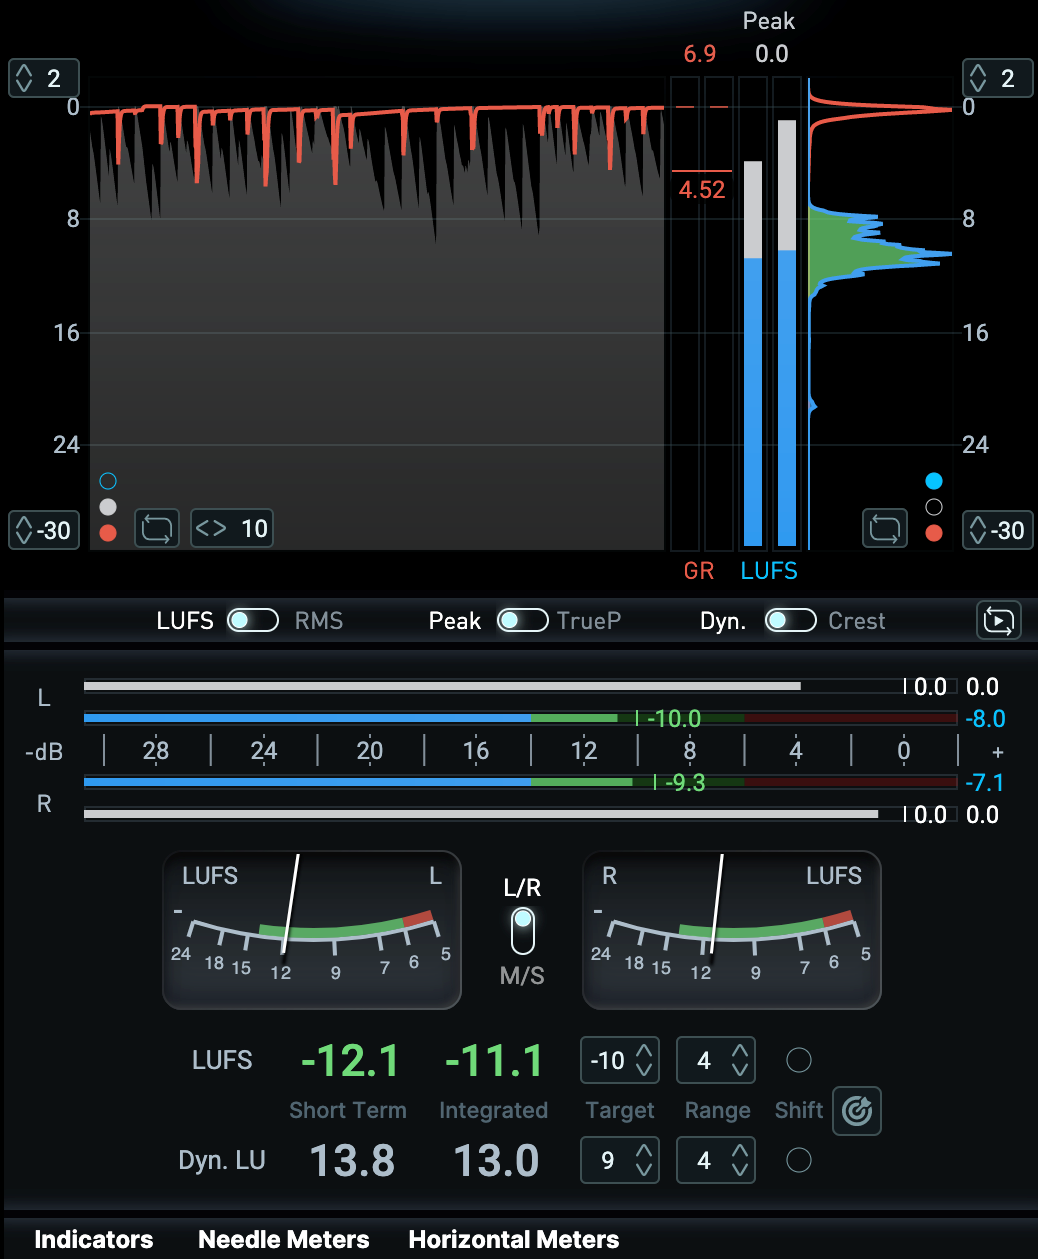
You can choose to display or hide metering sub-sections at the bottom of the Metering interface so you can visualize only what you really need.
Time Graph, Vertical Meters and Histograms
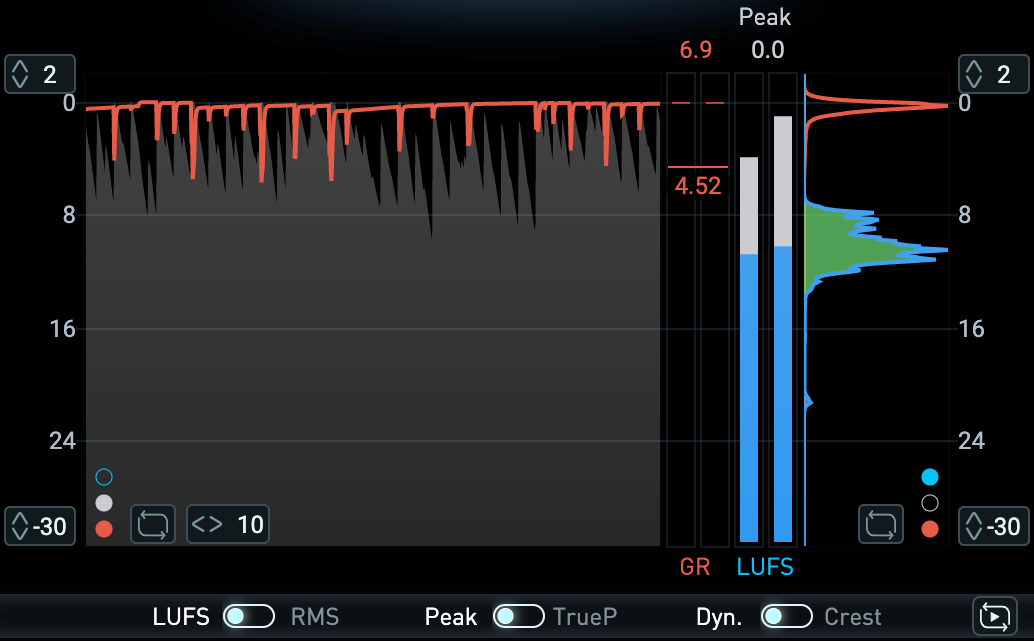
The time graph on the left allows you to visualize the Gain Reduction (red), LUFS/RMS (blue) and Peak/TruePeak (white) signals over time. The Gain Reduction signal comes from the FG-Level only. The LUFS/RMS and Peak/TruePeak are measured at the output of the plugin.
The 2 vertical meters display the same signals as the time graph
The histogram on the right displays how these 3 signals are accumulated over time. For example, a wide curve on the blue histogram (LUFS) indicates a dynamic track with a lot of loudness variations.
You can use the 3 switches at the bottom of the time graph to select which signal you want to visualize. Please note that this will also affect all the other metering components.
The time scale and dB scale can be adjusted by using the handles at the extremities of the subsection. You can also decide to display or hide signals on the time graph and histograms by clicking on the blue, white and red dots. You can reset the time graph and histograms independently by clicking inside their respective area or clicking on the reset button.
The clip indicators at the top display the maximum Gain Reduction and Peak/TruePeak value. You can reset these values by clicking on it.
By default, all meters are reset when on transport (when pressing play on your DAW). You can disable this function by clicking on the reset button at the bottom right hand corner.
Indicators
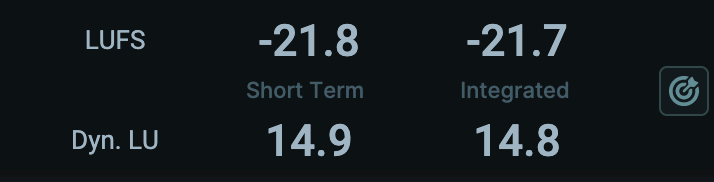
The indicators section gives you information about loudness and dynamics:
- The Short Term and Integrated Loudness (LUFS) measurements fully comply with ITU-R BS.1770 and EBU R128 standards.
- Short Term Dyn. LU measures the difference between Short Term True Peak value and Short Term Loudness.
- Integrated Dyn. LU measures the difference between the maximum True Peak value and Integrated Loudness.
Alternatively if you decide to use RMS on the global metering switches instead of LUFS you will visualize :
- Integrated and Short Term RMS, whose ballistics were chosen to match the corresponding LUFS ballistics.
- Short Term and Crest Factor as the difference between the Short Term Peak value and the Short Term RMS value
- Integrated Crest Factor as the difference between the maximum Peak value and the Integrated RMS value
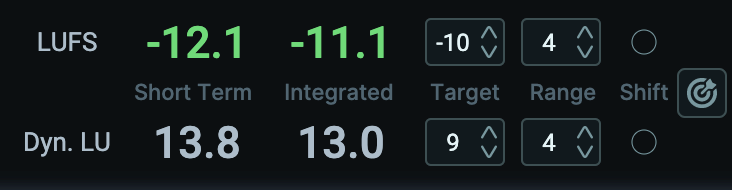
You can also enable the Target feature display by clicking on the Target icon.This allows you to set a target and a range for each of the metrics, allowing you to easily visualize if you are within your defined bounds. Green means everything is fine, red means you are overshooting. This affects all the meters. For example, setting Target to - 12 LUFS and the Range to 2 LU, the green range goes from -14 to - 10 LUFS.
The shift feature allows you to set the Target as the reference value (0). For example if you set the LUFS target to -10 LUFS and enable Shift, all LUFS values are going to be shifted 10 LU up. This affects Indicators and Needle Meters.
We included several metering presets (see Presets section further below) to help you set the targets recommended by the streaming platforms and also give starting points depending on your music genre.
Needle Meters
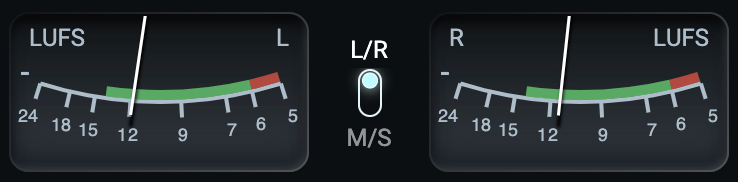
Needle Meters offer you an more old school way to visualize Loudness or RMS. You can also switch to a Mid/Side visualization and adjust the bounds of the meters if desired.
Horizontal Meters

Horizontal meters let you visualize the Loudness or RMS (blue) and Peak (white) for Left and Right channels. You can adjust the bounds of the meters if desired.
Presets
The preset browser is made up of two tabs: Audio and Metering.
Audio presets save all the FG-Comp and FG-Level parameters that affect your audio. By design, Gain, Ceiling, True Peak Limiting, Dither and monitoring options are not saved in presets.
Metering presets let you save your favorite metering settings. They already include the most up-to-date settings recommended by all the major streaming platforms.