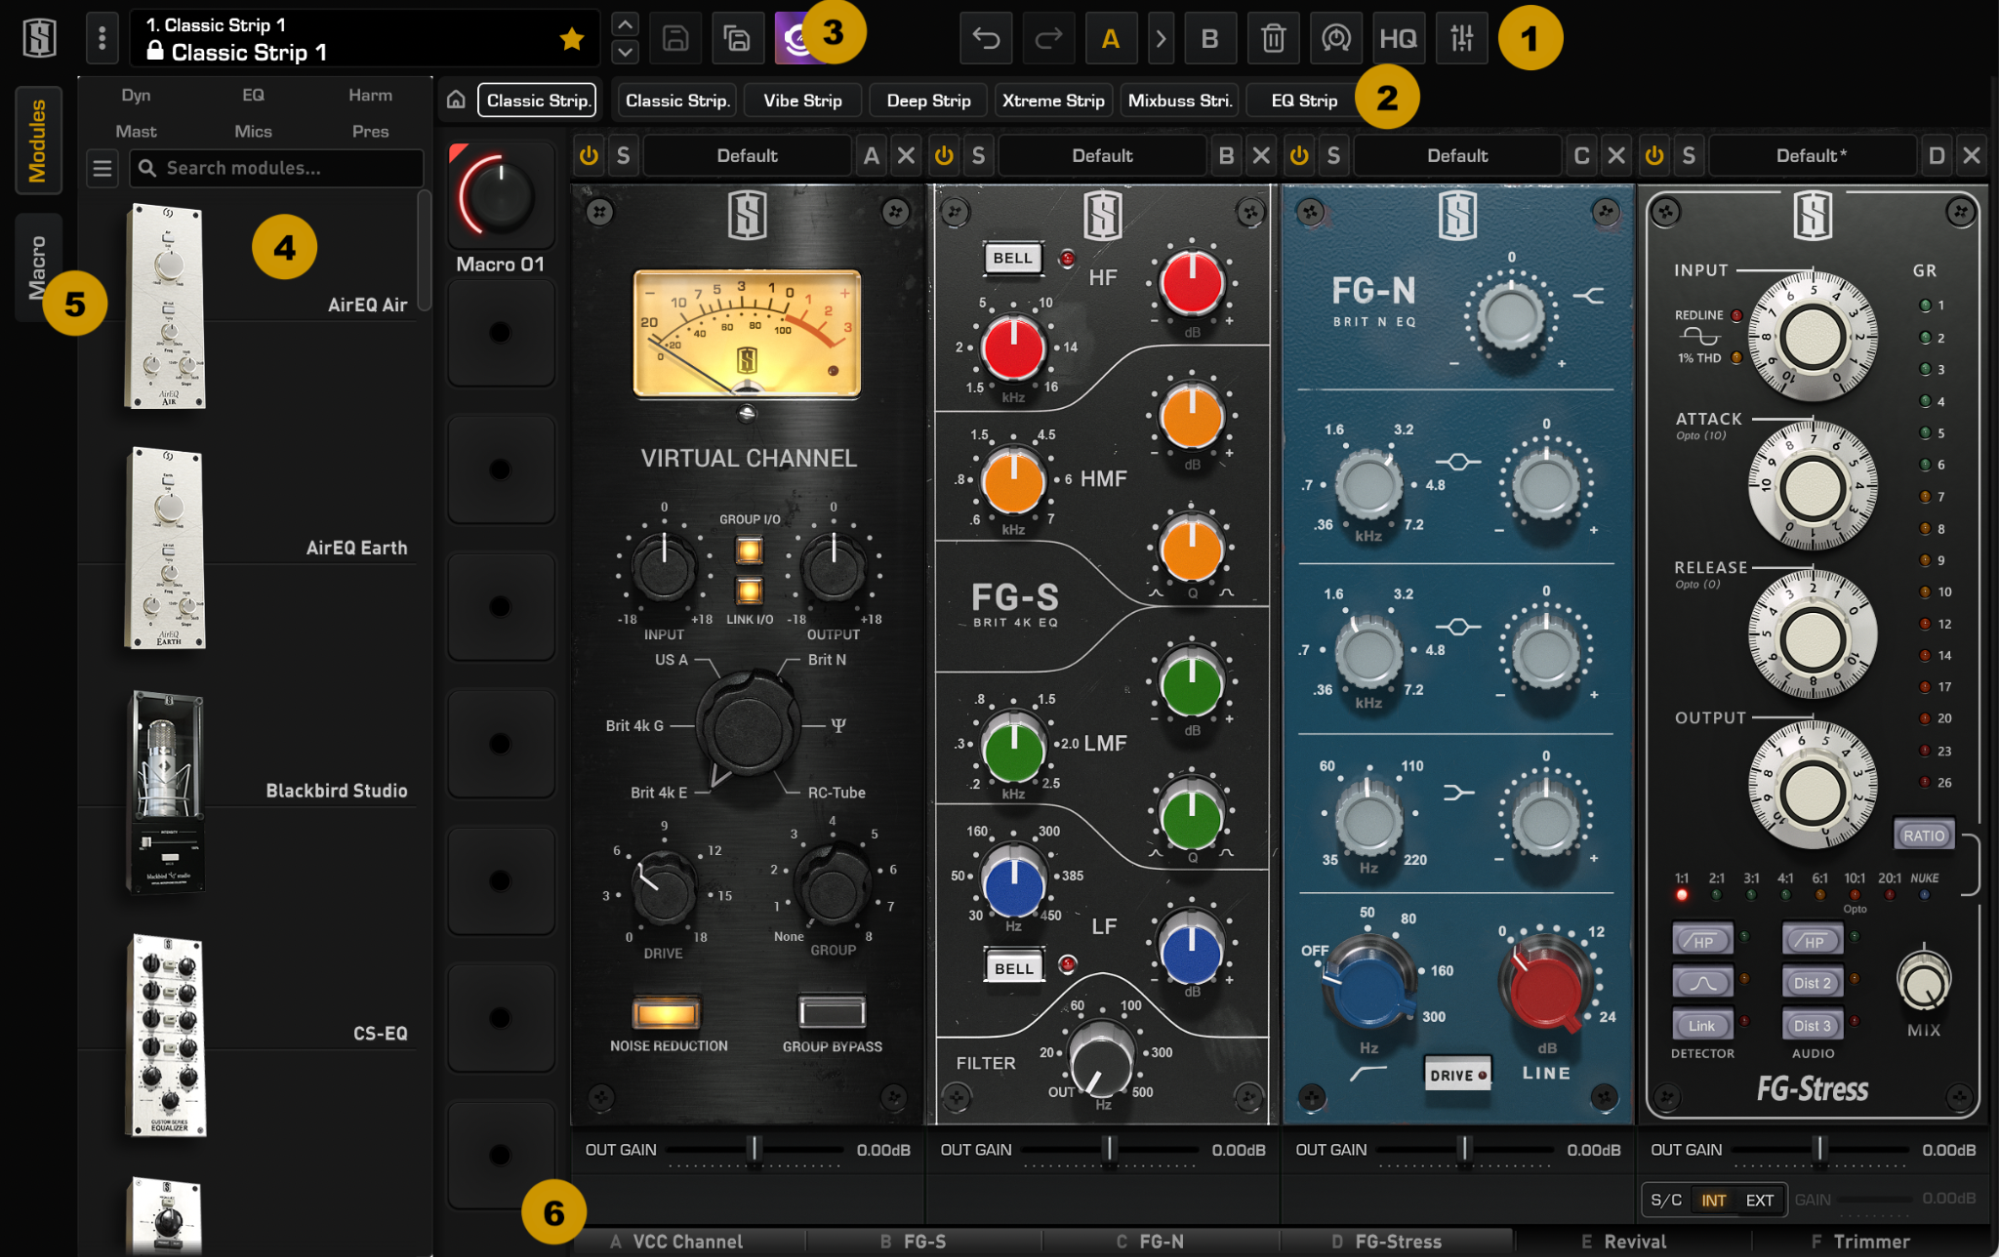
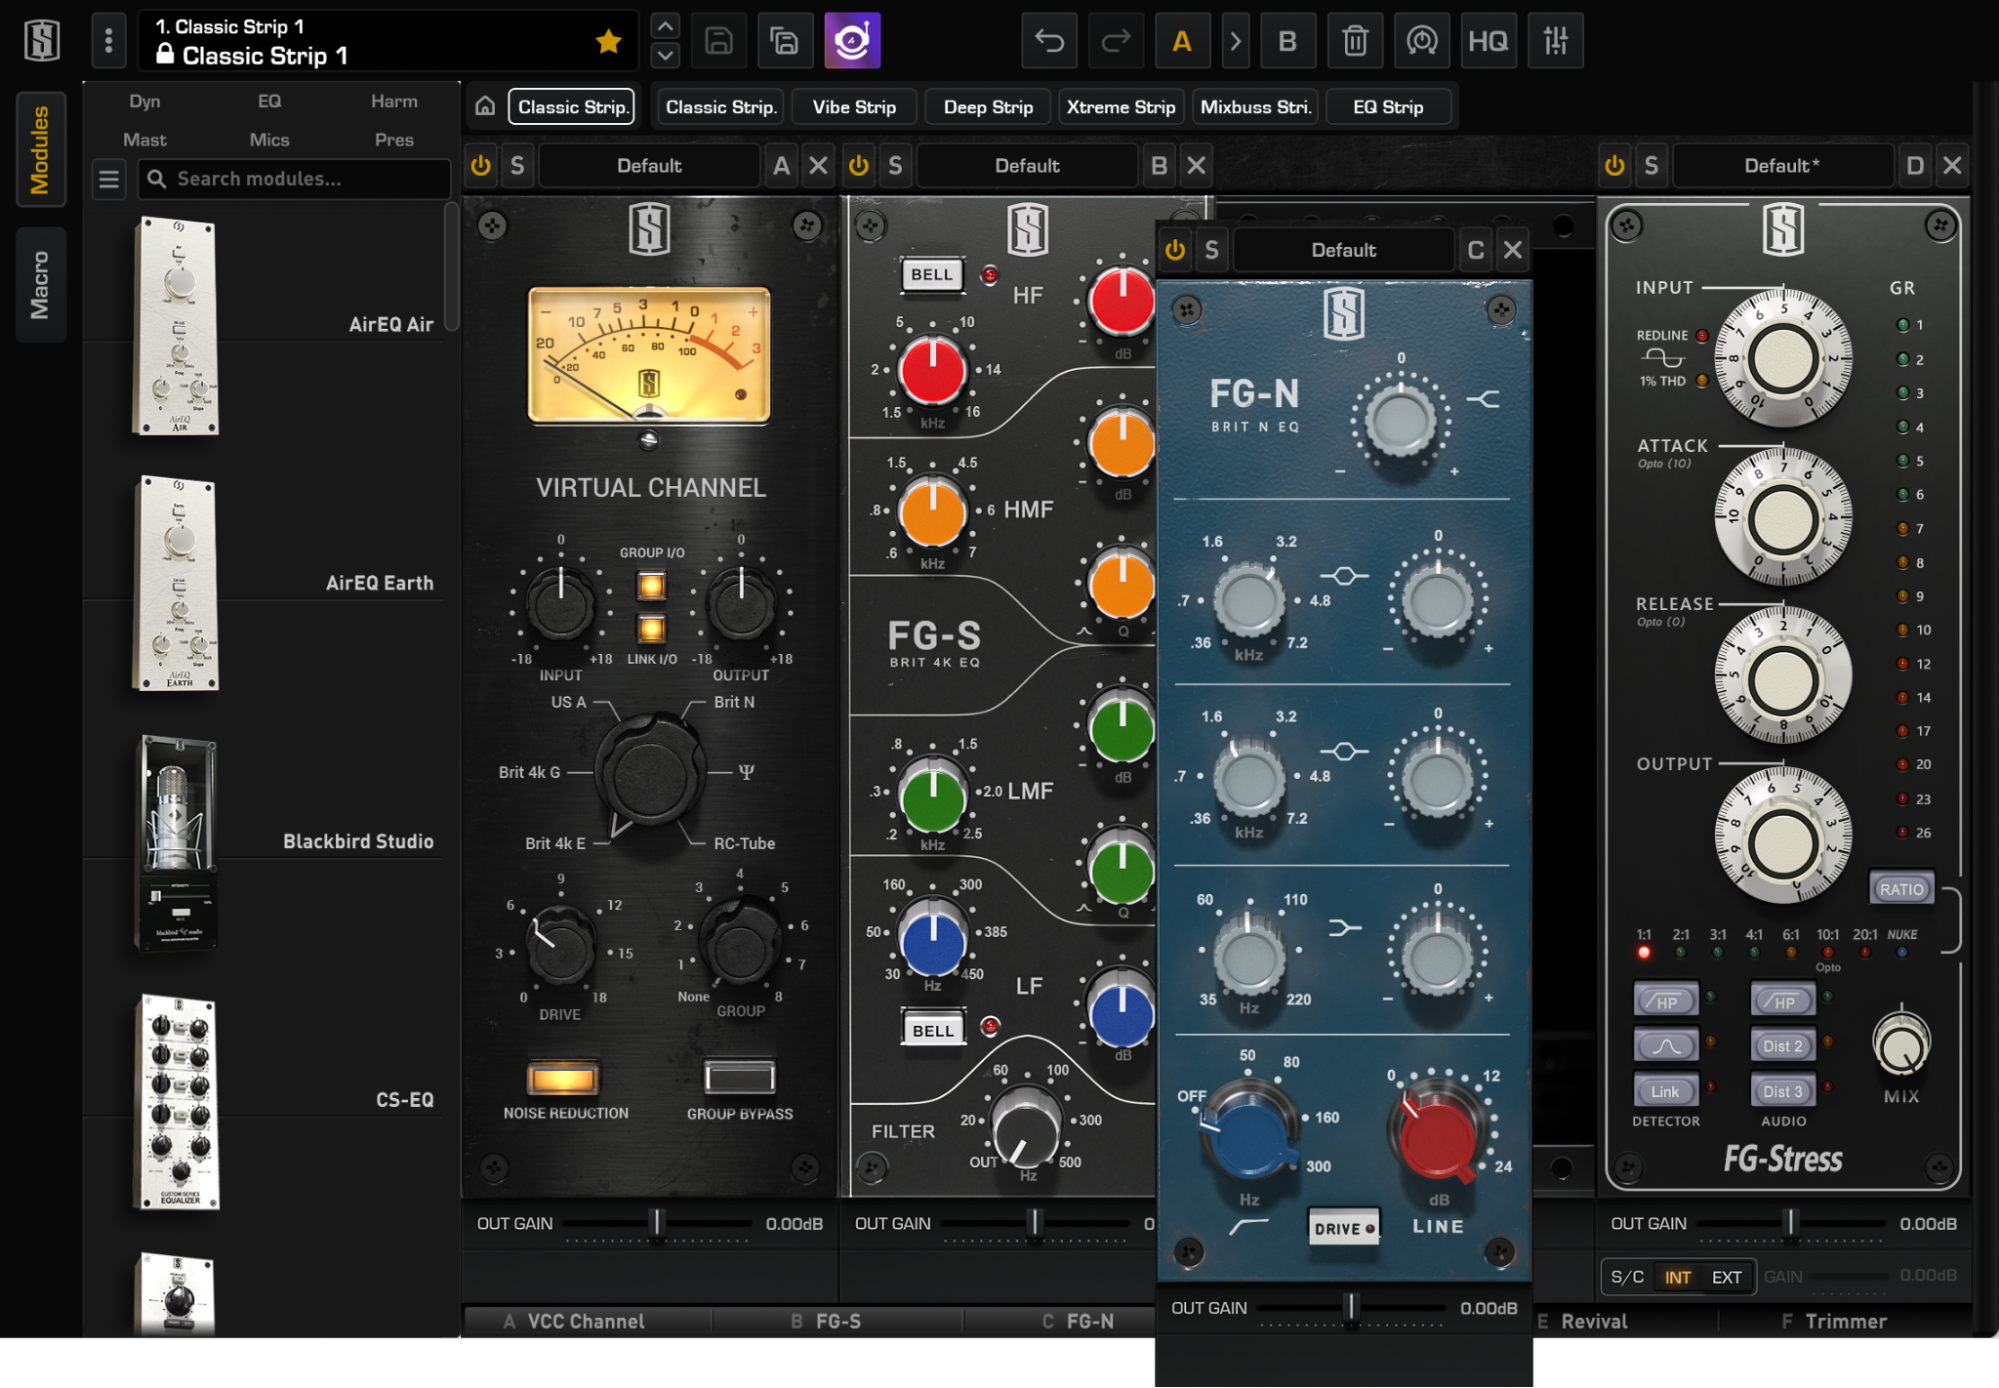
Virtual Mix Rack
Virtual Mix Rack (VMR) is a system for building custom mixing chains from individual processing units called Modules.
The VMR Plugin is divided into six sections: the Top Bar, the Dream Strip Bar below, the Discovery Preset Browser (accessible from the Top Bar icon), the Modules Library and Macro controls (left), and finally the Slots (center).
-
The Top Bar provides functions to manage entire Rack Presets, A/B Snapshots, and various utility features like Scaling, Undo/Redo, Clear Rack, etc. It also provides access to the Discovery Preset Browser.
-
The Dream Strip Bar provides quick access to your most used Rack configuration.
-
The Discovery Preset Browser gives you access to predefined mixing chains
-
The Modules Library displays all currently installed VMR Modules.
-
The Macro section gives you access to Macro Controls and Mappings Display
-
The Slot is the area in which VMR modules are loaded, adjusted, moved and removed.
Slots & Modules
There is an important distinction between VMR Slots and VMR Modules.
Slots
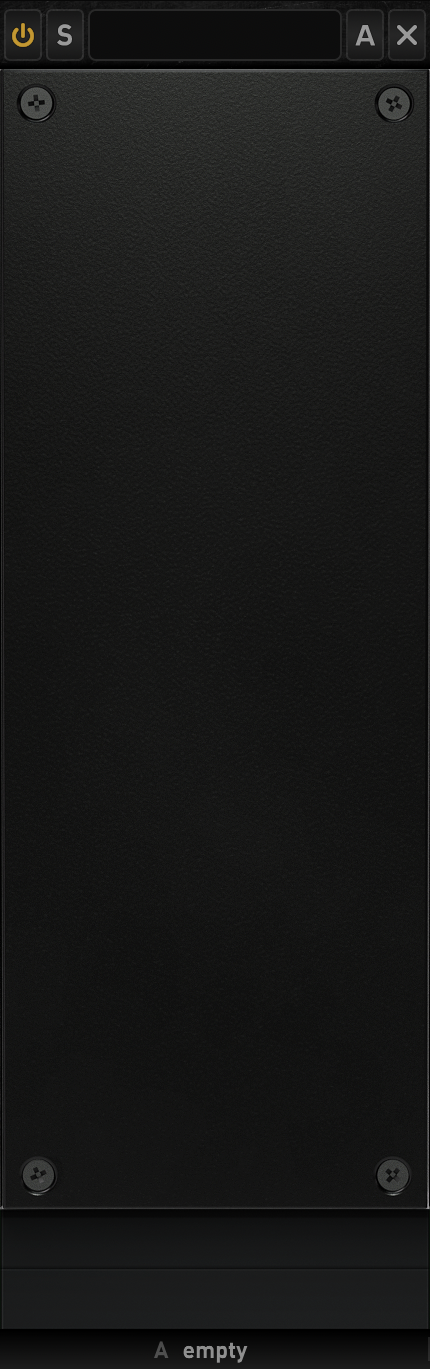
The VMR Plugin features up to eight VMR Slots, labeled A through H, which are empty rack spaces for loading Modules.
Host automation applies to Slot parameters, not individual Module parameters, as Slot parameters belong to the Rack and are declared to your Host. This is what enables you to load the same Module into multiple Slots in the rack and automate them individually.
Each Slot has its own header with utility and preset functions1 and footer with additional configurations and adjustments.
Slots that are left empty are covered by a blank metal plate.
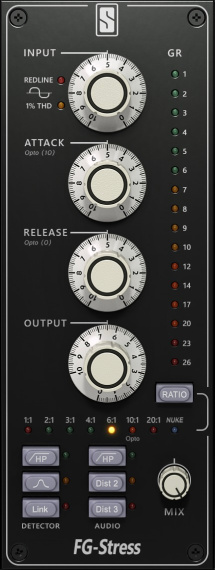
Modules
Modules are audio processing units that are loaded into empty Slots.
Module automation parameters are automatically mapped to the Slot parameters. Therefore module parameters are automatable only via Slot parameters.
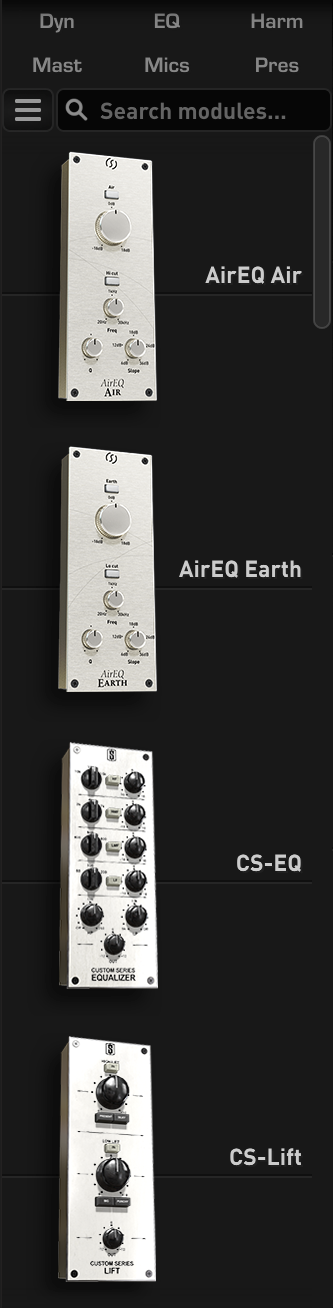
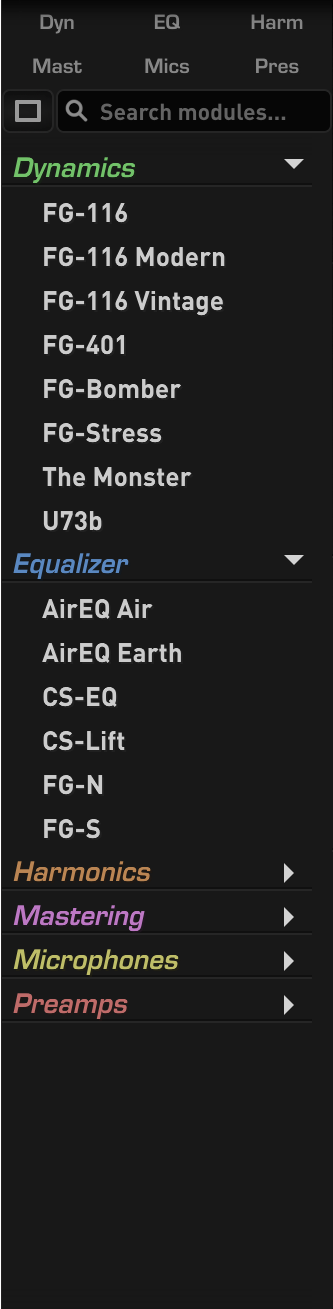
Modules Library
The Modules Library displays all the Modules that are installed on your system, and provides additional information about each VMR Module.
The Library is a great place to obtain useful information, such as:
- Module Status: Has a license been detected for this Module?
- Module Category: Dynamics (Dyn), EQ, Harmonics (Harm), etc.
- A brief description for each Module (Thumbnail View).
Two views are available in VMR: the Thumbnail View, which displays the Module names and icons, and the List View, which displays both Module names and categories.
Thumbnail view is the default view. To switch to the List View, click the ![]() icon. To switch back to the Thumbnail View, click the
icon. To switch back to the Thumbnail View, click the ![]() icon.
icon.
| Thumbnail View | List View |
|---|---|
 |
 |
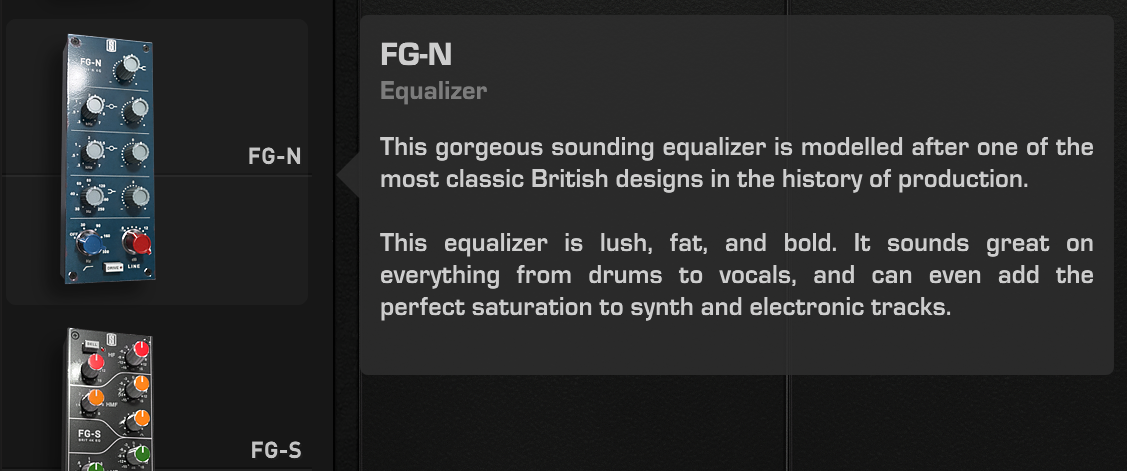
In both views, clicking on or hovering over any VMR Module will display a small popup, revealing more info:
Using Category Filters
You can use Category Filters to quickly find a Module in the Library.
Filters can be enabled or disabled by selecting or deselecting the filter name.
Clicking on a filter while holding the CMD (macOS)/CTRL (Windows) key will add the filter along with the currently filtered group. This allows the ability to create a more complex filter.
Using the Search Modules
VMR offers a Search Modules feature if you would like to narrow your search even further.
Simply click inside of the Search bar and type the characters pertaining to the module(s) you’d like to find. The search results will return results for any module or modules containing the sequence of typed characters.

The Search Module feature also has the ability to show results for multiple VMR Modules that do not necessarily relate to the entire string. For example, if you type “Air 401” into the Search bar, would return AirEQ Air, AirEQ Earth, and FG-401 as the results. This feature is useful if these are the only Modules you’d like to see.
Handling VMR Modules
Adding VMR Modules
There are two ways of adding VMR Modules:
- By double-clicking on the Module in the Library, which will load the Module into the rightmost free Slot.
- By dragging the Module from the Library and dropping it into an empty Rack Slot or between two occupied slots.
Moving Modules
To move a VMR Module, simply click near its icon or name and start dragging it around in the Rack. The Rack processing sequence is updated during the drag operation, both visually and sonically. This means that the audio path follows what is happening visually in real-time. Note that this operation actually reorders the Slots occupied by the Modules so that pre-existing host automation is preserved after the move.
Duplicating Modules
To duplicate a VMR Module, drag and drop it while holding the Opt/Alt key. As long as the Opt/Alt key is pressed during a drag-and-drop operation, the dragged VMR Module will be a clone of the original.
Removing VMR Modules
- There are two ways to remove VMR Modules and VMR Slots: By clicking on the ‘X’ icon in the Slot Header: the Slot is emptied of the Module inside.
- By clicking and dragging the VMR Slot, then dropping it outside of the VMR Rack. The Slot will display a trash icon, as shown below:
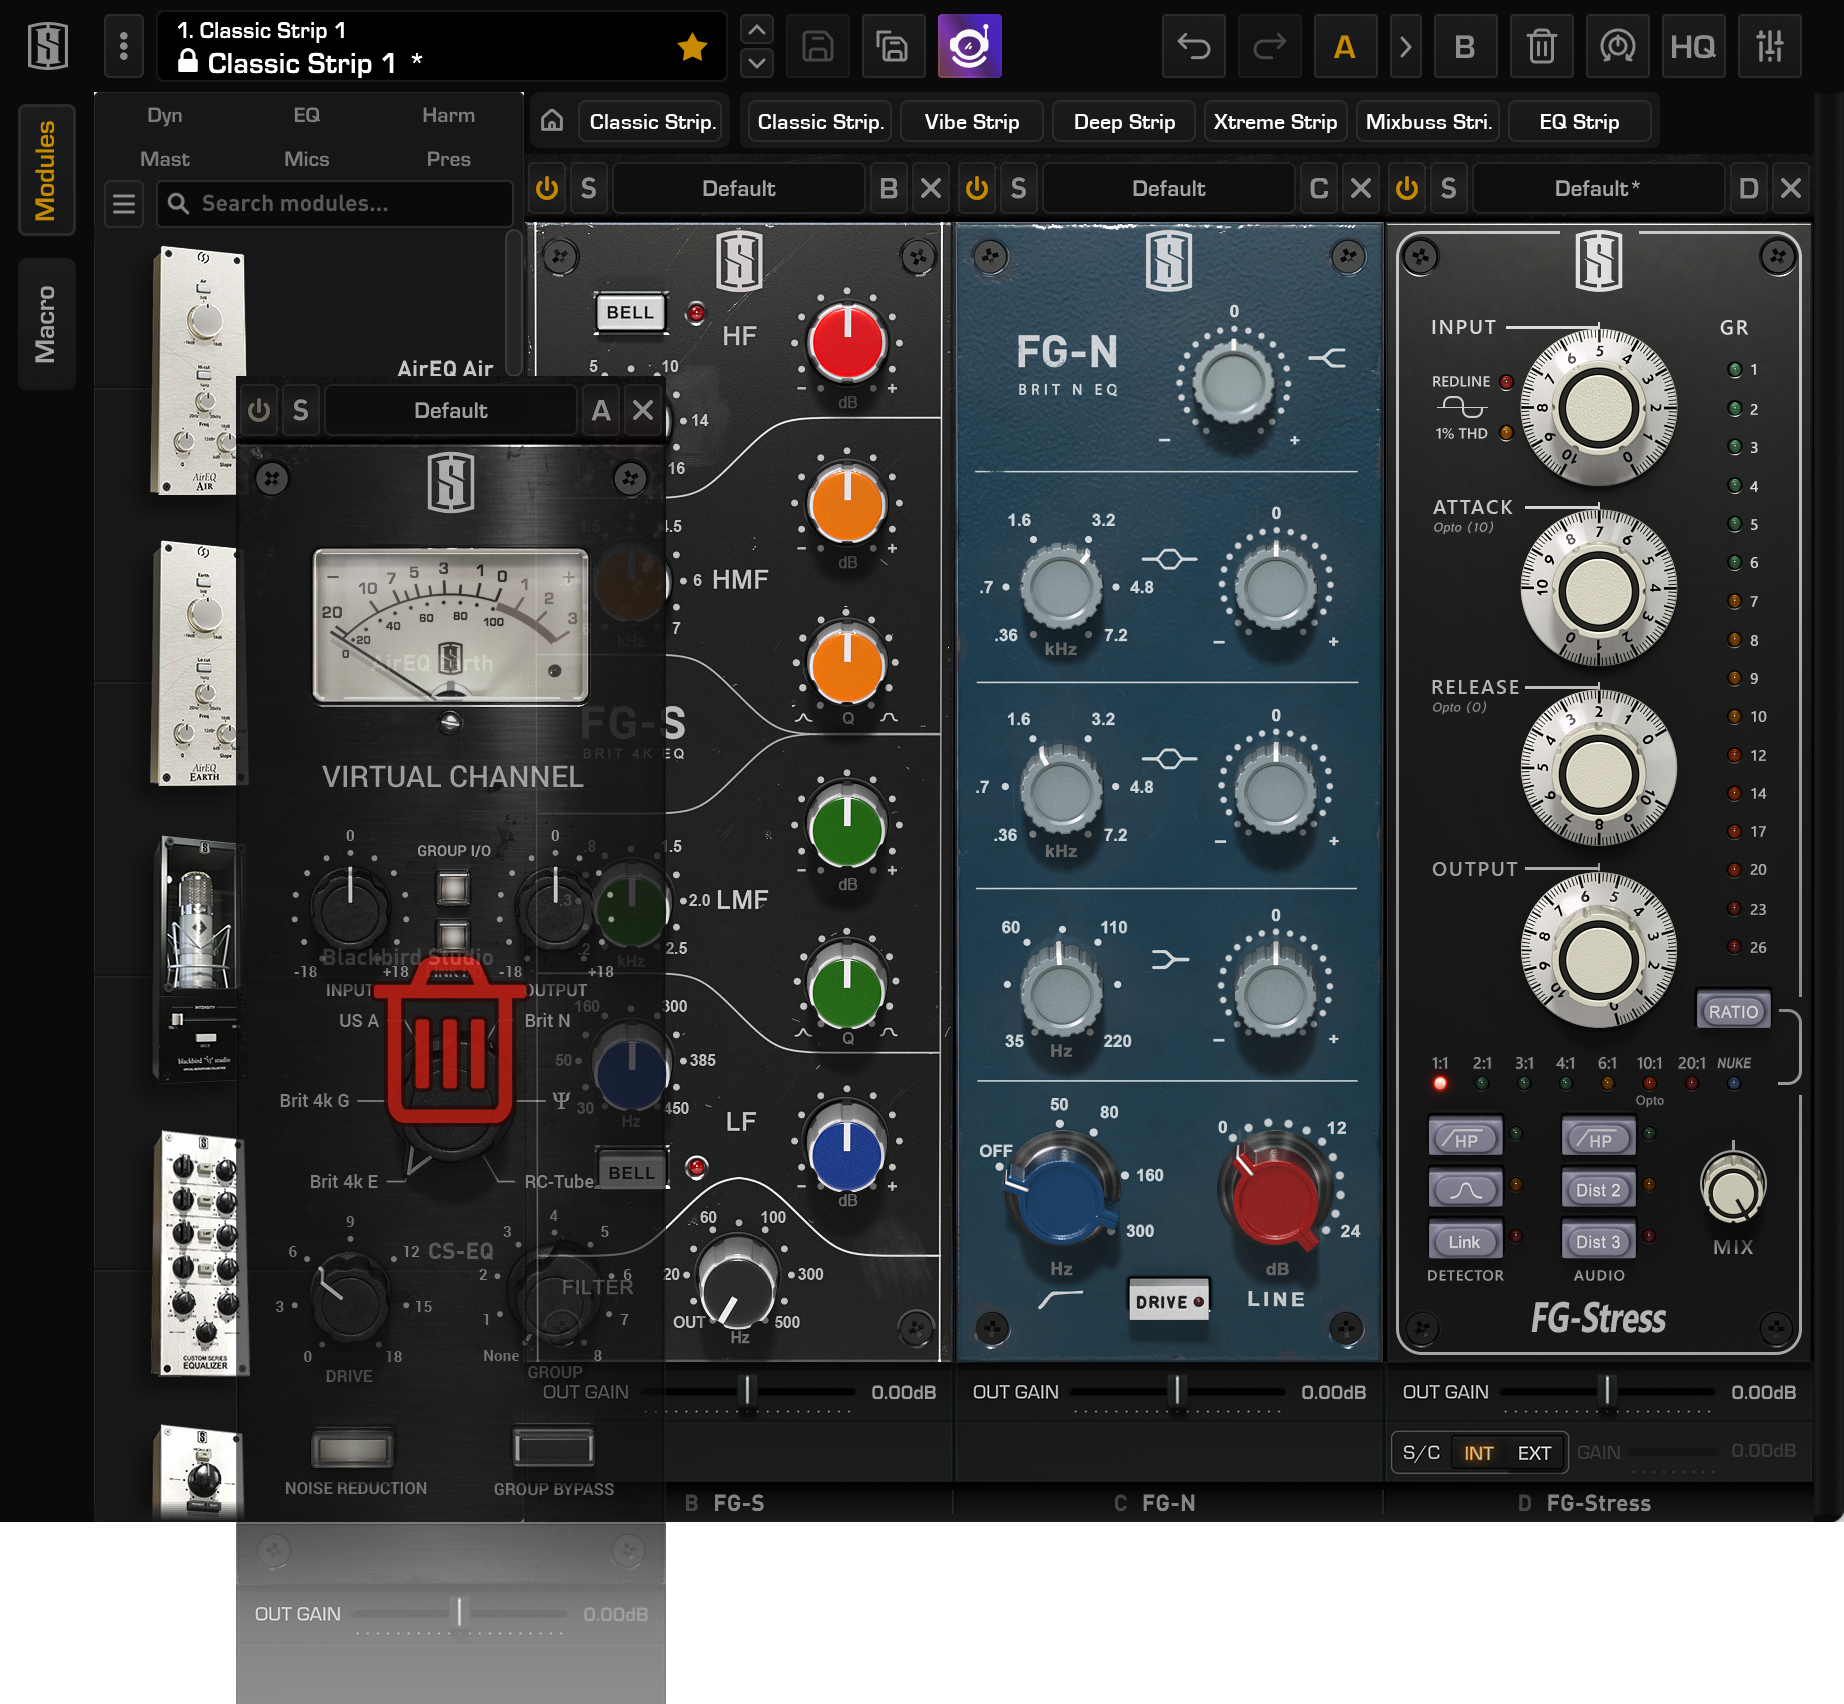
In both cases, the now empty Slot will be moved to the right side of the rack (potentially out of view if 3 or more Slots currently contain Modules).
Moving / Cloning Modules between Rack Instances
One of the most unique features of Virtual Mix Rack, from a workflow perspective, is that VMR Modules can be added, moved and duplicated between two Virtual Mix Rack Instances.
To Move / Clone a VMR Module from one instance to another, click and drag the VMR Module from the first Virtual Mix Rack instance to the second. Holding Opt/Alt during the Drag operation will duplicate the Module instead of moving it.
This also works with the Library. VMR Modules can be clicked and dragged from any instance of Virtual Mix Rack’s Library and dropped into any other Virtual Mix Rack instance’s VMR Slot.
Moving the VMR View
Virtual Mix Rack can host up to eight Modules, but has a maximum number of visible Slots. Depending on your screen resolution and the Library display, VMR will display anywhere from four to eight VMR Slots.
Depending on your screen resolution, some VMR Slots will not be visible, resulting in a Horizontal Scroll Bar shown at the bottom of the VMR Rack:
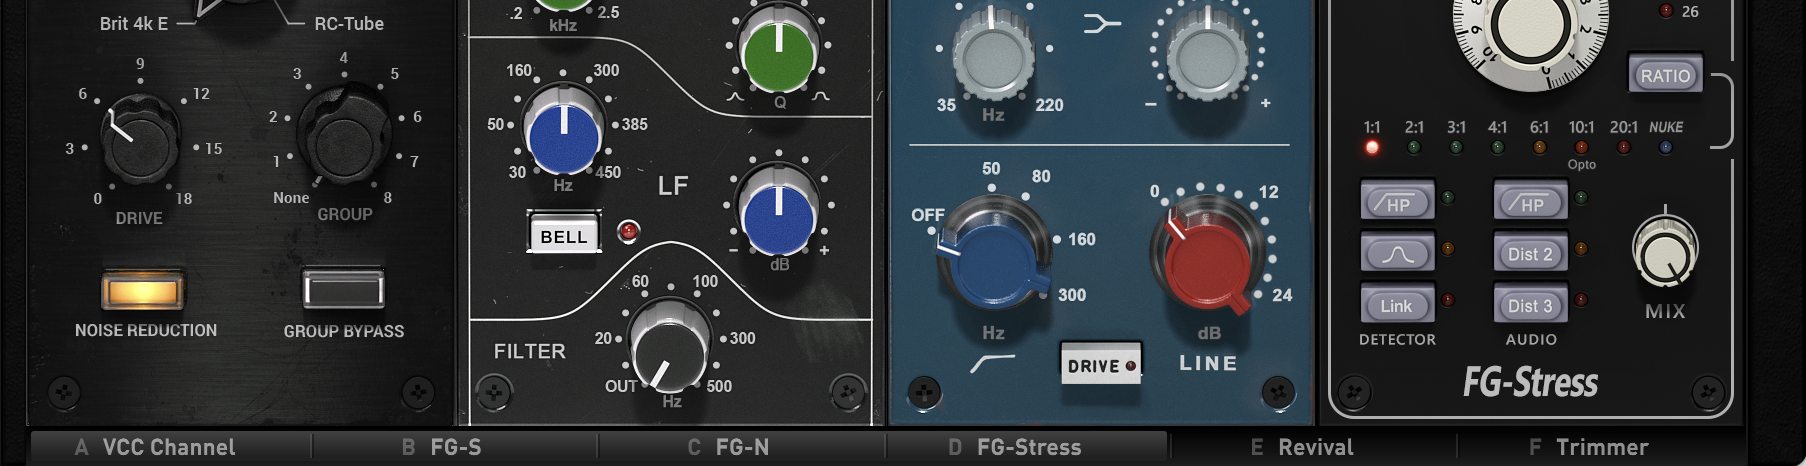
The Scroll Bar allows the ability to shift the view, which shows the hidden Modules in the visible VMR Rack. This can also be done by clicking directly on a hidden Module (like “E Revival” in the image above) displayed in the Scroll Bar.
Lastly, you can use Shift + Mouse Wheel to scroll through the modules.
Using the Modules
Power & Solo Modes
The processing for each VMR Slot can be bypassed and soloed. To bypass a VMR Slot, press the yellow Power Button in the upper left corner of the Slot to turn it off (grey).
To Solo a VMR Slot, press the “S” Button. Slot Solo has two modes of operations:
- X-OR Solo: Left Click on a Solo Button to Solo the Slot and cancel any other Slot Solos. This is the default Solo Mode in the VMR Rack.
- Latch Solo: CMD (macOS) / CTRL (Windows)+Left Click a Solo Button to add or remove the Slot to the current solo group.
Module Preset System
Each Slot includes a smaller Module-specific preset system that allows you to either Save, Load or Delete presets for just for that Modules2.
Automation Panel
The Virtual Mix Rack has a special panel dedicated to Automation mapping. The Automation panel displays a simple and straightforward view of the current VMR Module parameters, and their corresponding Automation Names (derived from the Slot names) that you’ll see in your DAW’s automation lanes. You can access this panel by clicking on the Slot Letter at the top of any Slot.
![]()
This panel displays a list of all the Automation Mappings, for all the currently loaded Modules:
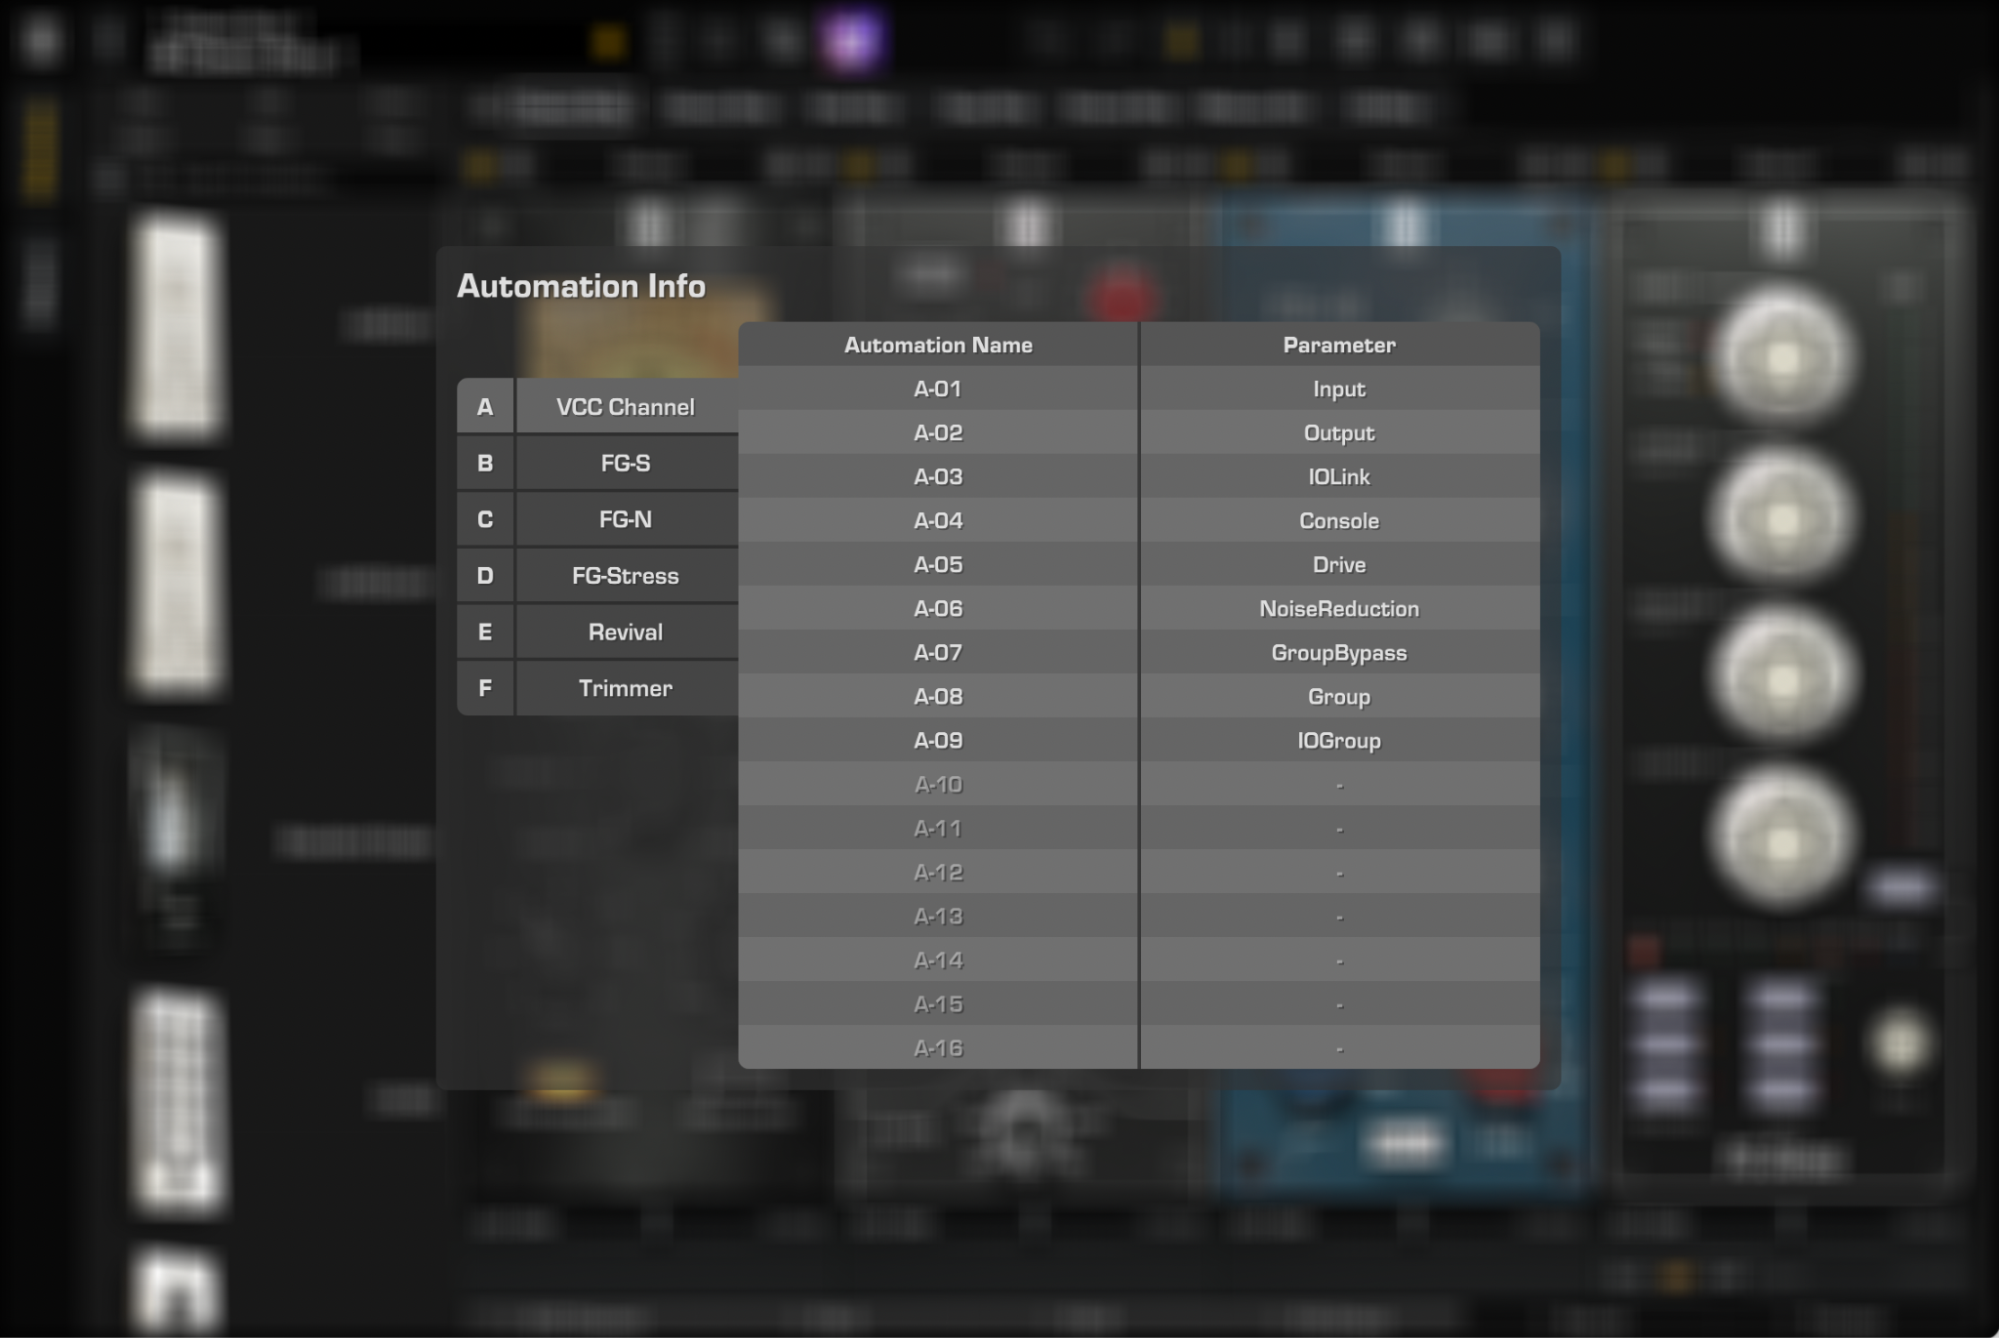
In the Automation Name column, you can read the names of the parameters as they will be seen by the Host—these are the Slot parameters.
In the Parameter column, you can see how the Module’s specific parameters are mapped to the Slot parameters.
Depending on the plugin format of Virtual Mix Rack (AU/VST/VST3/AAX) that you’ve instantiated, the Automation Names that are provided to the DAW (plugin HOST) can either be generic Slot Parameter number (like “H-10”), or can be dynamically changed to reflect the Slot’s Module parameter (like “H-Drive”).
To dismiss the Automation Info view, click anywhere outside the panel.
VMR Key Commands
Reset Parameters to Default
macOS: Double-Click or OPT + Click Windows: Double-Click or ALT + Click
Fine adjustments
macOS: Right-Click + Drag or CMD + Drag Windows: Right-Click + Drag or CTRL + Drag
Enable Automation Dialog (Pro Tools and VST3 DAWs3 only)
macOS: CTRL + OPT + CMD + Click Windows: CTRL + WIN + ALT + Click
Preset System
The Preset System allows you to speed up your workflow by using predefined configurations.
The VMR System, available from the first release of VMR, shows all the presets stored locally on your computer.
The Discovery Preset Browser, accessible by clicking on the following icon ![]() in the topbar, allows you to browse a growing list of online presets and search per Genre, Instrument, Author… etc. which can be downloaded to your computer.
in the topbar, allows you to browse a growing list of online presets and search per Genre, Instrument, Author… etc. which can be downloaded to your computer.
Discovery Preset Browser
This Preset Browser shows presets available online and requires a working Internet connection.
You can click a preset to open and close its detailed information on the right. Click the load button to open the preset in your VMR instance.
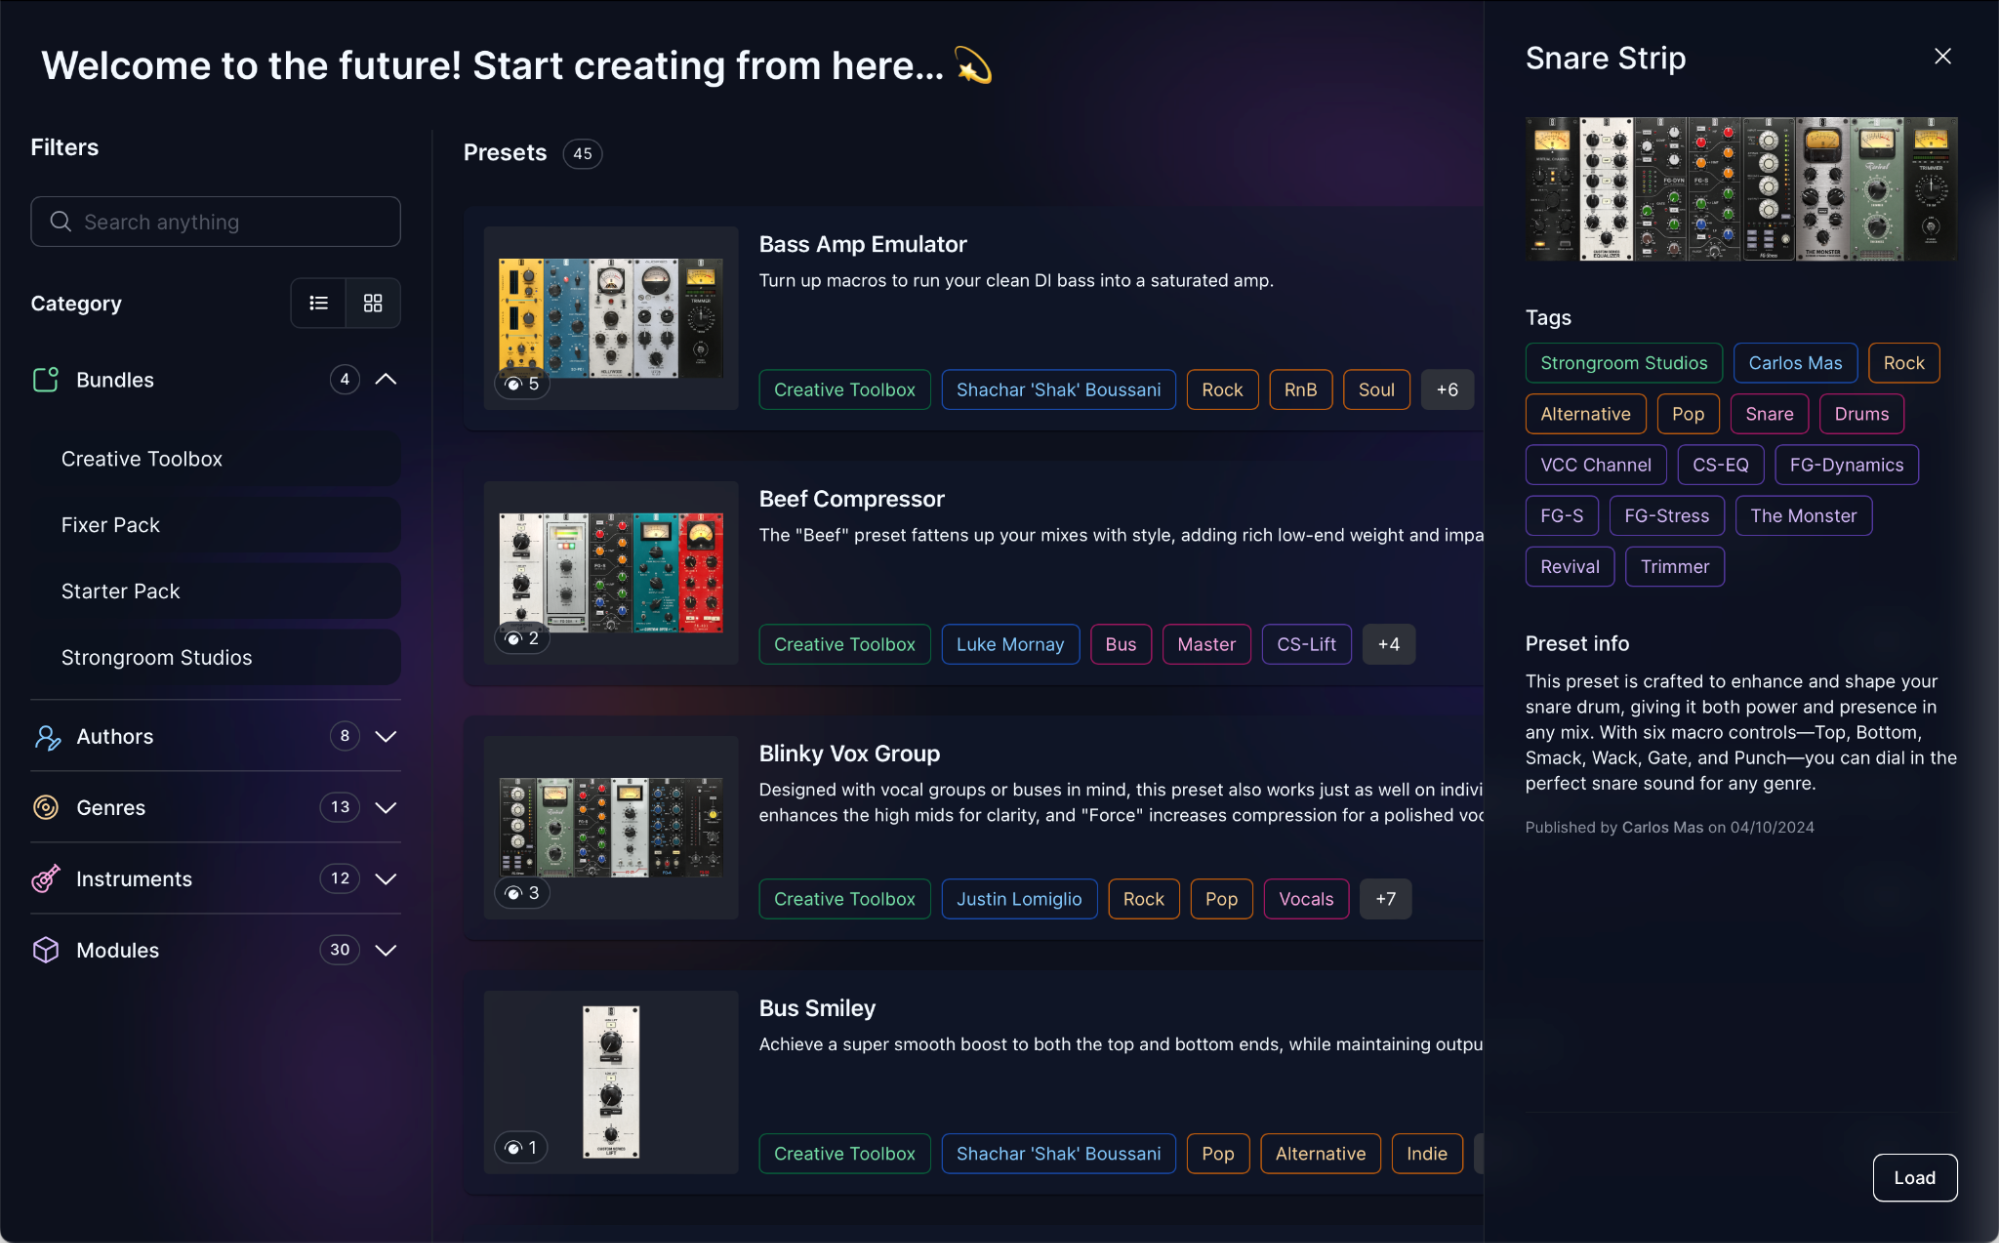
The number of Macros available in the preset is indicated by the following element: 
You can use the “Save” and “Save as…” from the VMR Preset System to store a local copy on your computer and iterate from it.
VMR Preset System
Locally stored Presets are divided in two Layers:
- Rack Presets: Handled through the Preset Browser in the Top Bar
- Module Presets: Handled through the Preset Browser above each Module in a Slot
Rack and Module Preset Systems are independent from one another. A Rack Preset contains the configurations for all Slots and Modules, with the exception of which Module Preset has been used in which Slot. This avoids any unnecessary synchronization mismatches. Rack Presets only store the Module Preset Names that have been used.
There are two categories of Rack Presets and Module Presets
- Factory Presets: Presets included by default in the VMR installer
- User Presets: Presets that you create
To prevent the loss of settings when installing a new VMR version, Factory Presets cannot be overwritten. They are displayed with a lock icon. To modify and save a Factory Preset, you’ll need to use the Save As button, which saves a new User Preset based on the Factory Preset that was modified.
Rack Presets
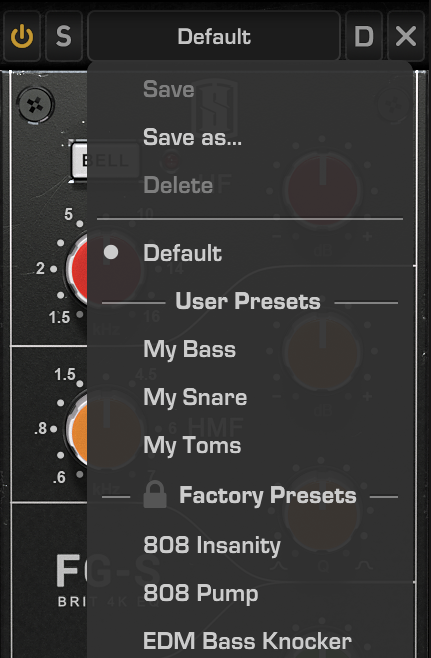
Clicking on the Preset Label area will open the Preset List:
The Main Menu displays the Banks.
The Sub-Menus display the Presets, divided in two categories: User and Factory Presets.
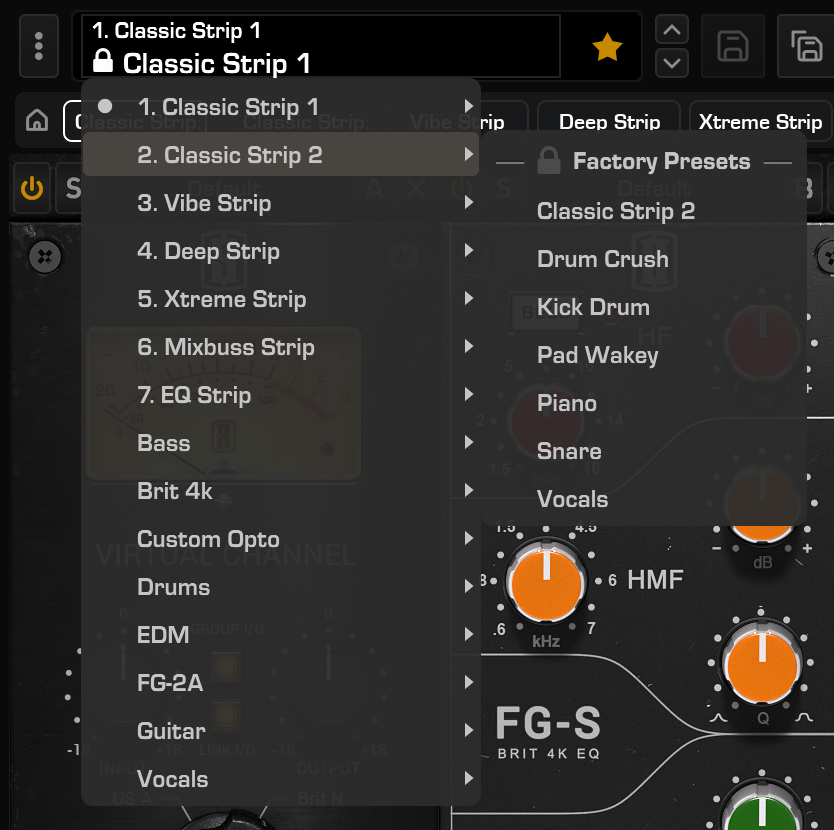
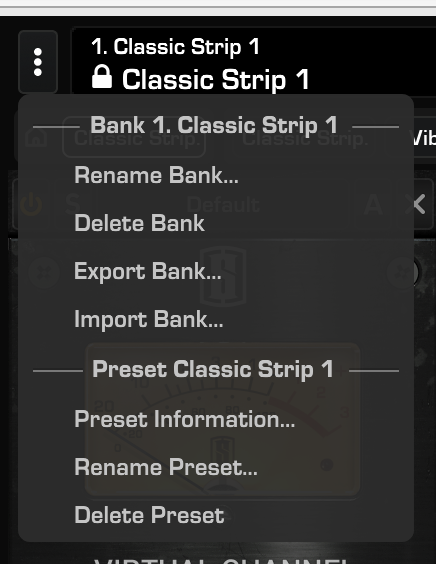
Clicking on the Menu Icon on the left will open the Preset Menu, from which you can:
-
Rename/Delete the current Bank
-
Export/Import Bank as .ebf files
-
Visualize and Edit Preset Information
-
Rename/Delete the current Preset
Clicking on the Up and Down arrows on the right side of the Top Preset bar will navigate through the Rack Presets and Banks.

Clicking on the Save Button will update your current User Preset or will bring up the Save As Panel if your Preset does not yet exit.
Note: Clicking Save is not possible on a Factory Preset. “Save As…” needs to be used to save it as a new User Preset.
Clicking on the Save As Button will open the Save Preset Panel, in which you can edit the Preset Information:
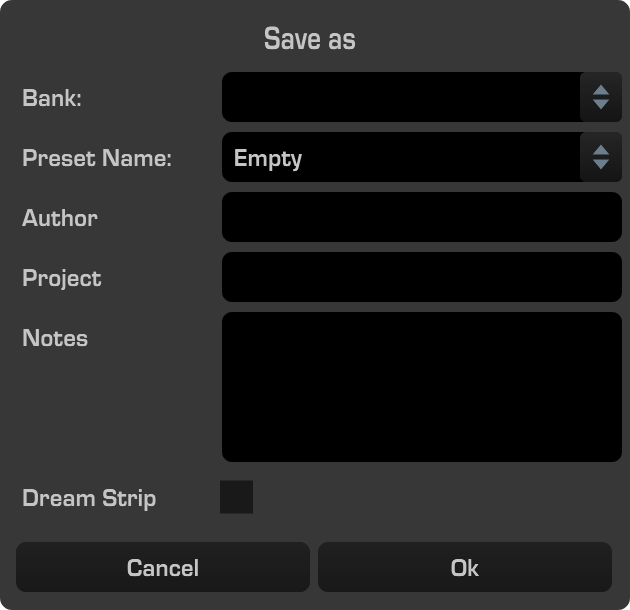
Module Presets
Clicking on the Preset Label area will open the Preset List. This allow for the following:
- Save the current User Preset (not possible with a Factory Preset)
- Save As… the current Preset
- Delete the current Preset
- Reset the Module to its Default State
- Load a Module Preset
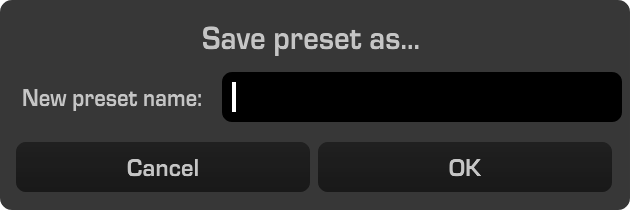
Clicking on the Save As… option will open the “Save preset as…” Panel:
Modified Preset Status


When a preset is modified (both Rack and Module), an asterisk appears next to the Preset Name. This indicates that the Preset is in a Modified state. Clicking Save, will update the Preset on the filesystem, and the star will disappear.
If the updated Preset is used in another instance (or another session), the star symbol will be displayed on the other instance to indicate the Module’s current settings don’t match the new contents of the Preset. Recalling the Preset will update it, and the star symbol will disappear.
Dream Strips

The Dream Strip system allows any Rack Preset stored locally (User or Factory), to be set as a Dream Strip, and will appear in the Dream Strip bar. This allows one-click access to your most used rack configuration.
The Dream Strip bar can contain up to eight Dream Strips, but can also be emptied if you’d like. When no dream strips are available, or have been removed, the Dream Strip bar is hidden
The first Dream Strip is the Default VMR state (![]() icon). To change it, simply re-order the Dream Strip buttons by dragging and dropping. If there are no Dream Strips, the Default VMR state is empty.
icon). To change it, simply re-order the Dream Strip buttons by dragging and dropping. If there are no Dream Strips, the Default VMR state is empty.
There are two methods to add a Preset to the Dream Strip Bar:
- Click the (
 icon) icon in the Preset menu
 - Click Save As… while on the current Preset and enable Dream Strip option
To load a Dream Strip, click on the Dream Strip button.
To re-order the Dream Strip buttons, drag and drop the Dream Strips left and right on the Dream Strips bar.
There are three methods to remove a Dream Strip:
- Right-click on the Dream Strip and select Remove From Dream Strips
- Click the
 icon icon in the Preset Menu
 - Disable the Dream Drip option in the Save As… panel
To update a Dream Strip with the current rack configuration, right-click on the Dream Strip button and select “Update With Current Strip”. This will open the Save As… panel with Factory Presets (which are not overridable see above), and act as the normal Save option.
Seven Dream Strips are available by default to get you started, which includes different variations included in the corresponding Dream Strip Bank. You can then safely configure the Dream Strip bar as you want, and VMR updates will not overwrite your preferred Dream Strips.
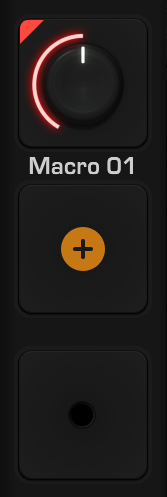
Macro controls
New in VMR 3, Macros allow you to simultaneously adjust several Module parameters from a single knob.
Some presets already include macros, but you can also set them up yourself.
Click the Macro button on the left to toggle the Macro Mappings Display.
If you don’t have any macros, displaying the Macro Mappings will automatically create the first Macro.
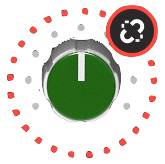
All the module’s controls that you can map (or assign) to a macro are colored. Click on these controls to map and unmap them to the macro.
Create new macros by hovering the macro column and clicking on the Plus element.
If you have several macros, clicking one “selects” it and displays its settings in the Macro Mappings Display on the left.
From the Macro Mappings Display you can:
- Rename the macro by hovering and clicking “Smack” in this example
- Delete the macro by clicking the Trash icon
- Disable and Re-enable a control mapping by clicking the toggle
- Adjust the relation between the control and the macro (range, progression curve)
In this example, the Macro named “Smack” is mapped to the Threshold parameter from the FG-Dynamics module, and to the Input parameter from the FG-Stress module. When the Macro is set at 0%, the Threshold is set at -7dB. When the Macro is set at 100%, the Threshold is set at -26dB.

 |
 |
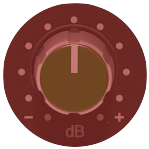 |
| A full circle or rectangle around a control means that it is mapped to a macro | A dotted line means that a mapping has been created but is disabled. Click the link button to relink the control to the macro | When the Macro Mappings Display is open, mappable parameters are colored. |
Note: Any existing Slot Automations are ignored when a Module parameter is mapped to a Macro. The value of the macro (and its automations) is used instead.
A/B Snapshots

The Virtual Mix Rack offers a simple and intuitive A/B Snapshots system to quickly compare two different Rack configurations.
A/B Snapshots can be controlled and switched using the dedicated A/B buttons located in the Top Bar.
Virtual Mix Rack is always using one of the two Snapshots (A by default). The current Snapshot is displayed in yellow.
Clicking on the arrow between the A and B buttons will copy the current Rack state into the other Snapshot. (ie: If Snapshot A is selected, clicking the arrow will copy and paste the rack from Snapshot A to Snapshot B).
HQ and Settings Menus
Oversampling
To reduce the aliasing effect produced by any digital clipping, VMR offers an Oversampling option accessible in the HQ menu.
When Oversampling is On, the CPU usage will slightly increase and a short latency will be introduced: 63 samples at 44.1/48 kHz and 127 samples at 88.2/96 kHz. This latency can be automatically compensated by your DAW.
You can enable Oversampling on the current VMR instance only by enabling “Oversampling”, or enable Oversampling for all instances of VMR by enabling « ‘On’ for all instances ».
Note: Enabling ‘On’ for all instances will disregard the Oversampling preference which will appear grayed out. For example, if Oversampling is disabled, but ‘On’ for all instances is enabled, because all VMR instances have oversampling, this preference is ignored.

Settings
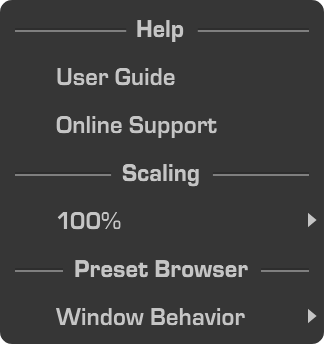
User Guide
Opens the Virtual Mix Rack User Guide.
Online Support
Redirects you to the Slate Digital Support Helpdesk.
Scaling
Defines the interface scaling. Inaccessible values are grayed out; it means that the plugin interface wouldn’t fit the screen at this specific value.
Preset Browser Window Behavior
The Discovery Preset Browser opens in a detached window. This settings allows you to choose whether the Browser should close automatically when loading a preset or stay open, allowing you to try other presets before closing it manually.
Miscellaneous
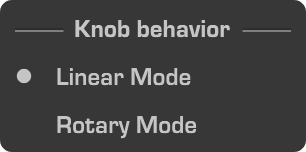
Rotary Knob Mode
Clicking on the Rotary Knob Mode icon in the Top Bar toggles the Knob Mode between Linear and Rotary modes.

In Linear Mode (default Knob Mode), the knobs follow horizontal and vertical mouse moves. In Rotary Mode, the knobs follow circular mouse moves. Rotary Mode can be very useful when using Virtual Mix Rack with a touch screen monitor.
The icon is highlighted in yellow when the Knobs are in Rotary Mode. Note: fine adjustments (CMD/CTRL+Drag) are also available in Rotary Knob Mode
Clear Rack

The Clear Rack button allows you to rapidly remove all Modules and reorder Slots.
Undo/Redo

Undo/Redo allows you to revert or repeat any action, including rack configuration (Modules inserted, Slot order, etc.). Undo/Redo is limited to 20 actions.
About Panel
Clicking on the Slate Digital Logo in the Preset Bar opens the About Panel:
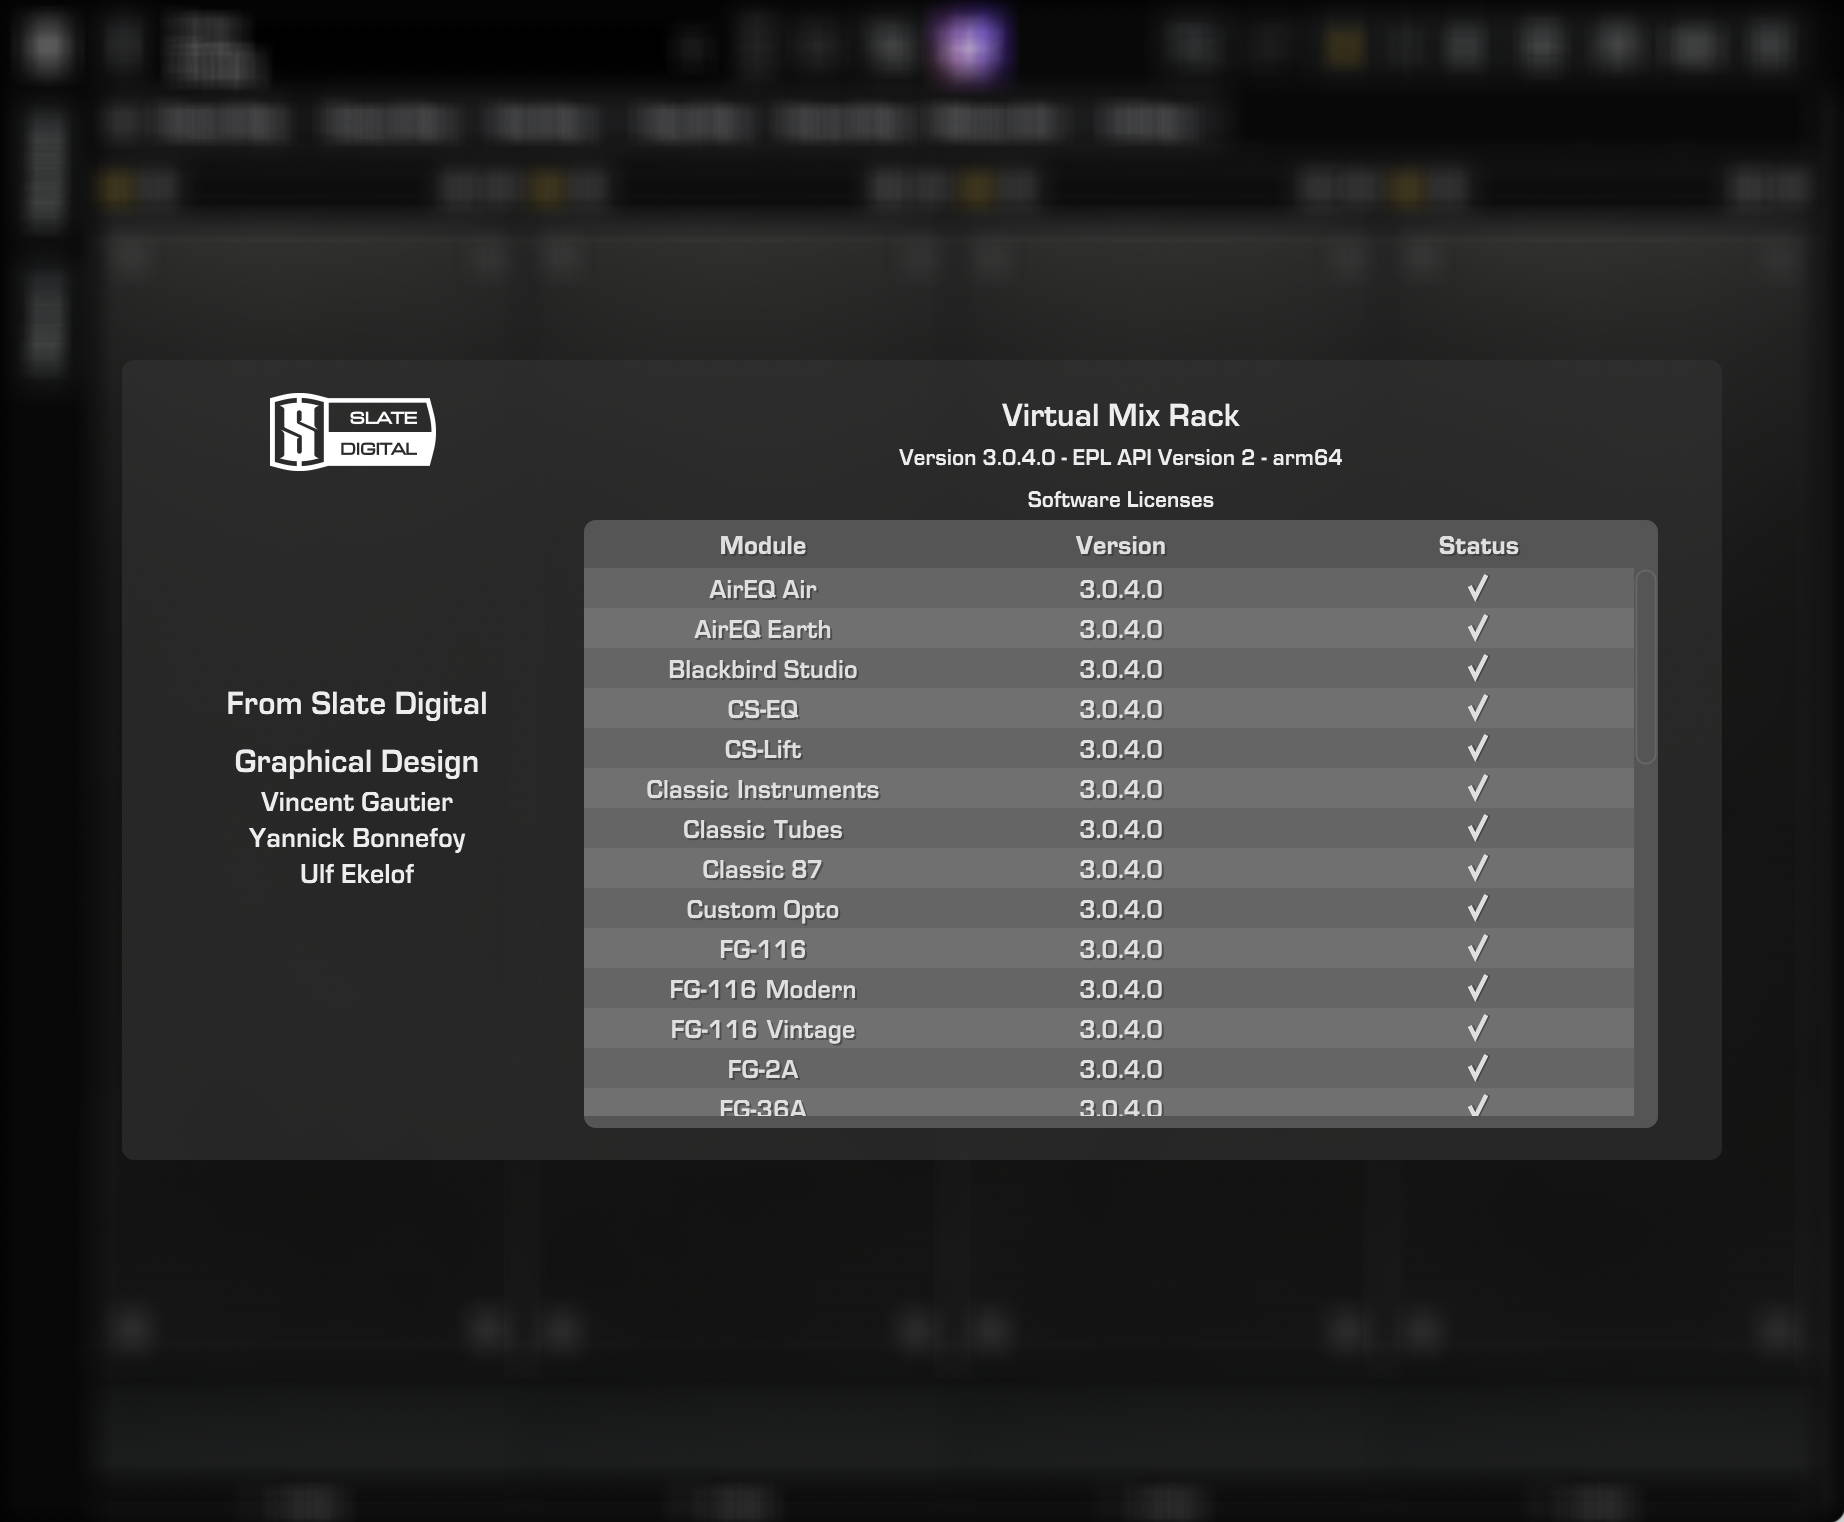
In this Panel:
- Clicking on the Slate Digital logo will redirect you to the Slate Digital Website.
- Clicking on the Version Number label will toggle between Version and build information.
- Right-Clicking on the Version Number label allows you to Copy the Plugin Information or to generate a Report for Slate Digital’s Support Team.
- The Module Version Table displays useful information about all the installed Modules: Names, Versions and Statuses.
- Clicking “Virtual Mix Rack” in the About Panel will show the location path of the current Virtual Mix Rack instance.
- Clicking Software Licenses displays the Third Party Software Licenses used.