AirEQ Premium
Thank you for choosing AirEQ!
AirEQ is designed to be the most musical, intuitive and fast equalizer you can use. Everything has been thought in order to bring back the focus on art, sound and music, and all the workflow details has been carefully designed and refined by the Eiosis team.
The result is a very natural and intuitive equalization process, crafted in a beautiful tool, with a look and feel that matches the elegance that you would expect from a high-end analog equalizer. We wish that it will become your EQ of choice for all mixing, mastering, tracking and post-production equalization needs !
Until now, parametric equalizers had Frequency, Q and Gain controls. AirEQ adds a new dimension to equalization: Character, which can be described as “resonance” or “focus” of the equalized sound.
The revolutionary, patent-pending, Character allows you to go beyond analog, in the digital domain. Character changes the shape of the equalization curve, and thus controls the resonance of each equalization band; in real time, naturally and intuitively.
Also, we made a lot of choices for this equalizer so you don’t have to; just focus on your art! The main choice was to keep only a few options, but to spend a lot of time perfecting the key features, adjusting the sound, adjusting how each setting and each knob would influence the algorithm.
We carefully designed the way that each equalization task would be performed, to make them more natural, and especially to make the sound coherent at all times. We also added some features like our innovative preset system, the ultra-musical analyzer, useful, intuitive metering and display settings..
We wanted to put your ears first, and to allow you to work eyes closed with AirEQ. In a few words, we wanted AirEQ to make sense, in every situation.
AirEQ is included in the Complete Access subscription and is also available to users who have purchased a perpetual license through our Shop. You can install the plugin via the Complete Access Hub or by downloading the installer from our installers page.
Overview
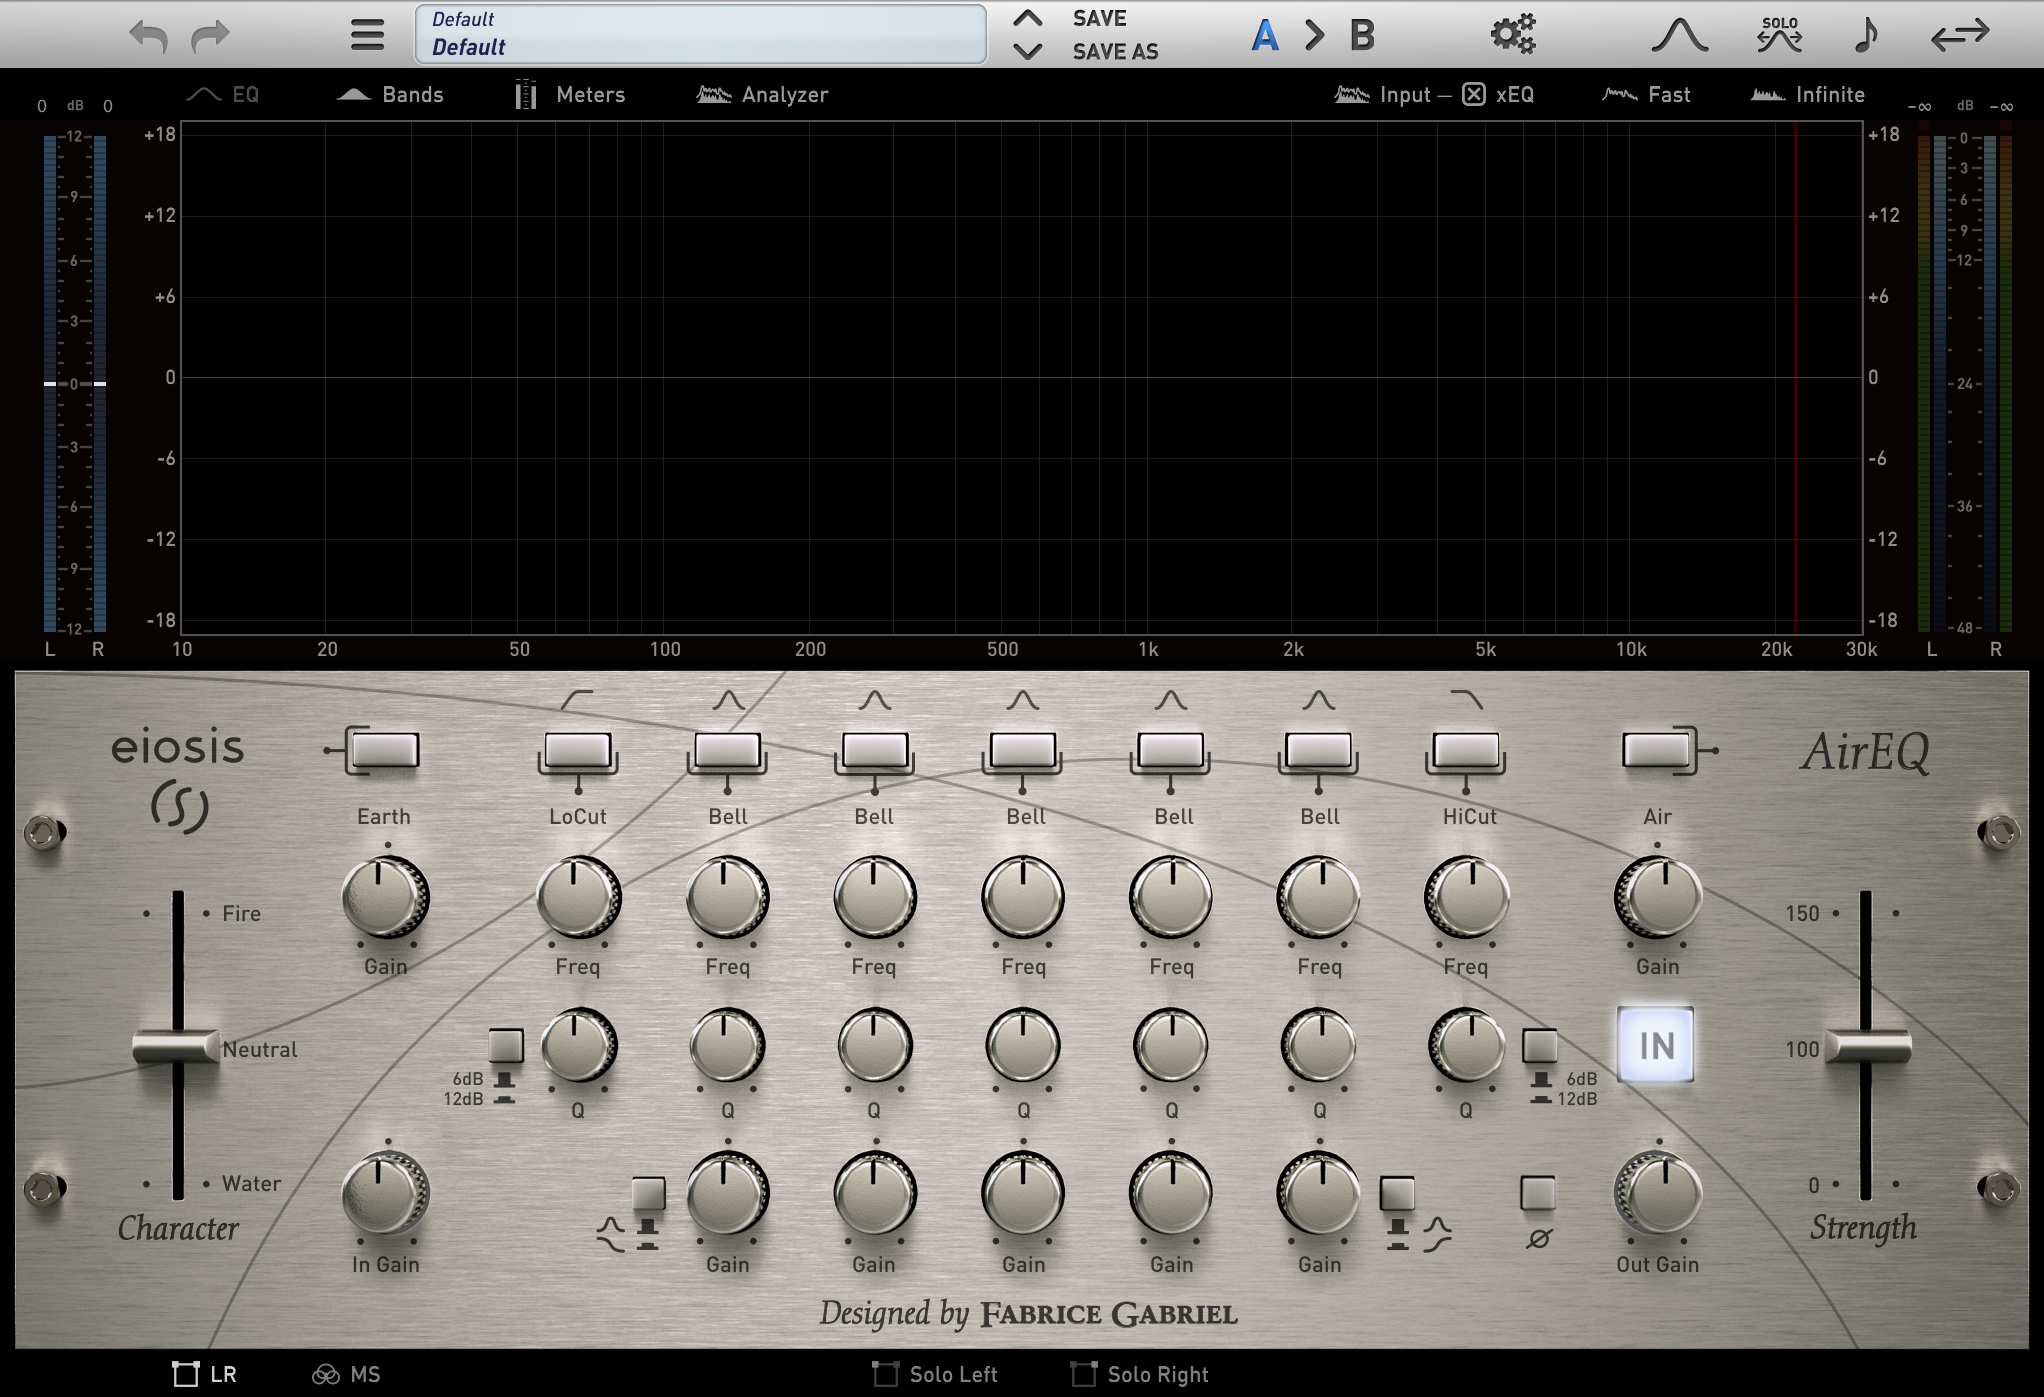
Equalization Bands
High Pass & Low Pass Filters
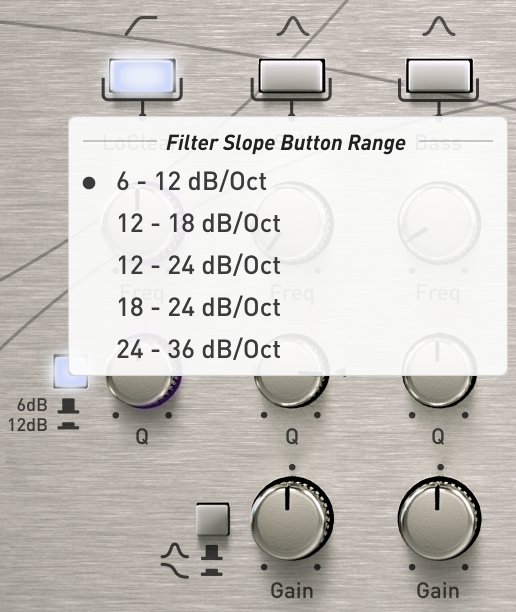
These filter bands are useful for attenuating frequencies above or below their cutoff frequency. By default, you can choose between a 6dB or 12dB slope by clicking the 6dB/12dB button.
By right clicking the Filter Slope Switch, you can also select a different Filter Slope Range and then switch between the following steeper slopes: 18, 24 or 36 dB/oct.
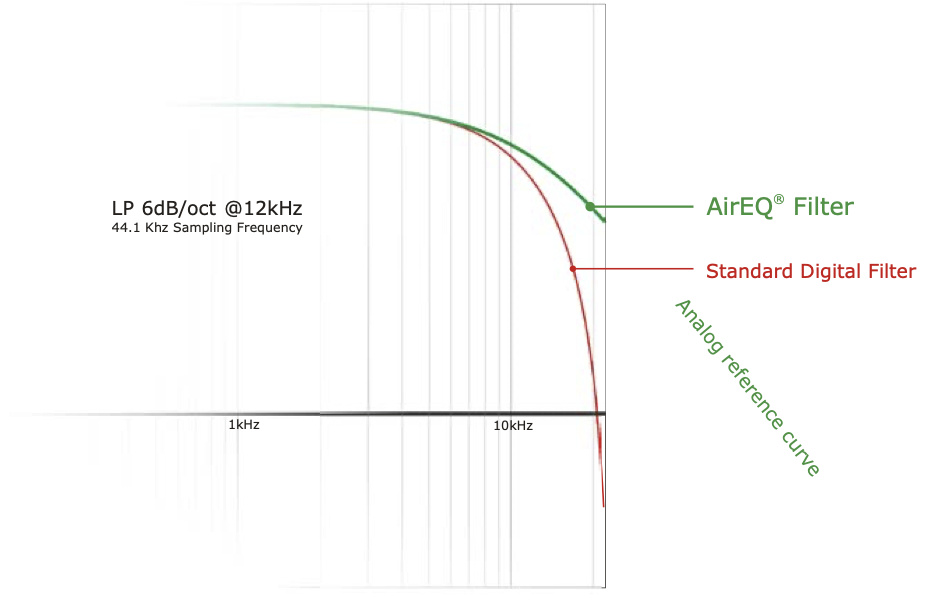
Unlike many digital equalizers, AirEQ’s Low Pass filter is perfectly matched to an analog filter curve. This is very important in order to achieve a natural attenuation in the high frequencies.
Bell Bands
AirEQ features five fully parametric equalization bands. Each Bands’ Frequency can be set from 10Hz to 30kHz, their Q from 0.1 to 7 and their Gain between -18dB to +18dB.
Q gives a broad slope when turned left and a steep slope when turned right. Q and Gain values are interdependent and react accordingly to our hearing sensation.
This allows for a natural equalization process, where the Gain doesn’t need to be readjusted after a change in the Q, and where the Gain adjustment gives a regular loudness sensation across the whole gain range.1
Shelf & Bell Bands
The first and fifth bands can be set to bell or shelving filters by clicking their Band Type buttons or by Right + Clicking the bands’ On / Off switch and choosing “Shelf” (see the Band Options section for more information).2
Unlike typical shelving filters, where the filter frequency is one of the resonant frequencies, AirEQ’s shelf frequency is the center frequency of the filter.
The result is a more natural behavior when adjusting gain: both Low and High Shelf Filters react the same with both positive and negative gains.
Steep Bell
Any of the five equalization bands can also be set to a Steep Bell. This Band Type can be selected by Right + Clicking the band’s On / Off switch and choosing “Steep Bell” (see the F. Band Options section).
Steep Bell has a much higher Q, without increase the gain of the filter’s center frequency. This allows for surgical boosts or cuts, for example, to remove annoying resonance.
Earth
Earth brings deep and solid sub-lows. It can be described as an “adjustable transformer.” Inspired by real transformer behavior, it is now accessible with an easy, one-knob adjustment. The result is always a tight and precise bass sound, exempt of muddiness and nonlinearities.
Being all linear in amplitude (i.e. without distortion or harmonics) is very useful to adjust bass in a level-independent manner, without adding anything to the sound but what already exists in the signal. The Earth is very useful to quickly add some consistent sub-lows to tracks like kick drums and bass. However, it can be useful in many other situations, like sound effects, or any situation when you need to make a track deeper or more powerful.
Air
Air is a new type of filter that helps you to restore or to add brightness to the sound, while always remaining natural. It allows to gently add high frequencies, without adding harshness or unpleasant digital artifacts. The smoothness of the Air allows you to bring an instrument to the front of a mix, add a subtle brilliance to a sound or to make a vocal track breathe, simply by increasing the Air.
Always natural and smooth, this band has been designed specifically to allow very smooth high frequency boosts, in a region of the audio spectrum where harshness can be quickly obtained.
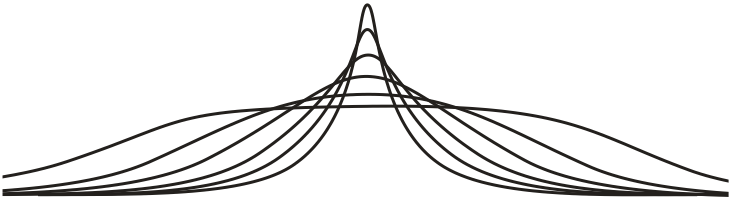
Character
Character dissociates the bandwidth and the resonance notions, which have always been considered as linked characteristics of parametric equalization.
The result is a constant bandwidth, constant power equalization with variable resonance shaping, which is very musical and useful in many situations.
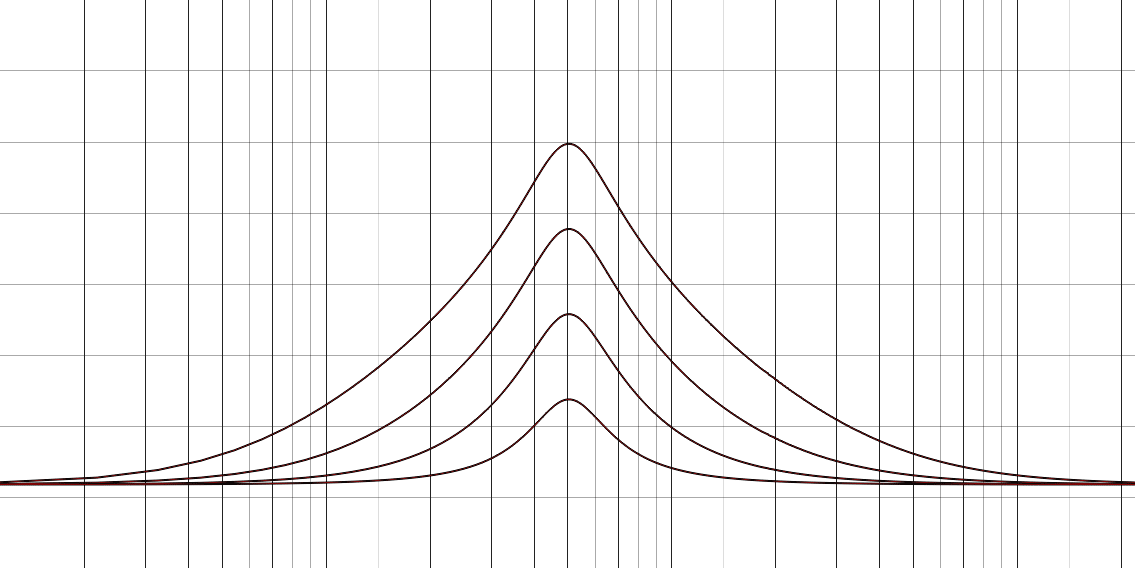
Character Curves
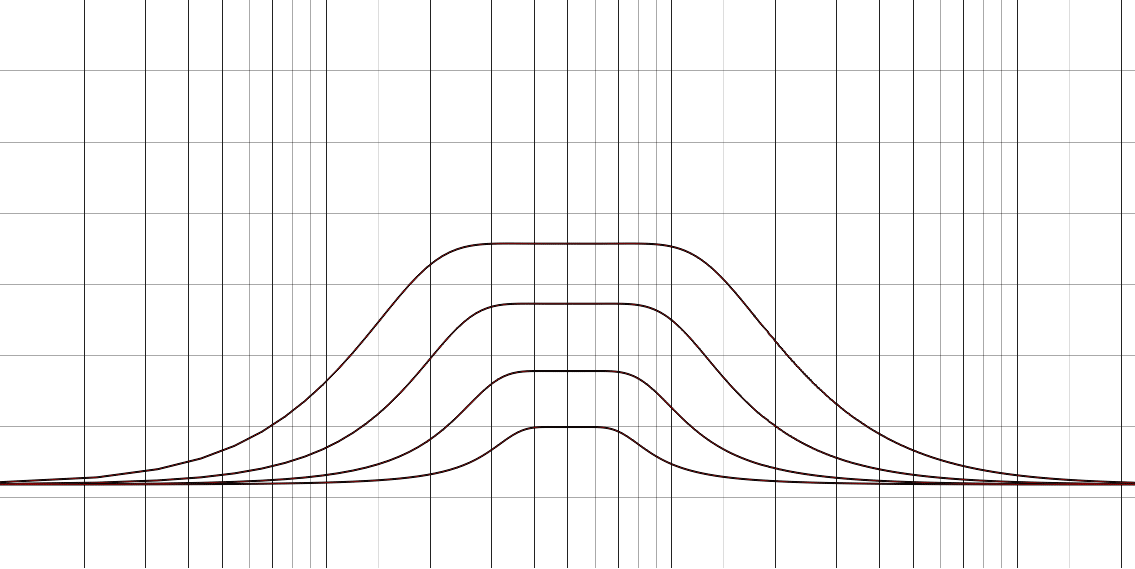
Water
The Water curve gradually flattens the top of the neutral equalization curve, which results in a smoother boost or cut. Often when boosting, the center of the boost curve is too loud when the intention is to only adjust a part of the spectrum which is not loud enough.
Surgical adjustments in equalization often result in undesirable resonances, which often produces an unnatural sound.
Water has been designed to have a very short time response, meaning that the resonance of such a boost or cut will be shorter. The result is a tighter sound, which makes it much easier to equalize a kick drum, without making it “boomy”; or a vocals’ high-mids, without making them strident; or even an entire mixes’ midrange, without adding nasal tones to the vocal.
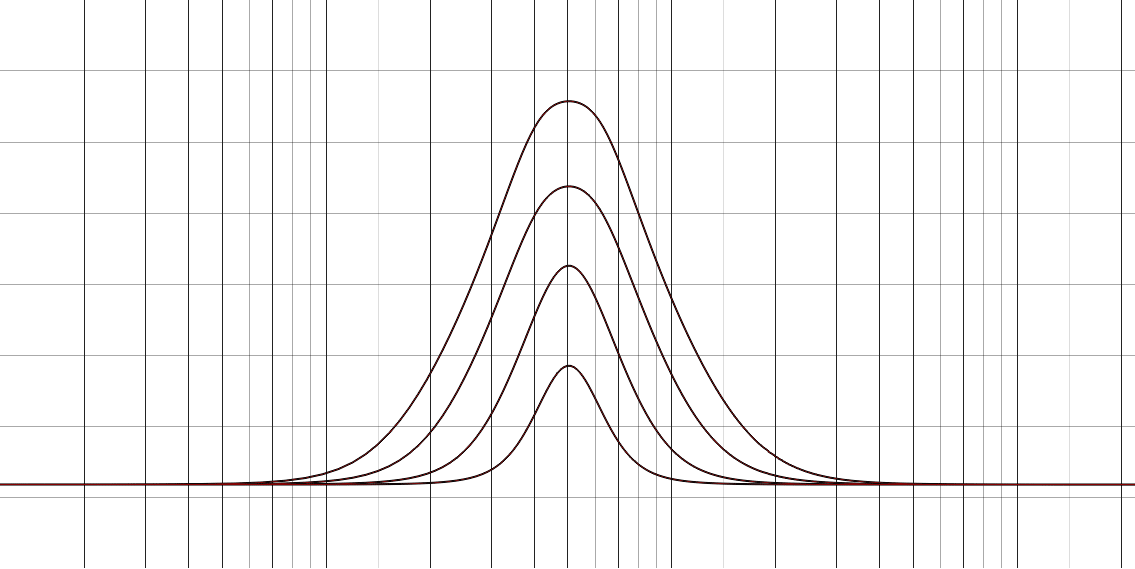
Fire
At a glance, the Fire curve may look like the neutral curve, with a steeper Q-factor adjustment, but it’s not. While the energy of the curve is more “grouped” around the center frequency, the time response is as tight as a standard equalization curve. This means that the Fire curves are very useful to add focused and tight boosts, or to cut precisely a frequency without smearing the transients too much.
Having the same focused frequency boost with a standard curve would mean a longer time response, which results in excessive ringing in the bass, muddy mids, and harsh high frequencies.
The Fire curve is the ideal way to apply focused boosts and cuts without those drawbacks. The result is a more punchy and precise sound, without the excessive smearing of transients, while retaining the impact of a steep boost or the precision of a narrow cut.
Neutral
The standard, analog-matched, equalization curves.
Character Slider/Switches
The Character Slider3 can continuously morph bell and shelf bands between Neutral and Water or Neutral and Fire curves, allowing for unprecedented control over the sound of your equalization.
The Character Switches4 discretely switch between all three Character curves.
Per-Band Character
In some situations, you may want to adjust the Character of a particular band, independently of the global Character. This can be done by Shift + Clicking and Dragging the bands Q knob to the left or right.
To disable Per-Band Character, Right + Click the band’s On/Off switch and select “Use Global Character” (see the F. Band Options section).
Strength
Mixing and equalizing is not a static process. Tracks interact and mask one another. Your ears are also influenced by many factors and fatigue over time.
When mixing, it is often required to adjust the amount of equalization you just applied or that you’ve made the day before. It’s also very useful to be able to blend the original sound with the equalized sound, when you want to retrieve some of the original flavor.
Strength Slider/Switches
The Strength Slider3 not only acts as an advanced wet/dry control, but can also boost the whole effect of the equalization. It works with the entire equalizer, without phasing issues inherent in a traditional wet/dry control.
The Strength Switches4 toggle discretely between strength values of 50%, 100% and 150%.
Furthermore, you can choose which bands are affected by the Strength parameter by Right + Clicking the Band Bypass switch and choosing “Include in Strength” or “Exclude from Strength”.
Eiosis Toolbar
Undo & Redo
Click the Undo or Redo arrows to revert or repeat any parameter change. 
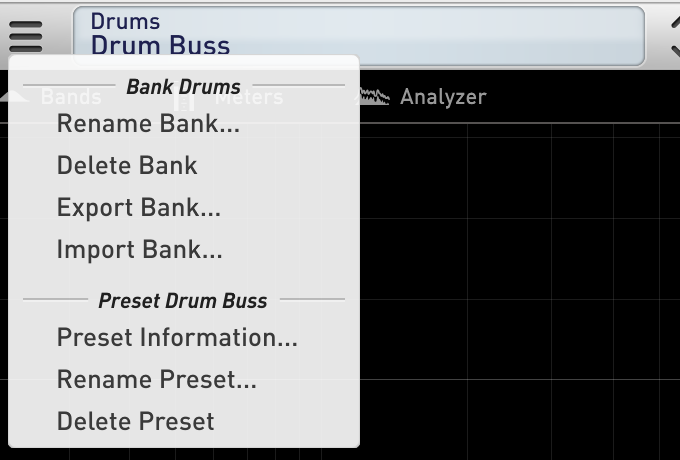
Preset Management
Banks & Presets
The Preset Management menu provides several options for organizing and sharing your presets.
From this menu, you can:
- Rename a Bank or Preset
- Delete a Bank or Preset
- Export or Import a Bank
- Edit Preset Information
Navigating Presets
You may navigate Presets within a Bank using the Up and Down arrows directly to the right of the Bank / Preset selection area.
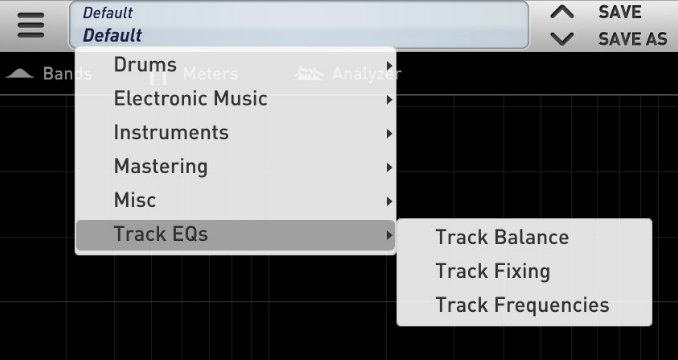
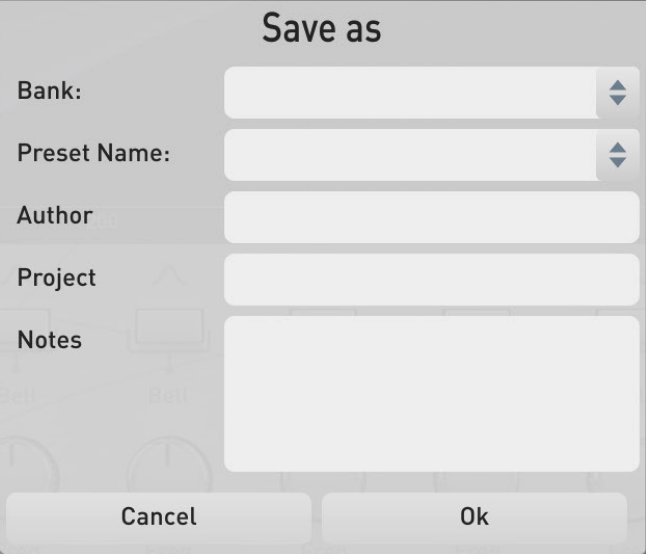
Saving a Preset
To save your Preset for the first time, click “Save” or “Save As”. A dialog box will open, allowing you to save your Preset with a new Bank or Preset name.
First, select the Bank in which you’d like your Preset to be saved, or create a new Bank by typing the desired name. Next, enter the name of your Preset and click “Ok” to save. If you’ve made some changes to your Preset, and would like to save them, click “Save” to overwrite the current preset.
Modified Preset Status

When you modify a Preset, a star exponent appears next to the Preset Name in order to inform you that the Preset is in a Modified Status. Saving the Preset will update it and then the star exponent will disappear.
If this updated Preset is used in an other instance (or an other session), the star exponent will be displayed in this instance. Recalling the Preset will update it and then the star exponent will disappear.
Snapshot Slots
AirEQ has two Snapshot Slots, A & B. Each Snapshot Slot can store different parameters or presets.
Settings may be swapped between them by clicking the arrow button. The corresponding letter will flash blue to indicate transfer. 
Configuration Menu
Reset: Settings & Parameters
Full Reset Resets all of AirEQ’s Parameters and Settings to their default value.
Reset: Parameter Values
Band Gains Resets all band Gain knobs to their default values.
In/Out Gain Resets the In and Out Gain knobs to their default values.
Active Bands Resets all Active bands’ Type, Frequency, Q, Character, & Gain to their default value.
Inactive Bands Resets all Inactive bands’ Type, Frequency, Q, Character, & Gain to their default value.
Reset: Settings
Reset to Default Restores all Settings to their default value.
Display: Frequency
Display as Notes5 When enabled, the Frequency knobs will display musical notes instead of frequencies.
Set A4 Frequency6 This allows you to choose the reference frequency. This is set to A440 by default.
Display: Q
Display as Octaves When enabled, the Q knobs will increment/decrement in octave intervals.
Display: Band Names
Display/Hide Displays or Hides Band Names. Band Names are displayed by default.
Display: Values
Display/Display When Editing/Hide Values are displayed by default.
Display: Contextual Help
Display/Hide Displays tips and key commands when the mouse is hovering over any knob, switch, or slider. Contextual Help is enabled by default.
Shift + Freq: Mode7
Band Solo In this mode, the Shift + Freq operation results in soloing the selected band at the Frequency knob position.
Conversely, the Shift + Alt + Freq switches to the Frequency Finder Mode.
Frequency Finder When enabled, the Shift + Freq operation results in boosting the selected band at the Frequency knob position.
Conversely, the Shift + Alt + Freq switches to the Band Solo Mode.
Shift + Freq: Q
Use Max Q When enabled, the Shift + Freq mode will use the steepest Q of the selected band. When disabled, the Shift + Freq mode will use the current Q of the selected band. By default, Use Max Q is enabled.
Shift + Freq: Gain
Gain: 3dB, 6dB, 12dB This setting defines how much Gain is applied in either of the Shift + Freq modes. This is set to 6dB by default.
Knobs: Stepping
Q: None, Coarse, Fine8 None disables the stepping behavior on the Q knob, and is enabled by default. Coarse and Fine stepping modes limit the resolution of the knob by snapping to predefined values.
Gain: None, 0.25dB, 0.5dB, 1dB, 2dB8 None disables the stepping behavior on the Gain knob, and is enabled by default. The 0.25dB, 0.5dB, 1dB, and 2dB settings define the interval in which the Gain knob may be incremented or decremented.
Knobs: Auto-On
Auto-On When enabled, adjusting any parameter will automatically turn the associated band on. This is enabled by default.
Defaults: Settings9
Set Current As Default Stores all current settings as the default.
Set Factory As Default Restores the factory settings to default.
Defaults: Parameters10
Set Current As Default Stores all current settings as the default.
Set Factory As Default Restores the factory settings to default.
Display Analyzer & Curve
This button toggles the display of the Analyzer & Curve window.
The Analyzer and Curve window is shown by default. 
Band Solo / Frequency Finder Menu
Click on this icon to access to the Shift + Freq settings: Mode, Q and Gain.11 
Frequencies As Notes
This button toggles whether Frequency knob values are shown as frequencies or as musical notes. Frequencies As Notes is disabled by default. 
Sort Bands by Frequency
Clicking this button will sort the five parametric bands based on their Frequency knob values; lowest to highest, from left to right.12 
Multi-Channel Toolbar
Stereo Processing Modes
LR & MS Modes
When using the stereo version of AirEQ, you can choose between Left / Right or Mid-Side processing modes.

Left/Right
In Left/Right mode, you can equalize the Left and Right channels differently and listen them in solo. Click on ‘LR’ switch to enable Left/Right mode.
Mid-Side
In Mid-Side mode, you can equalize the Mid and Side components differently and listen them in solo. Click on the MS switch to enable Mid-Side mode.
The Mid and Side components are a result of a stereo decoding, which separates the common information between Left and Right channels (Mid), and the difference between Left and Right Channels (Side).
The active mode is highlighted in white.
LR & MS Band Options
To choose which stereo channel a band will process, Right+Click the Band Bypass switch and select:
- Stereo, Left or Right channel; if you are in LR mode.
- Stereo, Mid or Side channel; if you are in MS mode.
The first letter of the assigned channel will appear within the Band Bypass switch to denote it’s stereo channel assignment.
Channel Solo
Both in LR and MS mode, you can solo each component of the stereo signal.
Unlike many solos of this type, the AirEQ’s Channel Solo replaces the soloed component in the center. For example, a Solo Left will place the Left channel in equivalent proportion both in Left and Right Channel output.


An active solo is highlighted in white.
Surround Processing (5.1)
Surround Channels
In AirEQ 5.1, there are four components that may be equalized differently or soloed:

LR - Left and Right channels LsRs - Left and Right Surround channels C - Center channel LFE - Low Frequency Effect channel
Click on a multi-channel component to view and edit its equalization. The selected component is highlighted with a gray box
Unlinking & Linking Channels

The ‘LsRs’, ‘C’ and ‘LFE’ components may be linked to the ‘LR’ component in order to make the same equalization.
Clicking the Link button to the left of each multi-channel component will Unlink that component from the Left and Right channels. All multi-channel components are linked to the Left and Right channels by default. Linked components are highlighted in white, while unlinked components are dimmed.
Link All automatically links every component to the Left and Right channels, resulting in a single equalization.
Unlink All automatically unlinks every component from the Left and Right channels, resulting in a unique equalization for each multi-channel component.
Channel Solo
As the Stereo processing, you can listen each components in solo. However, unlike the Stereo Solo, the Surround Solo is a real solo: it doesn’t replace the component in the center.
The yellow lighted Solo is the current Solo.
Band Options
Channel
Right Click the Band Bypass switch to access the Band Channel option. Linked to the Stereo Processing mode, this option allows you to select which stereo channels the band will process (see the E. Multi-Channel Toolbar section for more information).
- In LR mode, the channel options are Stereo, Left, & Right.
- In MS mode, the channel options are Stereo, Mid, & Side.
Band Type13
Right Click the Band Bypass switch to access the Band Type option. Band Type is only available on the five parametric bands.
- The first and fifth bands may be set to Bell, Shelf, or Steep Bell.
- The second through fourth bands may be set to Bell or Steep Bell.
For more information on Band Types, see section A. Equalization Bands.
Per-Band Character14
Right Click the Band Bypass switch to access the Use Per-Band Character option. Per-Band Character is only available on the five parametric bands.
By default, Character is controlled via the global Character slider / switches, however, you may set a band’s character parameter independently from the global by Shift + Clicking that band’s Q knob or selecting “Use Per-Band Character” from the Band Options menu.
You can restore the band to the global Character by choosing “Use Global Character” from the Band Options menu.
Strength Behavior
By Default, Strength affects every band, however, there may be some circumstances where you only want specific bands to be affected. Right Click the Band Bypass switch to access the Strength Behavior option.
- “Include in Strength” allows the band to be affected by Strength.
- “Exclude in Strength” removes the band from Strength.
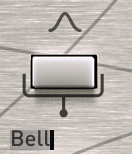
Band Names
You can rename each equalization band by clicking the name field, modifying it, and pressing return.
When you recall a session, you can then easily visualize the function of each band, or the sonic characteristic it is intended to modify. We recommend scrolling through the factory presets to get an idea of how to get the most out of this feature.
Miscellaneous
Phase Reverse
This switch inverts the polarity of the plugin 180 degrees. Right Click the Phase Reverse switch to access the Channel option. Linked to the Stereo Processing mode, this option allows you to select which stereo channels the Phase Reverse will process.

Master Bypass
Bypasses the entire plugin.

About Panel
Clicking the Eiosis logo above Character will open the About Panel, which has a few useful functions.
- Click the Eiosis logo to launch the eiosis.com website.
- Click AirEQ Premium to open this User Guide.
- Click the version number to toggle between version number and build number.
- Right Click the version number to Copy Plugin Info to your clipboard. This is very useful information to have when contacting our support.
Analyzer & Curve Display
AirEQ Premium features a real-time frequency spectrum analyzer. This analyzer isn’t just a traditional FFT analyzer, it has been designed to best serve the needs of frequency analysis in an equalization context.

Traditional FFT analyzers perform a scientific analysis and display its result, while letting you deal with this tremendous amount of information. To help you in that task, they often provide a couple of settings that let you control the temporal aspects, such as the overlapping factor, or the precision, such as window type and size.
At best, those settings allow you to reduce the quantity of information the analyzer is showing, but this is not making it more manageable nor useful. A traditional FFT analyzer displays everything that is happening in your signal, and leave you with the difficult task of filtering and locating the information you are actually seeking.
AirEQ’s analyzer uses another approach. It has been designed to display more meaningful analysis results, that will complement what you are hearing instead of just displaying how a scientific tool would “see” and represent the audio signal.
Analyzer Display Settings
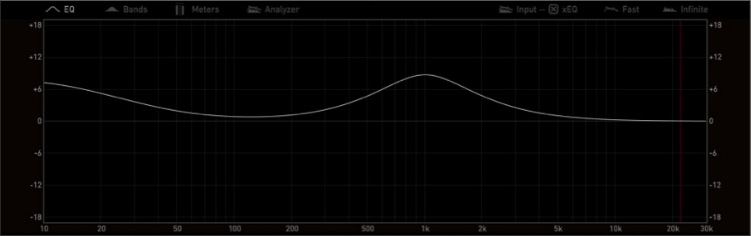
Curve15
Clicking on the EQ label will display the combined curve of all bands.
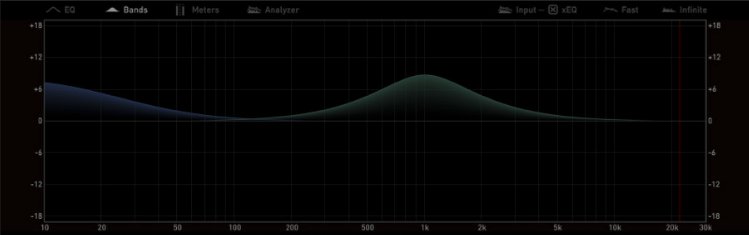
Bands15
Clicking on the Bands Label will display the EQ Band’s Curves with one color per Band:
Meters
Clicking on the Meters Label will display the Input and Output Meters.
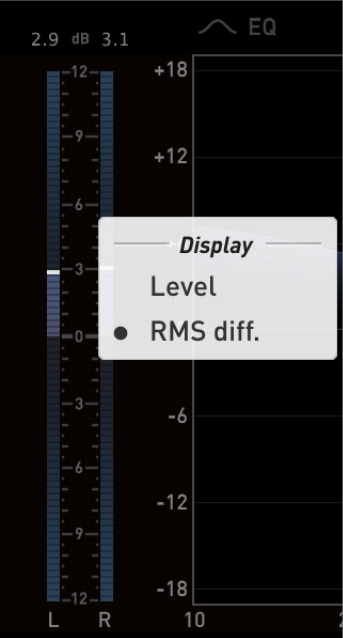
Input Meter
The Input Meter is located to the left of the Analyzer & Curve window. You can select between two meter types by Right + Clicking the Input Meter.
Level
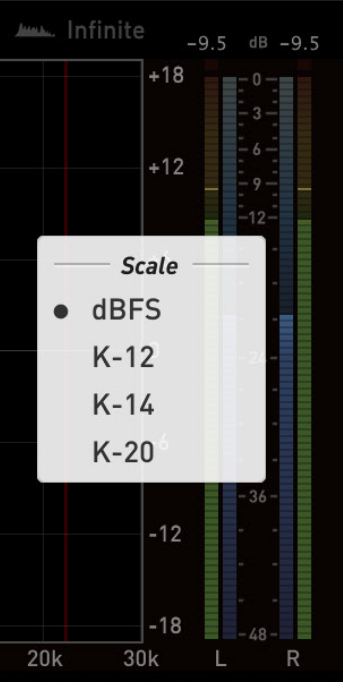
The Level meter type displays the realtime level at the input of the plugin. With Level selected, you may also choose between four scales:
dBFS The most common scale, where the maximum is 0dBFS.
K-Metering K-12 sets the 0dB level to -12dB, whereas the maximum is 12dBFS. K-14 sets the 0dB level to -14dB, whereas the maximum is 14dBFS. K-12 sets the 0dB level to -20dB, whereas the maximum is 20dBFS.

RMS Diff.
The RMS Differential meter type compares the average volume of the equalized and unequalized signals and is very useful when using the Input Gain to compensate for loudness differences.
Negative values show that the equalized signal is quieter than the unequalized, while positive values show the opposite.
Output Meters
The Output Meter is located to the right of the Analyzer & Curve window. The Output Meter is post the Output Gain knob and shows the final level leaving the plugin.
You can select between the same meter scales available to the Input Meter by Right + Clicking the Output Meter.
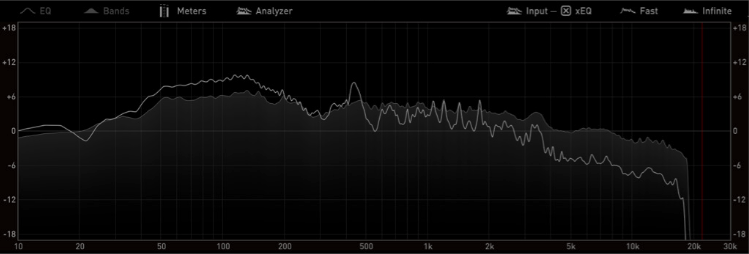
Analyzer16
Clicking on the Analyzer label will display the Realtime and Average Analyzers.
Analyzer Settings
Analysis Source
By default, the Analysis Source is “Input x EQ” Mode. This Mode analyzes the Input Source processed by the EQ.
By clicking the checkbox or on “xEQ” Label, you will switch to the Input Analysis Source. This Mode analyzes directly the Input Source.
By clicking on the “Input” Label, you will switch to the Output Analysis Source. This Mode analyzes directly the Output, then the Input Source processed by the EQ and trimmed by the In and Out Gains.
Realtime Analysis
Real Time Analysis is set to Fast mode by default, which is the most reactive. By clicking on the “Fast” label, you will switch to Slow mode. This mode is less reactive but allows for easier monitoring. By clicking on the “Slow” label you will switch to the Off Analysis mode. In this mode, Realtime Analysis is not displayed.17

Average Analysis
Average Analysis is set to Infinite mode by default. In this mode, the Average Analysis constantly refreshes. By clicking on the “Infinite” label you will switch to 10s mode. In this mode, the Average Analysis refreshes every 10 seconds. By clicking on the “10s” label you will switch to Off. In this mode, Average Analysis is not displayed.18

Rescaling the Amplitude
Scrolling with the mouse pointer in the Analyzer area will rescale the EQ and EQ Band Curve Amplitudes. Scrolling down increases the scale until -24/+24 dB. Scrolling up decreases the scale until -1/+1 dB.
Offsetting the Analyzer Curve
For better visibility, the Analyzer Curve can be vertically offset by clicking and dragging anywhere inside the analyzer display.
Mouse & Keyboard Shortcuts
Kick (Momentary)
The state of AirEQ’s switches can be ‘kicked’ or momentarily toggled by holding down the Command / Control key while clicking and holding.
This is very useful to quickly compare a setting such as a filter slope or to momentarily undo or redo an adjustment. The state of the switch will remain changed for as long as your mouse button is depressed.
Switch ‘Kick’ works on the following switches:
- Undo/Redo
- Band On/Off
- Filter Slope 6dB/12dB
- Bell/Shelf
- A/B Snapshot Slots
- EQ Phase Switch
- EQ Master Bypass19
- Channel Solo
Coarse & Fine Adjustments
By design, AirEQ’s knobs and sliders operate at ‘Coarse’ resolution. To adjust a knob or slider with ‘Fine’ resolution, hold the Command / Control key while dragging up or down on it, or simply dragging with the right click.
Reset to Default
Any of AirEQ’s knobs, switches, or sliders can be instantly reset to their default value by holding the Option / Alt key while clicking them. Additionally, you can reset knobs to their default value simply by double clicking them.
Shift+Freq
Frequency Finder
You can tune the Frequency values while keeping the Gain and/ or Q at their Maximum Value (See Settings for more information). This way, you can precisely hear the resonances you search for, while keeping the original gain of the bands.
To set the Gain value at maximum gain while sweeping the Frequency, hold the Shift key while adjusting the value. When you release the Shift key, the Gain returns to its original value.
When the Frequency Finder Mode is enabled, using the Shift and the Alt keys results in a Band Solo.
Band Solo
With Band Solo enabled, the Shift+Click Frequency knob behavior will solo the output of the selected band while keeping the Gain and/ or Q at their maximum value (See Settings for more information). This way, you can precisely hear the resonances you search for, while keeping the original gain of the bands.
When the Band Solo Mode is enabled, using the Shift and the Alt keys results in a Frequency Finder.
Enable Automation Dialog
The Automation Dialog is a Pro Tools and VST3 DAWs feature which allows to add a parameter for automation. This dialog is enabled by holding Control+Win+Alt (or Control+Option+Command on Mac) while clicking on the parameter you want to add for automation.
Constant Q
The Q adjustment is very particular in AirEQ and offers a new approach of mixing with the ear. While adjusting the Q factor of most equalizers, the gain remains constant.

The problem with this behavior is that the loudness of the equalized sound varies when adjusting the Q-factor, and thus what you hear is not only the result of the Q-factor adjustment, but also the loudness variation.
With AirEQ, the gain is automatically adjusted in concert with the Q-factor. The steeper the Q-factor, the more the gain is increased. The audible effect of this is that when you sweep the Q-factor, you hear very few variations in loudness, and thus you can truly hear the effect of the Q-factor adjustment.
Why is this important? Because when you adjust a parameter, this parameter must be coherent with what you hear, and not with “how many dBs the filter adds to the center frequency.”
When tuning the Q-factor, it is better to hear the real effect of the Q-factor, not the effect of the Q-factor plus the loudness variation it produces. You also don’t have to change the gain each time you adjust the Q-factor knob.
It is more musical, natural, and intuitive.
For example, if you take a 1kHz bell boost, and set the gain to +3dB and that you sweep the Q factor, you will hear that for narrow values, the boost can not be easily heard. In many cases, you have to raise the gain for narrow Qs (to add impact to a kick drum, remove voice strong resonances or extra sibilance, add pitch to toms or snare, etc.), and to lower the gain for wide Qs (to gently change the character of an instrument or a song, for many mastering purposes, etc.).
There a dilemma here: generally speaking, you need more (real absolute gain) precision and lower gains for wide Q-factors; less (real absolute) gain precision and higher gains for narrow Q-factors.
You have to familiarize yourself with this kind of behavior before taking all the advantages from it. We can consider that the gain display in AirEQ shows the musical units of the gain, i.e. the perceived loudness that you add to the sound, rather than mathematical units, which only relates a scientifically fact, i.e. that the bell peaks at xx dBs.
Technology
Analog Matched Linear Transformer (AMLT™)
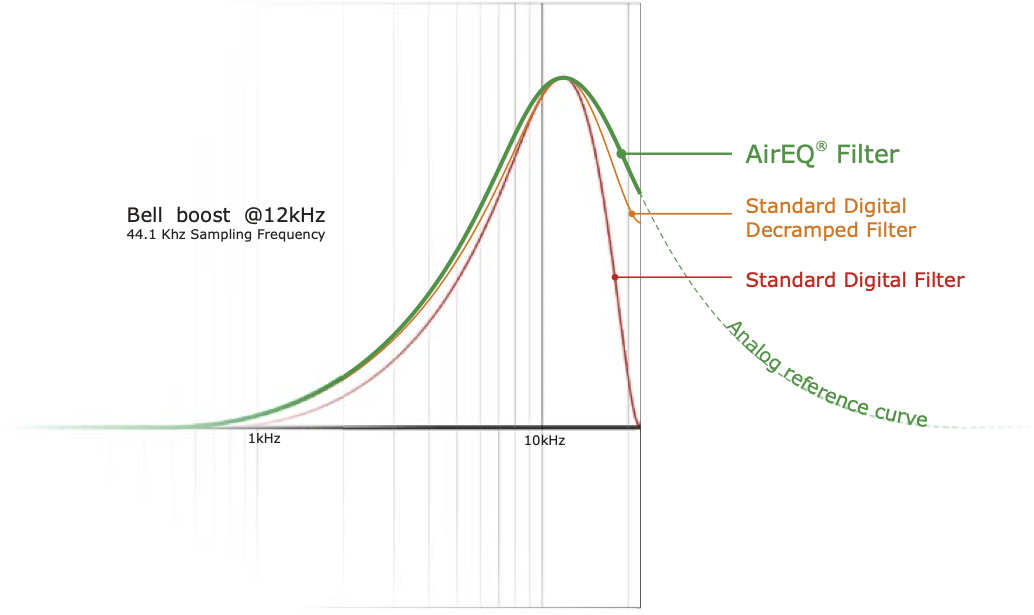
With AirEQ, you always have the guarantee that the processing is of the best quality. The Analog Matched Linear Transformer (AMLT™) algorithms allow perfect curves across the entire frequency spectrum, regardless of the sampling frequency. This means that you get the same cutting edge performance when using AirEQ as you would with any analog equalizer.
You can especially hear the difference when doing frequency sweeps, because the curve is perfect, you don’t get any digital harshness or unbalanced sound. And because AirEQ achieves that without oversampling or processing delays, with such low-CPU requirements, it is the perfect tool for every situation where high quality and flexibility are required.
Technology Comparisons
Conclusion
I’m extremely proud of the work that has been achieved by the Eiosis team, and I can assure you that we will keep working on AirEQ to make it better, add more options and features, always keeping it’s philosophy of being simple, intuitive and musical.
AirEQ was a great challenge at all levels: regarding the algorithm, the sound design, the workflow and the graphical design.
First, the algorithm offers the best quality processing you can have with zero delay processing. I strongly believe that mixing engineers should not have to chose between several quality options, that’s why AirEQ has always the most perfect sound. Perfectly analog matched curves, with extremely clean processing.
Some people ask me, “Is AirEQ a mixing EQ or a mastering EQ?” I reply to them that it’s both, because you always get the best quality processing, always at zero delay, low CPU!
Indeed, a great care has been given to the CPU processing by the development team: we made so whatever the curve, Water or Fire, the CPU would remain the lowest possible, so you can put instances of AirEQ across your entire session.
The sound design was extremely challenging, because I had to mix some technical aspects with artistic aspects, and to adjust the behavior of the curves manually. For instance for the Earth, it required a lot of research and development to achieve a powerful sound in the bass without boominess: the phase behavior of this filter had to be designed specifically, and once again, adjusted by ear on many different sources.
We took a great care of making the workflow the most intuitive possible, by thinking about every detail, every setting carefully. Accessing all your parameters directly on the same interface, the innovative preset system, the Band Solo, the Character and Strength sliders, and one of the most important aspects, to me, is the many display options: values, curves, analyzer, and the crucial “ears only mode”, which allows to focus on the sound, and thus to be able to very quickly check the analyzer by double clicking on the interface background.
All those features provide a feeling of ease, speed, and the many seconds that you gain while equalizing makes, at the end, the final result sound better, because the creative process is faster. You have more time to think, to listen, and to make artistic decisions.
This is also why I adjusted every setting by ear, and I verified that each parameter combination, each knob change, would feel natural. For each curve, each Q, each Gain combination, I tested the settings on individual tracks, on a mixbuss, and each time, it had to feel right. This took a tremendous amount of time, because everything had also to be continuous, and smooth while adjusting the Q, the Gain or the Character.
I also wanted AirEQ to be beautiful. To me, a gorgeous user interface is very important, because an equalizer is a tool you will use everyday. It influences the way you use it, because if you enjoy looking at the tool you’re using, you’ll want to keep it open and spend more time perfecting the sound you get out of it.
At last, I wanted the analyzer to be exceptional, and musical. To me, an analyzer should not have any complex setting, and should be very intuitive to read. That’s what I believe we succeeded to do with the AirEQ analyzer: it’s precise in the bass, and very reactive in the highs, very musical, in a way that you can “read” the notes and the music easily; I would say “very fluently.”
I’m very proud of what we could achieve with AirEQ, and all the work and dedication of all the team that has been required to reach this goal, I think, is reflected in the feeling that you will get from using it.
Fabrice Gabriel Eiosis founder - Former CEO
-
For more information on the Q and Gain interaction, see the Constant-Q section ↩
-
The Q range for the Shelving Filters differs from that of the Bell Curves, which is why, when switching from the Bell Filter to the Shelving Filter, you may notice the Q knob position change ↩
-
Display as Notes may also be enabled using the Frequency as Notes button on the Eiosis Toolbar ↩
-
You may also access the Set A4 Frequency dialogue by right+clicking the Frequency as Notes button in the Eiosis Toolbar ↩
-
Shift + Freq Mode, Q & Gain may also be accessed by clicking the Band Solo / Frequency Finder Menu in the Eiosis Toolbar ↩
-
You can always override the stepping behavior by pressing Command (Mac) / Control (Win) when adjusting a knob ↩ ↩2
-
Settings are defined as any preference that affects how AirEQ operates. This includes Display, Shift+Freq, Knobs, Analyzer & Curve display modes, Input & Output Metering types, and Multi-Channel Toolbar options ↩
-
Parameters are defined as any value that affects the equalizer itself. This includes Band On / Off switches; Band Type; Band Frequency, Q, Gain; Character; Strength; Input & Output Gains; Phase Reverse; and Master Bypass parameters ↩
-
Shift + Freq Mode, Q and Gain may also be accessed in the Configuration Menu. For more information on the Shift + Freq settings, see the Configuration Menu section ↩
-
Sorting Bands by Frequency actually reorders values on Bands 1-5; it does not reorder the bands themselves. Therefore, this action will break automation written to any the five parametric bands ↩
-
The Band Type option is only available on the five parametric bands ↩
-
The Per-Band Character option is only available on the five parametric bands ↩
-
The amplitude scale displayed on the left and the right corresponds to the EQ Curve and Bands’ Curve amplitude, not to the Analyzer amplitude ↩ ↩2
-
The Analyzer doesn’t display absolute amplitude values. This is why the amplitude scale doesn’t refer to the analysis curve, but to the EQ and Band Curves. ↩
-
Left+Click to cycle forward through the Realtime Analysis options. Right+Click to cycle backwards through these options. ↩
-
Left+Click to cycle forward through the Average Analysis options. Right+Click to cycle backwards through these options. ↩
-
The EQ Master Bypass can be also ‘kicked’ by holding down the Shift key while clicking and holding the A/B Snapshot Slots. ↩