Infinity EQ
Welcome to the next level of equalization.
Infinity EQ 2 is designed to make your workflow faster, more intuitive, and more creative than ever before.
First introduced in 2020, Infinity EQ quickly became a staple in countless user workflows. The beautiful interface and ease-of-use quickly made it an audience favorite, but there was one key feature that was missing upon release: dynamic filters. With Infinity EQ 2, dynamic filters join three new filter types and a major GUI update, significantly enhancing the plugin’s utility and flexibility as an all-around mixing tool.
Infinity EQ 2’s controls are meticulously designed to minimize mouse movements and maximize eye-to-ear intuition. The plugin’s interface allows for a speedy and efficient experience, starting with the versatile hover menu and intuitive filter shape selection.
Infinity EQ 2’s dynamic bands offer a new level of filter flexibility, providing two timing styles, the ability to use an External Sidechain to trigger the dynamic bands, and an Automatic Threshold for ultra ease of use. These bands keep the same degree of flexibility: continuous slopes for precision, continuous filter panning for creativity, and independent shelf resonances for enhanced control.
Uncompromising processing quality remains at the heart of Infinity EQ 2, delivering perfectly analog-matched curves with zero delay for crisp highs and precise lows. The Average Analyzer visually displays the impact of your equalization adjustments, providing immediate feedback to inform your mixing and mastering decisions.
Combining an enhanced feature set with elite performance and an unbeatable user experience, Infinity EQ 2 makes an already-excellent equalizer that much more powerful.
Your new favorite EQ awaits…let’s get started.
Overview
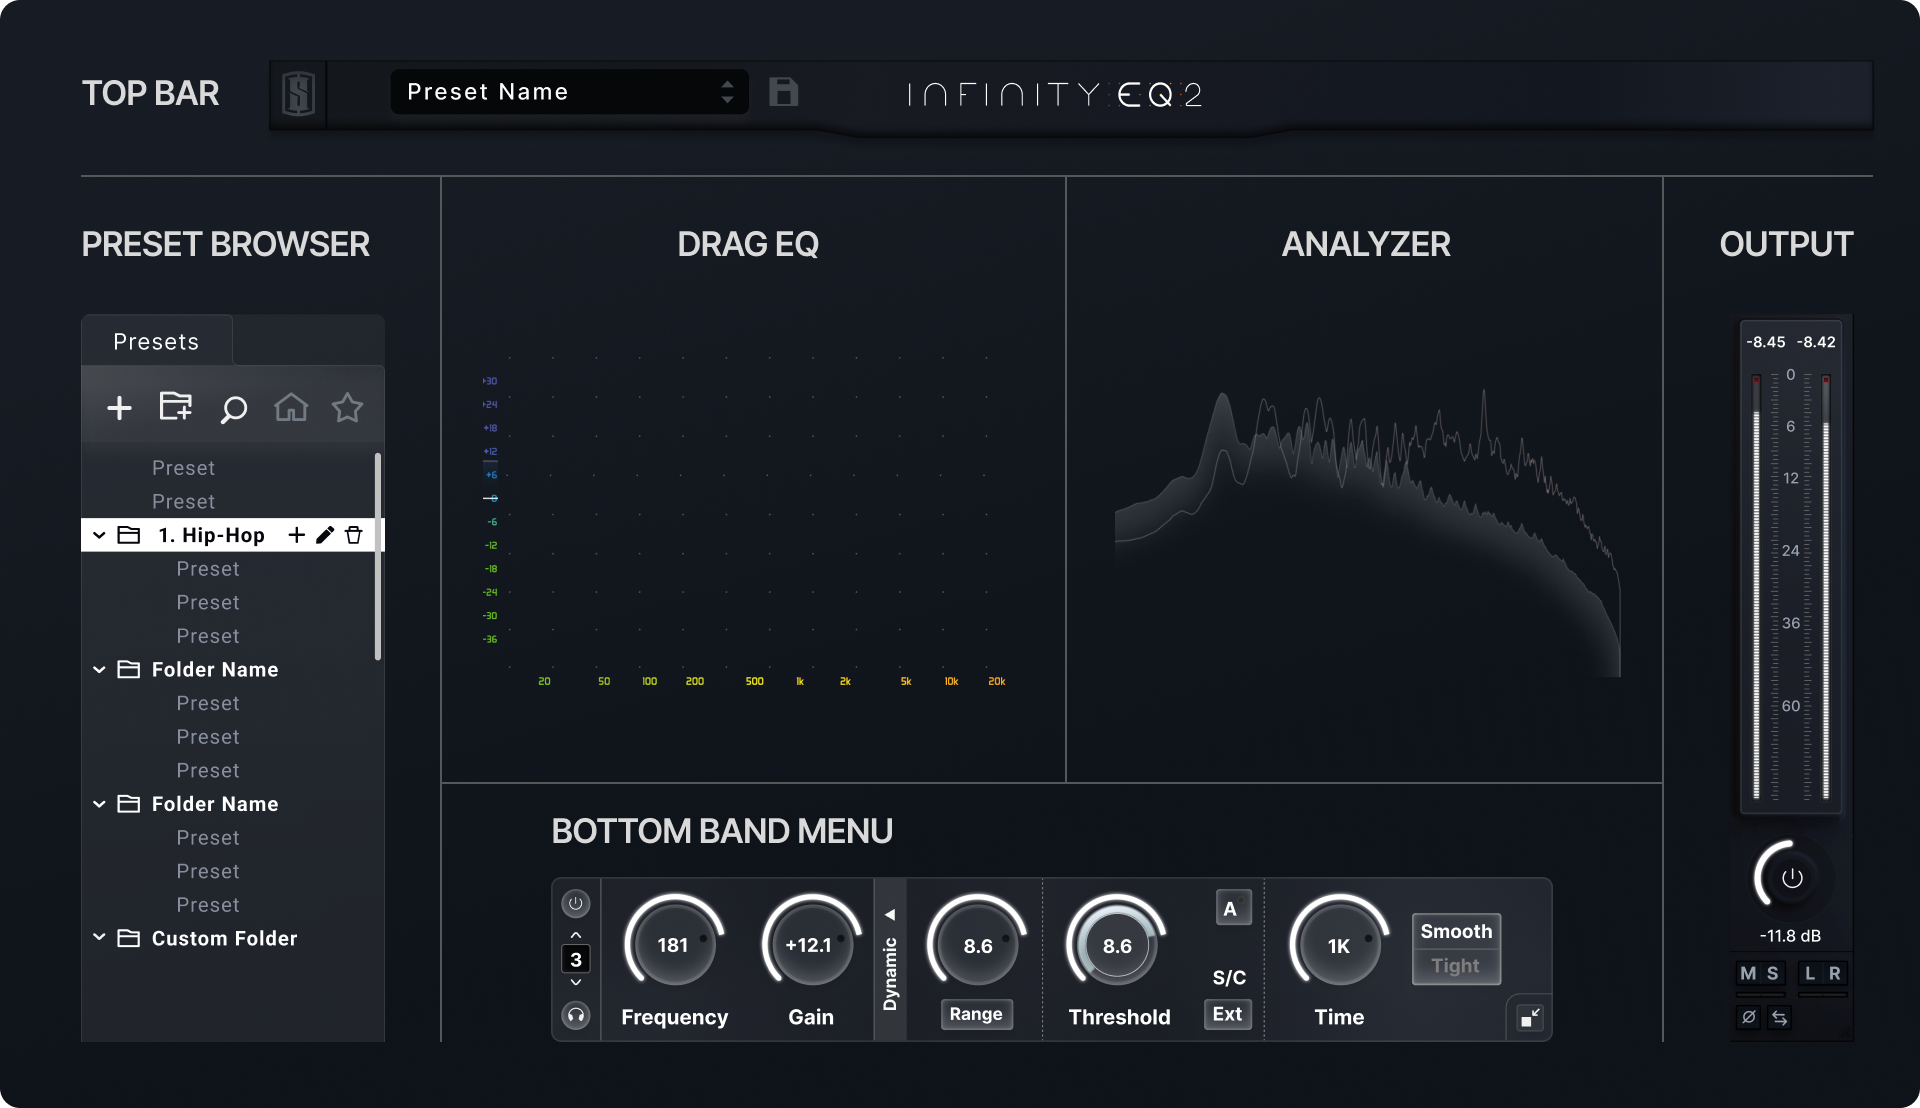
Adapt your plugin interface to your own preferences
Resize and Scale
Adapt your plugin interface from the bottom right corner of the plugin:
- Resize – allows you to increase the drag EQ area
- Scale – allows you to make everything bigger and to scale all the controls
Display Settings
The following settings are available by clicking on the Display settings icon in the topbar:
- Show / Hide Analyzer
- Show / Hide the Global Curve
- This mode gives the focus to the global EQ curve. Here you can directly create an EQ Band from the global curve.
- Curve Menu on Hover
- This setting defines if the curve controls near the band appears when hovering over the curve point or only when clicking on it.
Display Range
The button at the top left of the Drag EQ area allows you to choose whether the plugin automatically zooms out when dragging a curve point or if you’d prefer to restrict the visible area to a specific range (e.g., -12 to +12 dB).
Create an EQ Band
Double-click in the drag EQ area to create an EQ Band. The initial Band Type created depends on where within the area that you click; a graphic representing the curve type to be created will also be shown next to your mouse before you click:
If you would like to create a band with a type that differs from the default Band Type, right-click anywhere inside the drag EQ area and select the desired Band Type from the pop-up menu.
If the Global Curve is visible (you can set this from the Display settings menu available in the Top Bar), you can also create a band by clicking directly on the Global EQ Curve and dragging up or down.
Modify an EQ Band
Band menu
You can modify an EQ Band from the controls near the curve point, or from the bottom band menu when the band is selected (click on it to permanently select it).
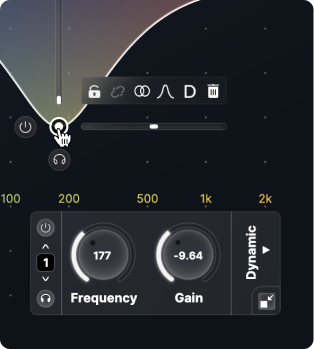
Note that you can click the following icon to hide the bottom band menu if you don’t need it: ![]()
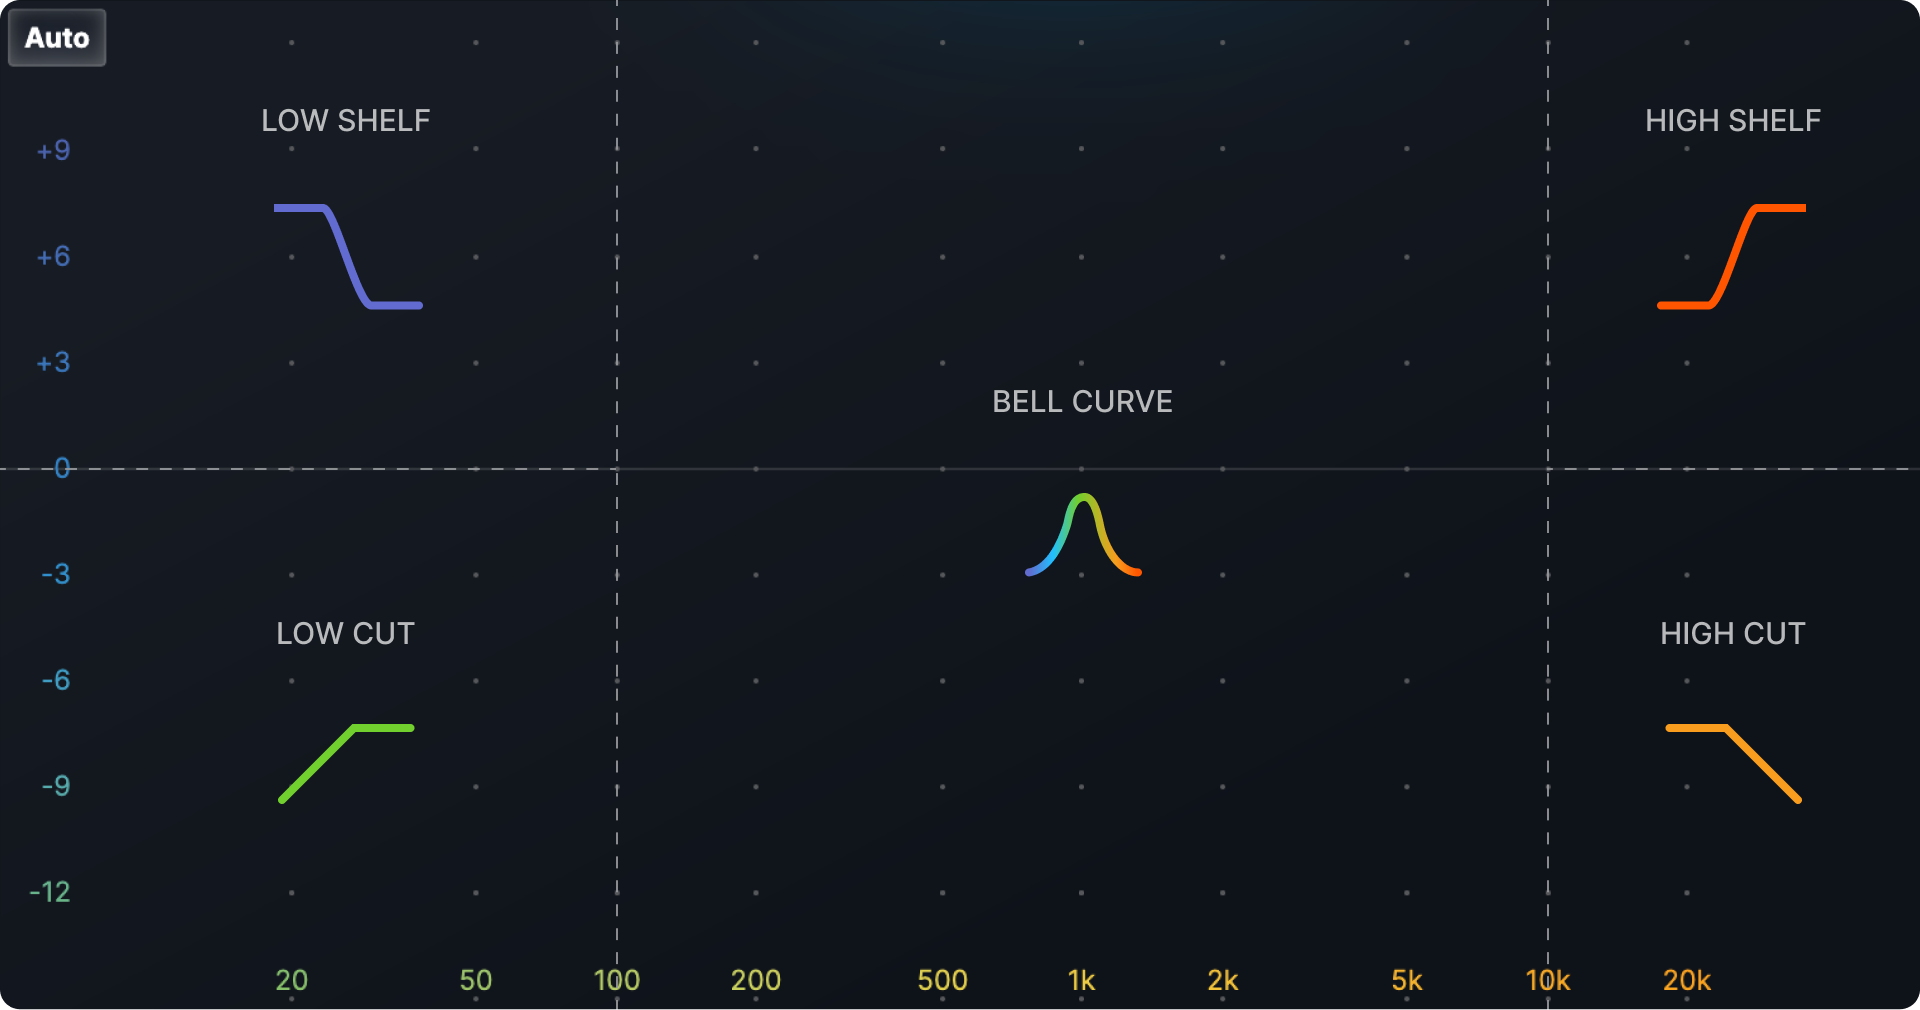
Band Type
Infinity EQ offers 8 Band Types:
- Bell
- Low Shelf
- High Shelf
- Low Cut
- High Cut
- BandPass
- Tilt
- Notch
After creating a Band, you can modify the Type in the Band Menu by hovering over the Band Point and clicking on the Band Type icon, then selecting a new Band Type.
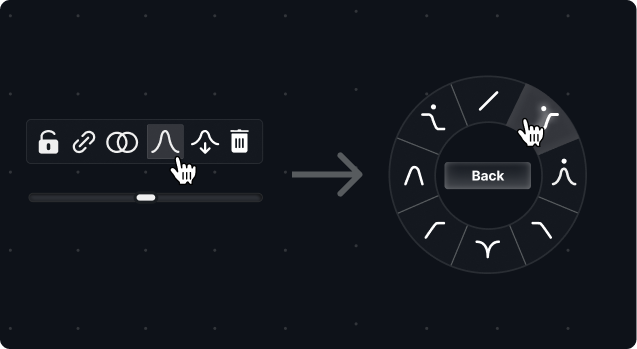
By hovering your mouse over a Band Type, a preview is displayed to help you visualize the modifications on your current band.
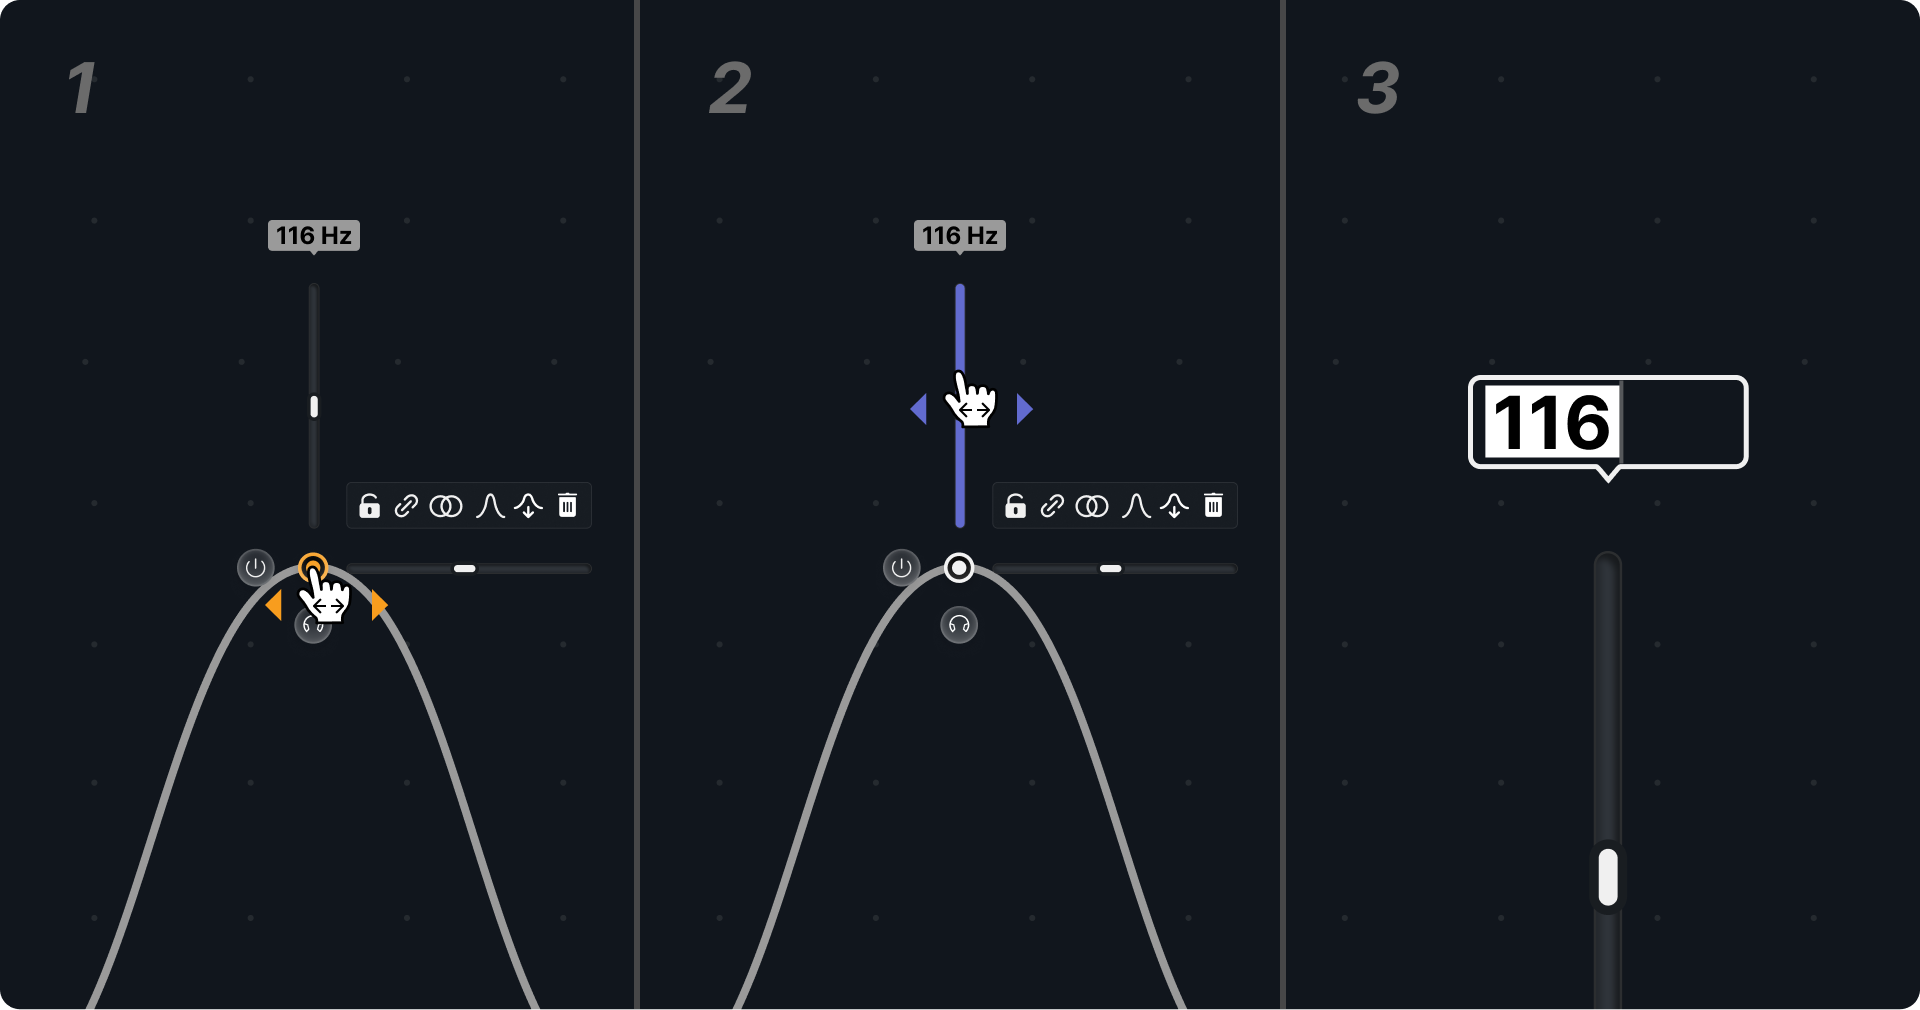
Frequency
- To modify the Frequency of an EQ Band, drag the Band Point horizontally.
- To exclusively modify the Frequency without changing the Gain, drag the vertical slider horizontally or hold OPT (Mac) or ALT (Windows) and click and drag the Band Point horizontally.
- You can also edit the value inside the Frequency Label by double-clicking it, or you can directly drag the Frequency Label horizontally.
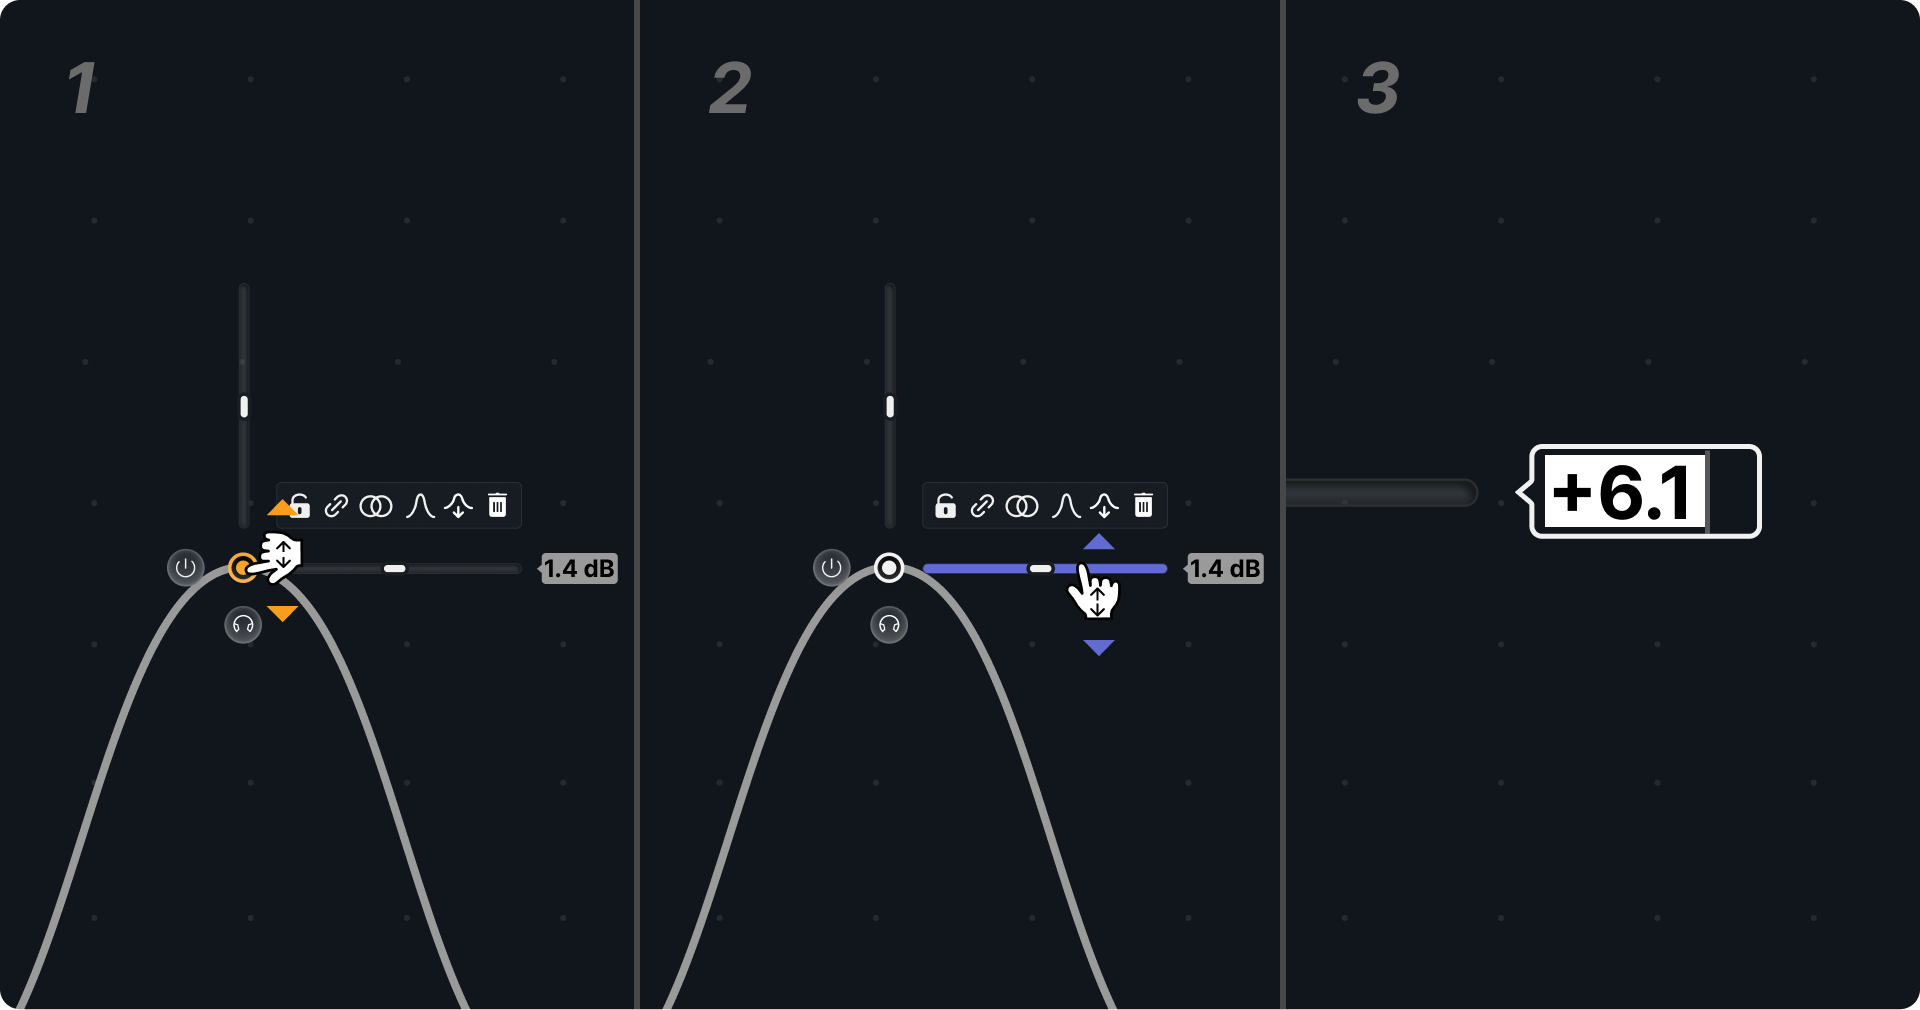
Gain (or Resting Gain)
- To modify the Gain of an EQ Band, drag the Band Point vertically.
- To exclusively modify the Gain without changing the Frequency, drag the horizontal slider vertically or hold OPT (macOS) or ALT (Windows) and click and drag the Band Point vertically.
- You can also modify the value inside the Gain Label by double-clicking it, or directly drag the Gain Label vertically.
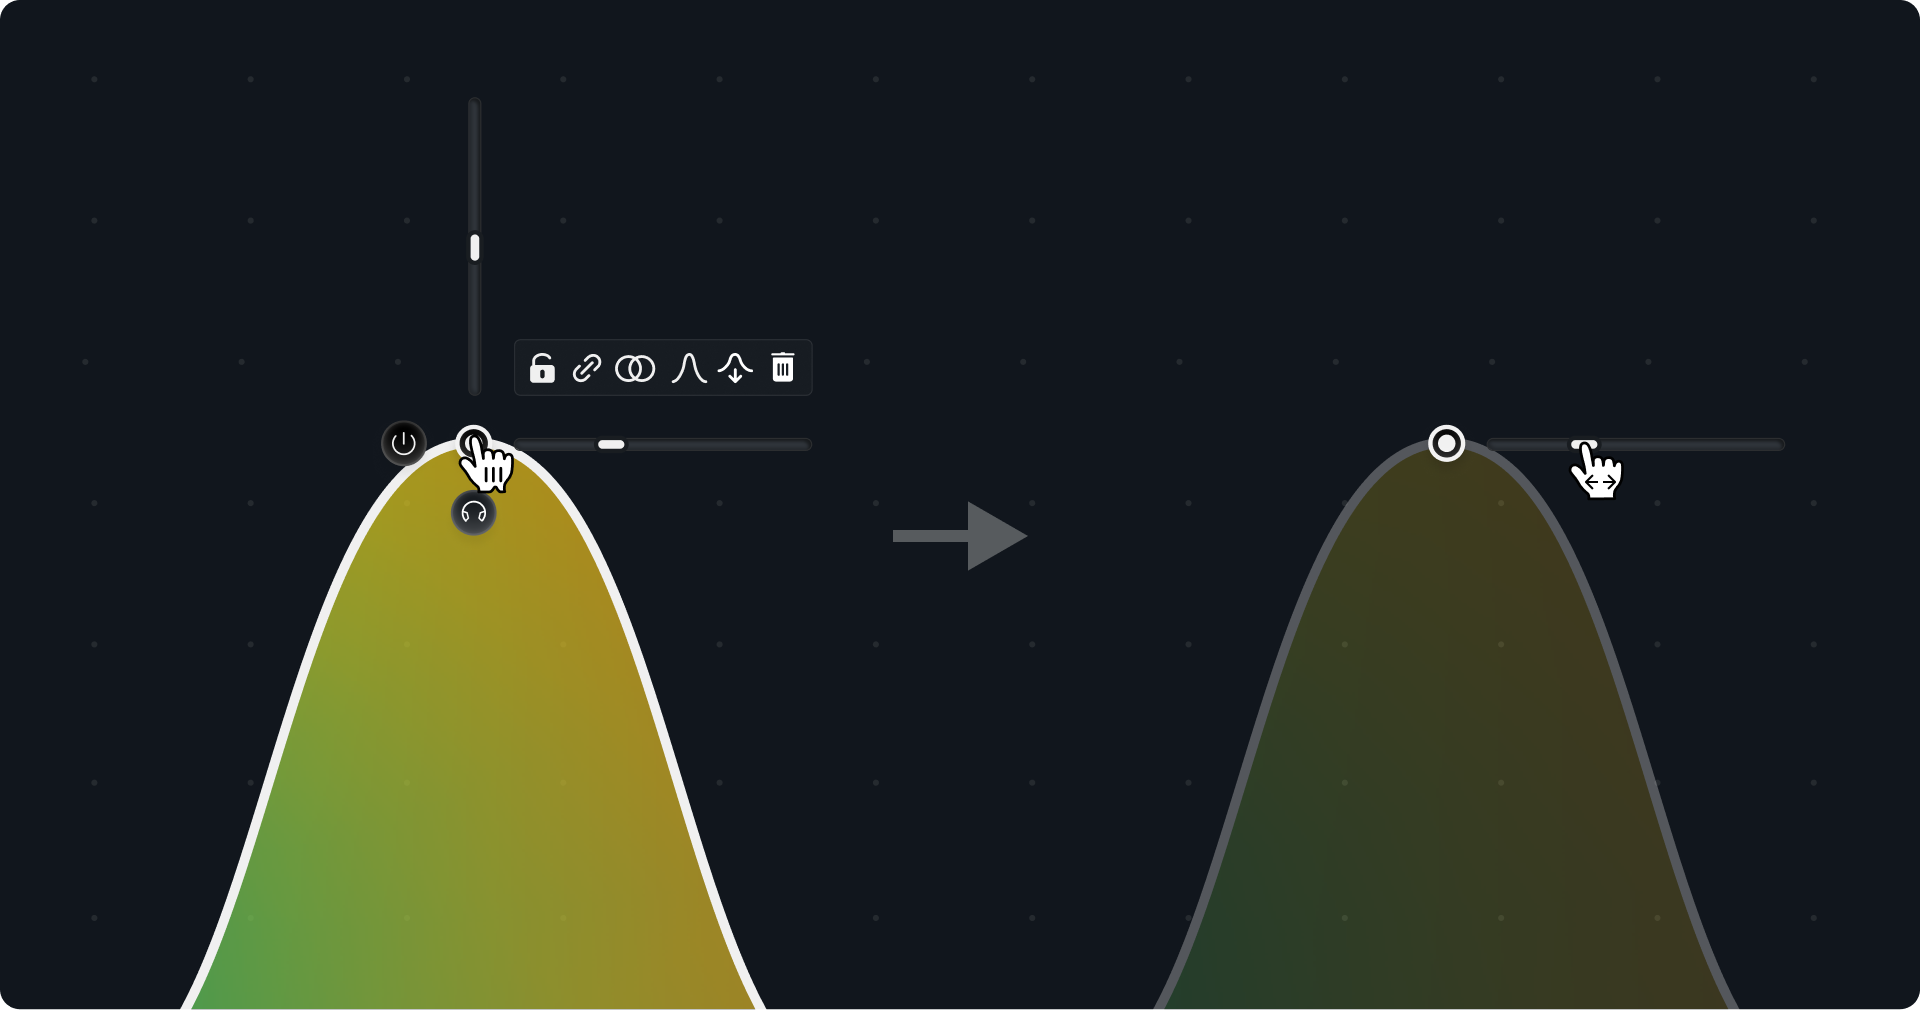
Bandwidth, Q, and Slope
Bandwidth
Also known as Q, the Bandwidth controls the width of a Bell, BandPass, or Tilt Band from very narrow to wide, allowing you to easily adapt it to your needs. It is expressed in semitones (st).
To modify the Bandwidth, hover over the Band Point and drag directly on the horizontal slider knob or use the mouse wheel:
Double Q Shelves
Also known as Resonance, Shelves in Infinity EQ offer two Qs: Q1 and Q2:
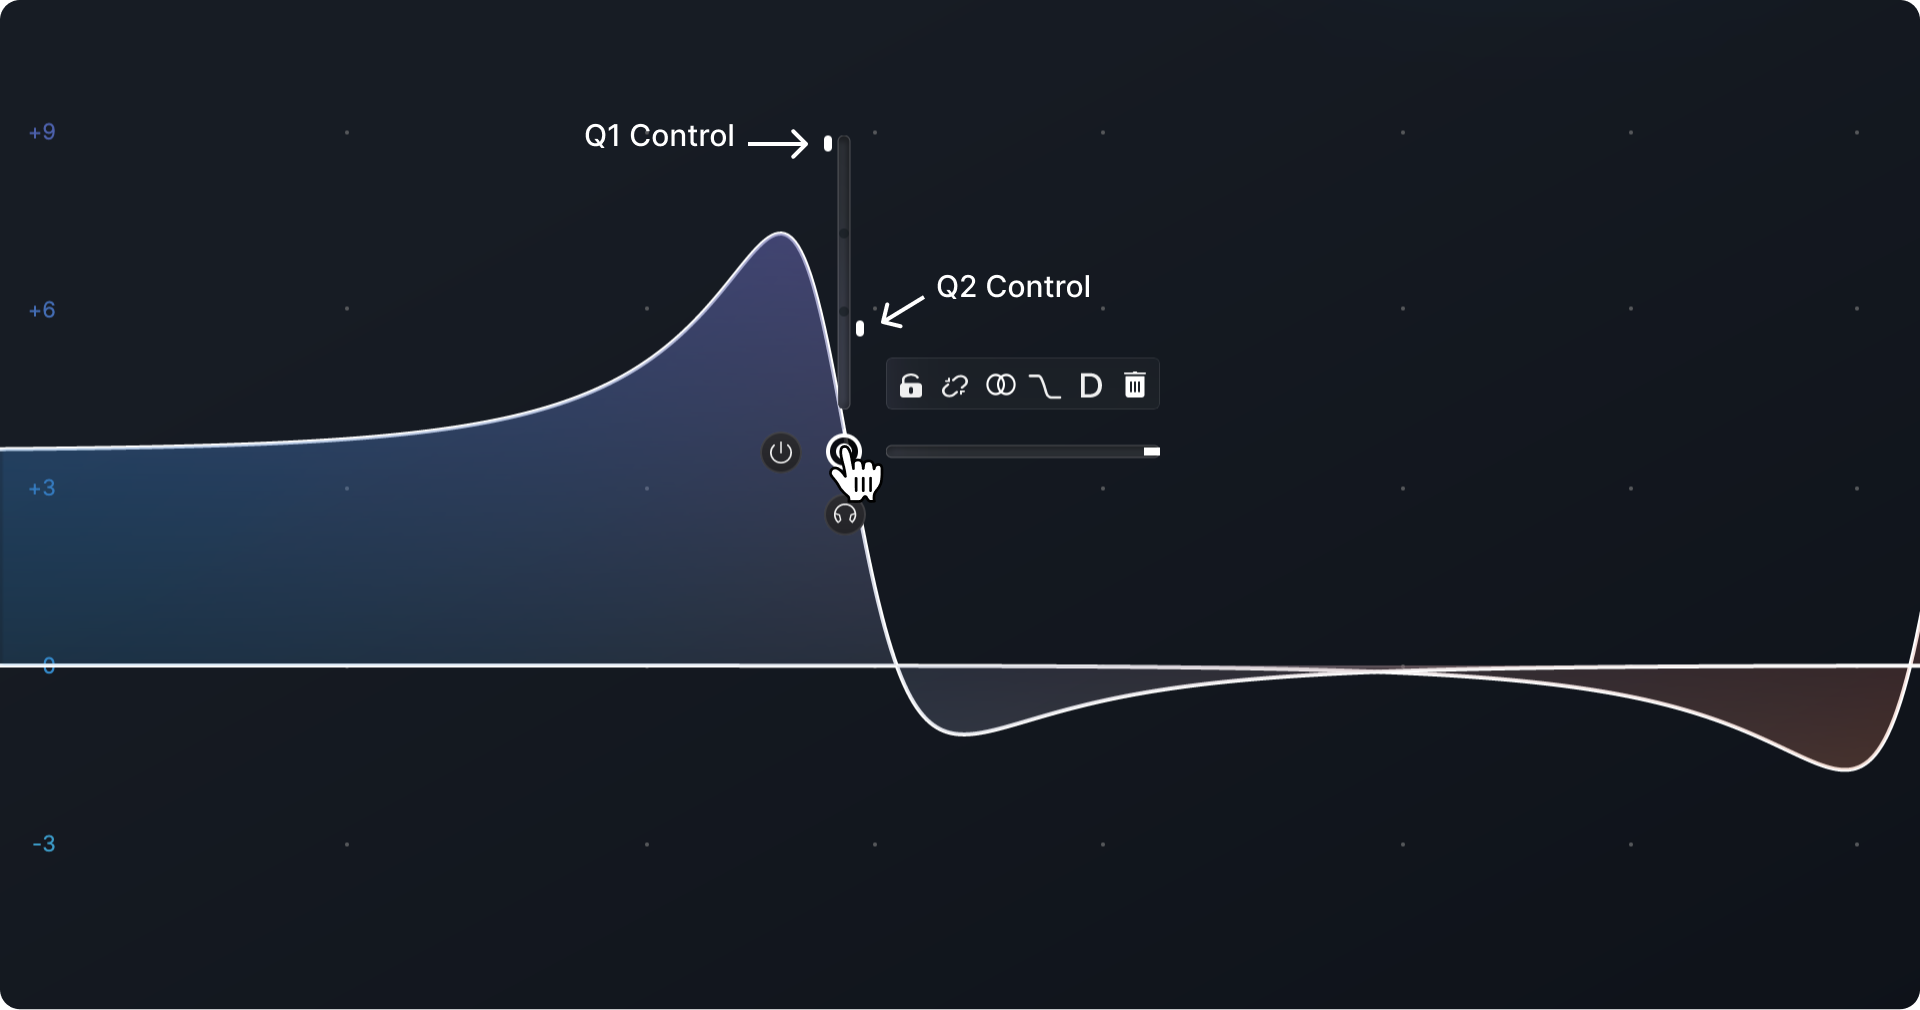
To modify the two Qs, hover over the Band Point and drag the small slider thumbs in the vertical slider, or use mouse wheel (in this case, both Qs are modified reciprocally).
Slope
Slope parameter is available for all Band Types. It controls the steepness of the filter and can be modified continuously. It is expressed in decibels / octave.
Stereo Panning
With stereo inserts, you can make different adjustments between Left/Right (L/R) or Mid/Side (M/S) channels directly within the same Band.
By default, the EQ Band has the same effect on L/R or M/S channels. It is represented by the stereo icon
By hovering over the Band Point and clicking on the Stereo icon, you can choose to adjust your band’s channel’s (L/R or M/S) gain:
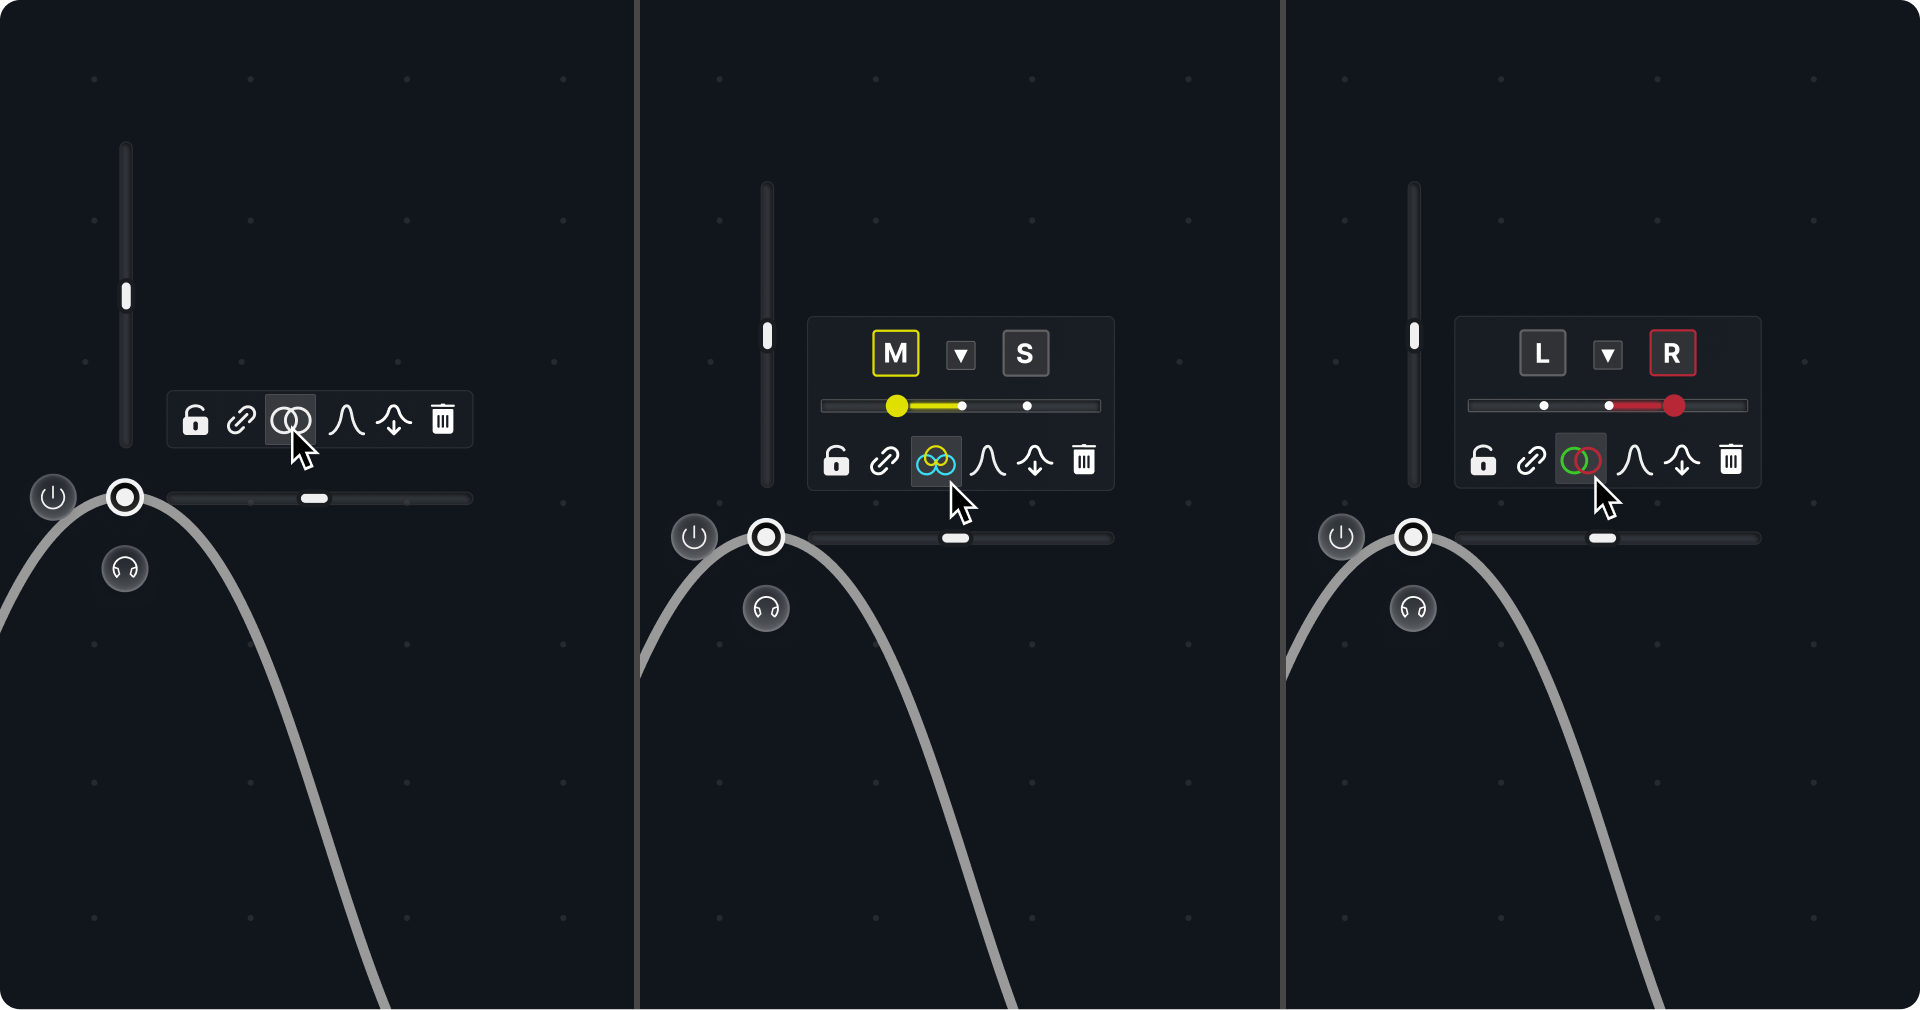
A new slider appears when switching the Band to L/R or M/S process. It controls the panning of the EQ Band and is expressed in percentage:
Example 1: 100% on Left (L) means that the filter is fully applied on Left channel but not applied on Right channel (0%).
Example 2: 50% on Mid (M) means that the filter is fully applied on Mid channel and half applied on Side (S).
Example 3: 200% on Side (S) means that the filter is fully applied on Side channel and inversely applied on Mid (M) channel.
Note: The L, R, M, S options in the upper portion of the hover menu are clickable and are shortcuts to set the respective channel to 100%.
Dynamic Features
Infinity EQ 2 offers dynamic Bells and Shelves. Click “Dynamic” or “D” in the band menu to enable dynamics.
When a Band has dynamics enabled, it will sit at its Resting Gain until the sidechain signal exceeds the Threshold. After this, the gain will start to actively move towards the Target Gain (shown with the dotted line) the more the sidechain level exceeds the Threshold, returning towards the Resting Gain when the sidechain level drops. The Target Gain represents the maximum amount of Gain Reduction possible for the Band.

The Threshold is set to Automatic by default. Click the icon to deactivate the Automatic mode and adjust it manually. The sidechain signal level is shown around the Threshold knob.
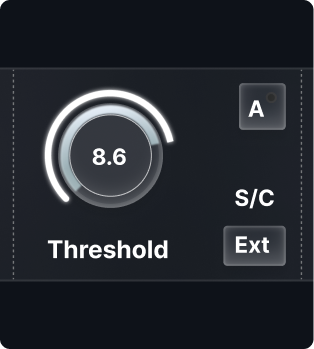
You can switch between Internal and External sidechain by clicking this toggle button.
When using the external sidechain, the full frequency spectrum of the sidechained signal is used for detection.
Time section
The Time section offers 2 unique styles:
-
Tight - Short Attack with moderate Release speed. This mode is very reactive and can be used for Deessing purposes, among others.
-
Smooth - Longer Attack and Release speeds. Having a longer Attack is helpful to let the Transient go through before compressing.
Time percentage - allows you to scale all the Attack and Releases.
Target / Range switch
Target Mode - Adjust the Resting Gain and the Target Gain independently
This is really helpful if you’re happy with the way the band behaves dynamically, but want to boost or cut a little more when the signal is below your threshold.
Range Mode - Adjusts the Resting Gain and also moves the Target value.
Misc
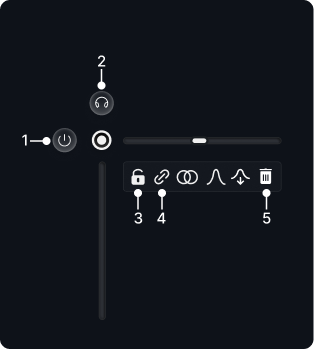
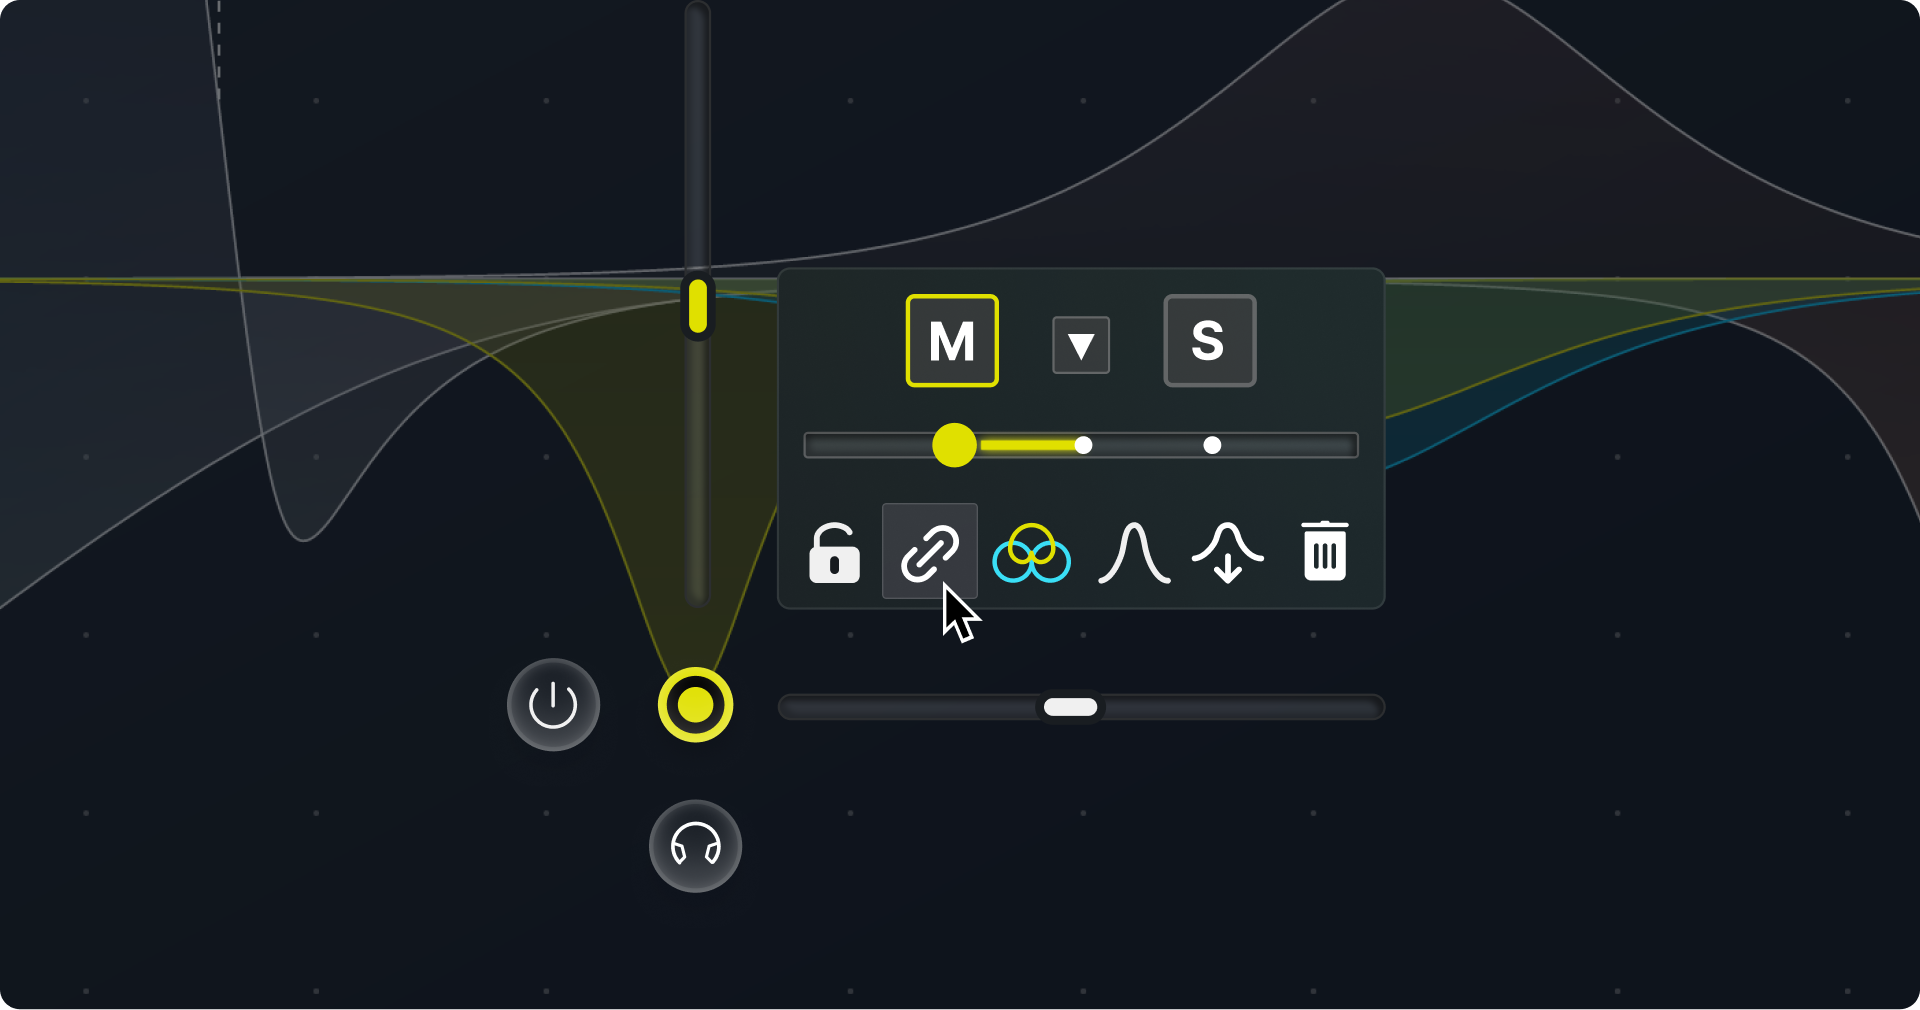
- Band Bypass: Controls the on/off state of the EQ Band.
- Band Listen: Allows you to solo what the filter boosts or cuts. Adjusting the curve with the scroll wheel is possible while Band Listen is active. Dragging vertically and/or horizontally allows you to temporarily increase or decrease the global gain and/or frequency.
- Lock: Allows you to lock the EQ Band to avoid accidental modifications. A locked band cannot be controlled from the user interface but still follows automations.
- Link: Allows you to group several EQ Bands. This option is only available when several bands are selected.
- Delete: Click the trash icon to delete the EQ Band.
Select and Group EQ Bands
electing multiple bands allows you to apply the same modifications to several EQ Bands simultaneously (i.e. reducing gains for two or more EQ Bands).
To select several EQ Bands, click and drag a selection rectangle in the Drag EQ area:
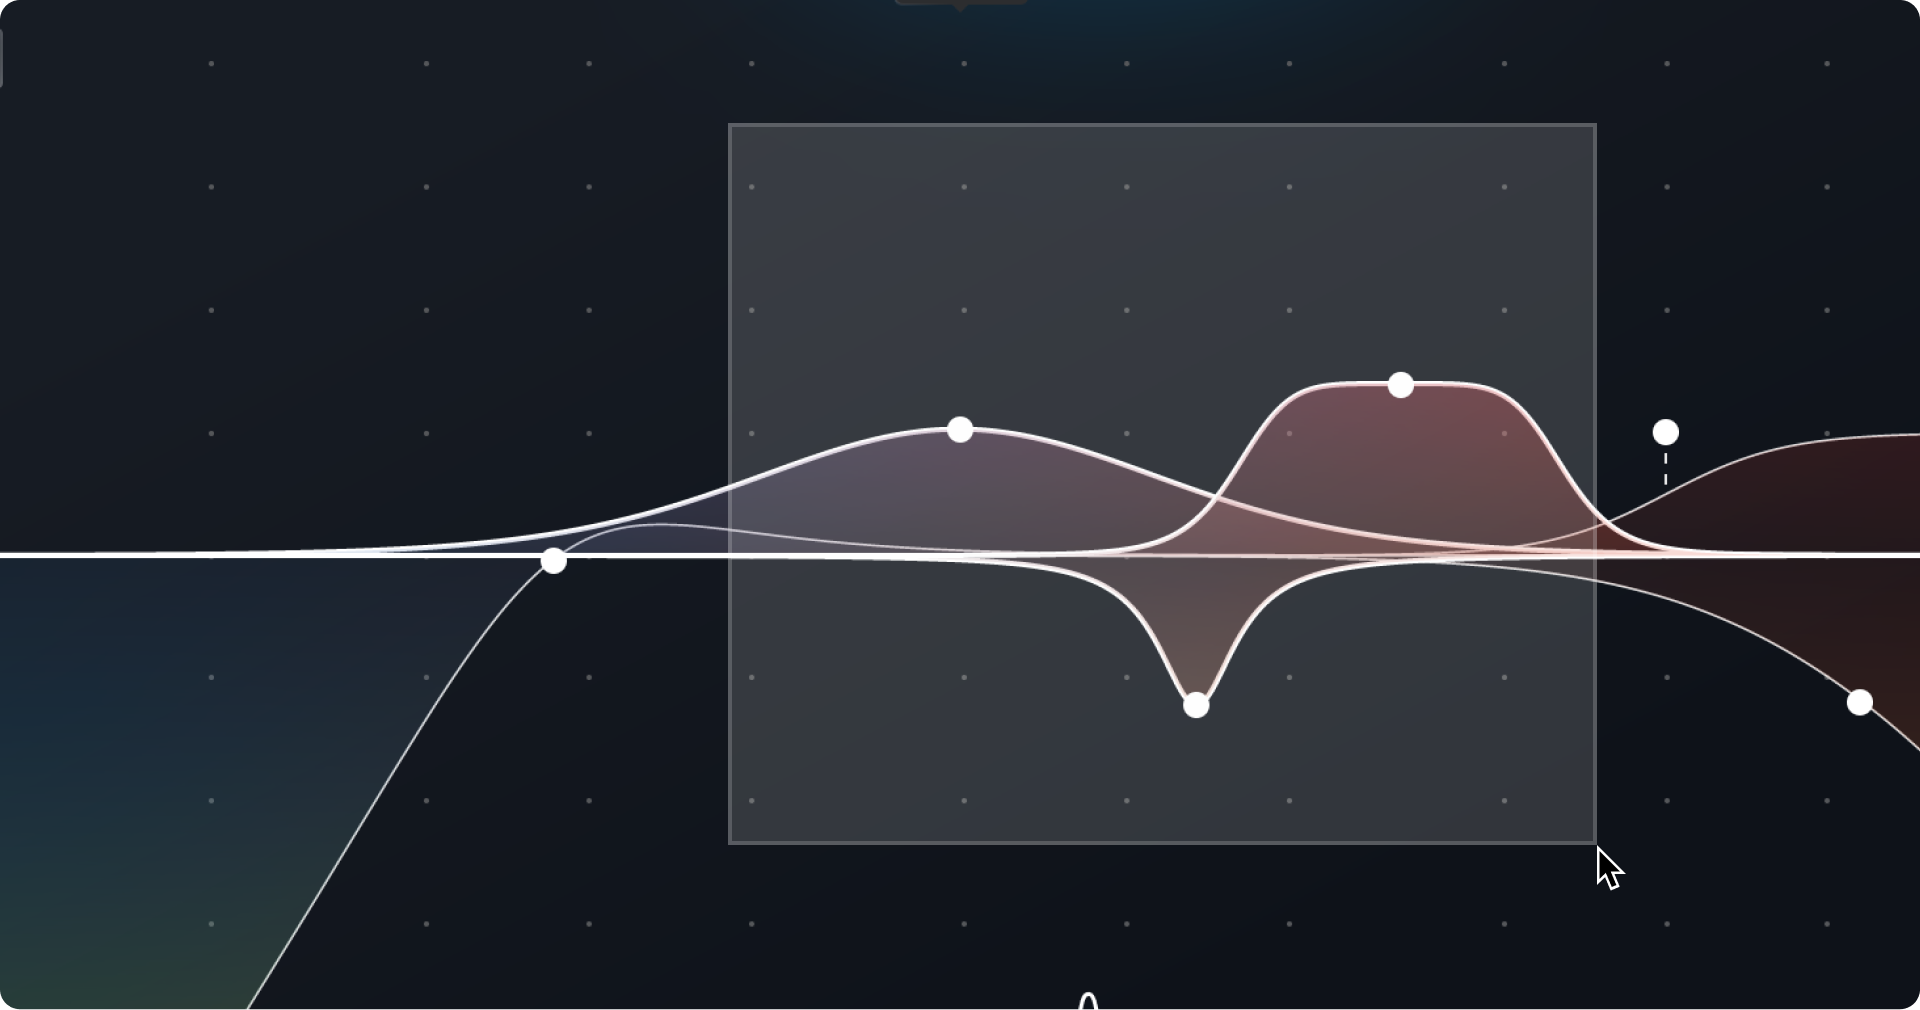
Once selected, clicking and dragging one of the bands will cause all others in the group to move in kind.
When it comes to adjusting the gain—that is, vertical movements—there are two options for this:
-
By simply dragging a band up and down, all bands will move up and down maintaining their relative ratios to one another. For example, if you have three bands with gains of -1dB, +2dB, and +4dB in a group (a ratio of -1:2:4) and drag the +4dB band to +6dB, the -1dB band will now be at -1.5dB and the +2dB band will be at +3dB, thus maintaining the -1:2:4 ratios between them.
-
If you hold SHIFT and drag a Band up and down, all Bands in the group will move up and down by the same value of decibels. For example, if you have three bands with gains of -1dB, +2dB, and +4dB in a group (gaps of 3dB and 2dB) and SHIFT-drag the +4dB band to +6dB, the -1dB band will now be at +1dB and the +2dB band will now be at +4dB, thus maintaining the 3dB and 2dB gaps that originally existed between them.
It is also possible to link bands to form a Linked EQ Group by clicking the Link option in the Band Menu after selecting multiple Bands:
A Linked EQ Group can be adjusted exactly as described above, the main benefit being that you don’t need to re-select the individual Bands each time you want to adjust them in the future. Just click one of the Bands and all others in the Linked EQ Group will automatically be selected.
Linked EQ Groups are saved in sessions and presets.
Analyzer
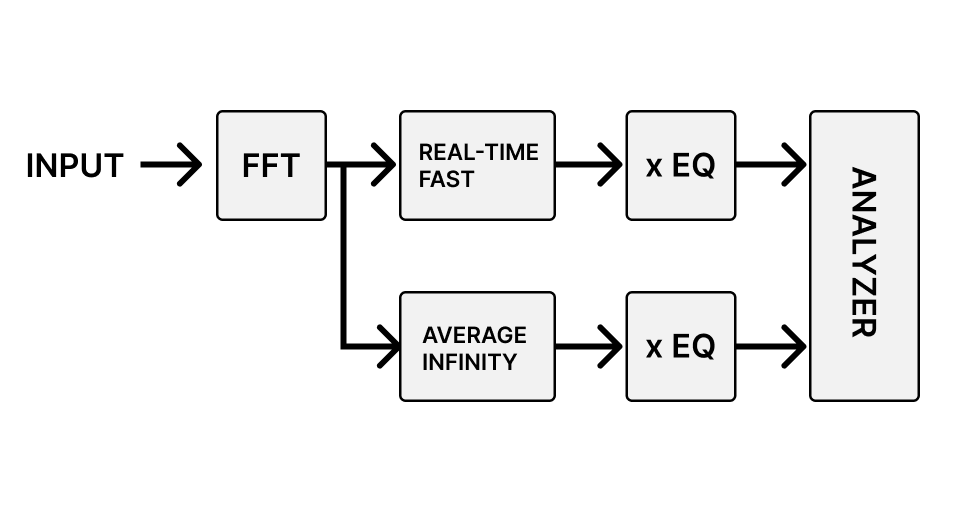
Infinity EQ offers two spectrum analyzers:
- A Real-Time Analyzer to instantly monitor the source’s frequencies.
- An Average Analyzer that is constantly updated to monitor the global frequency response of your source. You can immediately see the effect your static EQ curves have on the sound as you alter the curves.
You can choose which to show or not from the Display settings menu available in the top bar.
Both Analyzers visualize up to half of the session sample rate. For example, if your session is at 44.1kHz, the Analyzers will measure up to 22.05kHz.
Contrary to most of 3rd party analyzers which only monitor the Output, Infinity EQ Analyzer monitors the Input processed by the EQ. This allows the user to directly see on the Average Analyzer the EQ’s effect as FFT smoothing is done before the EQ.
When soloing a specific channel through the Monitoring Options in the output section, both Analyzers are updated accordingly and display what you are currently hearing:

Output Section
Output Meter
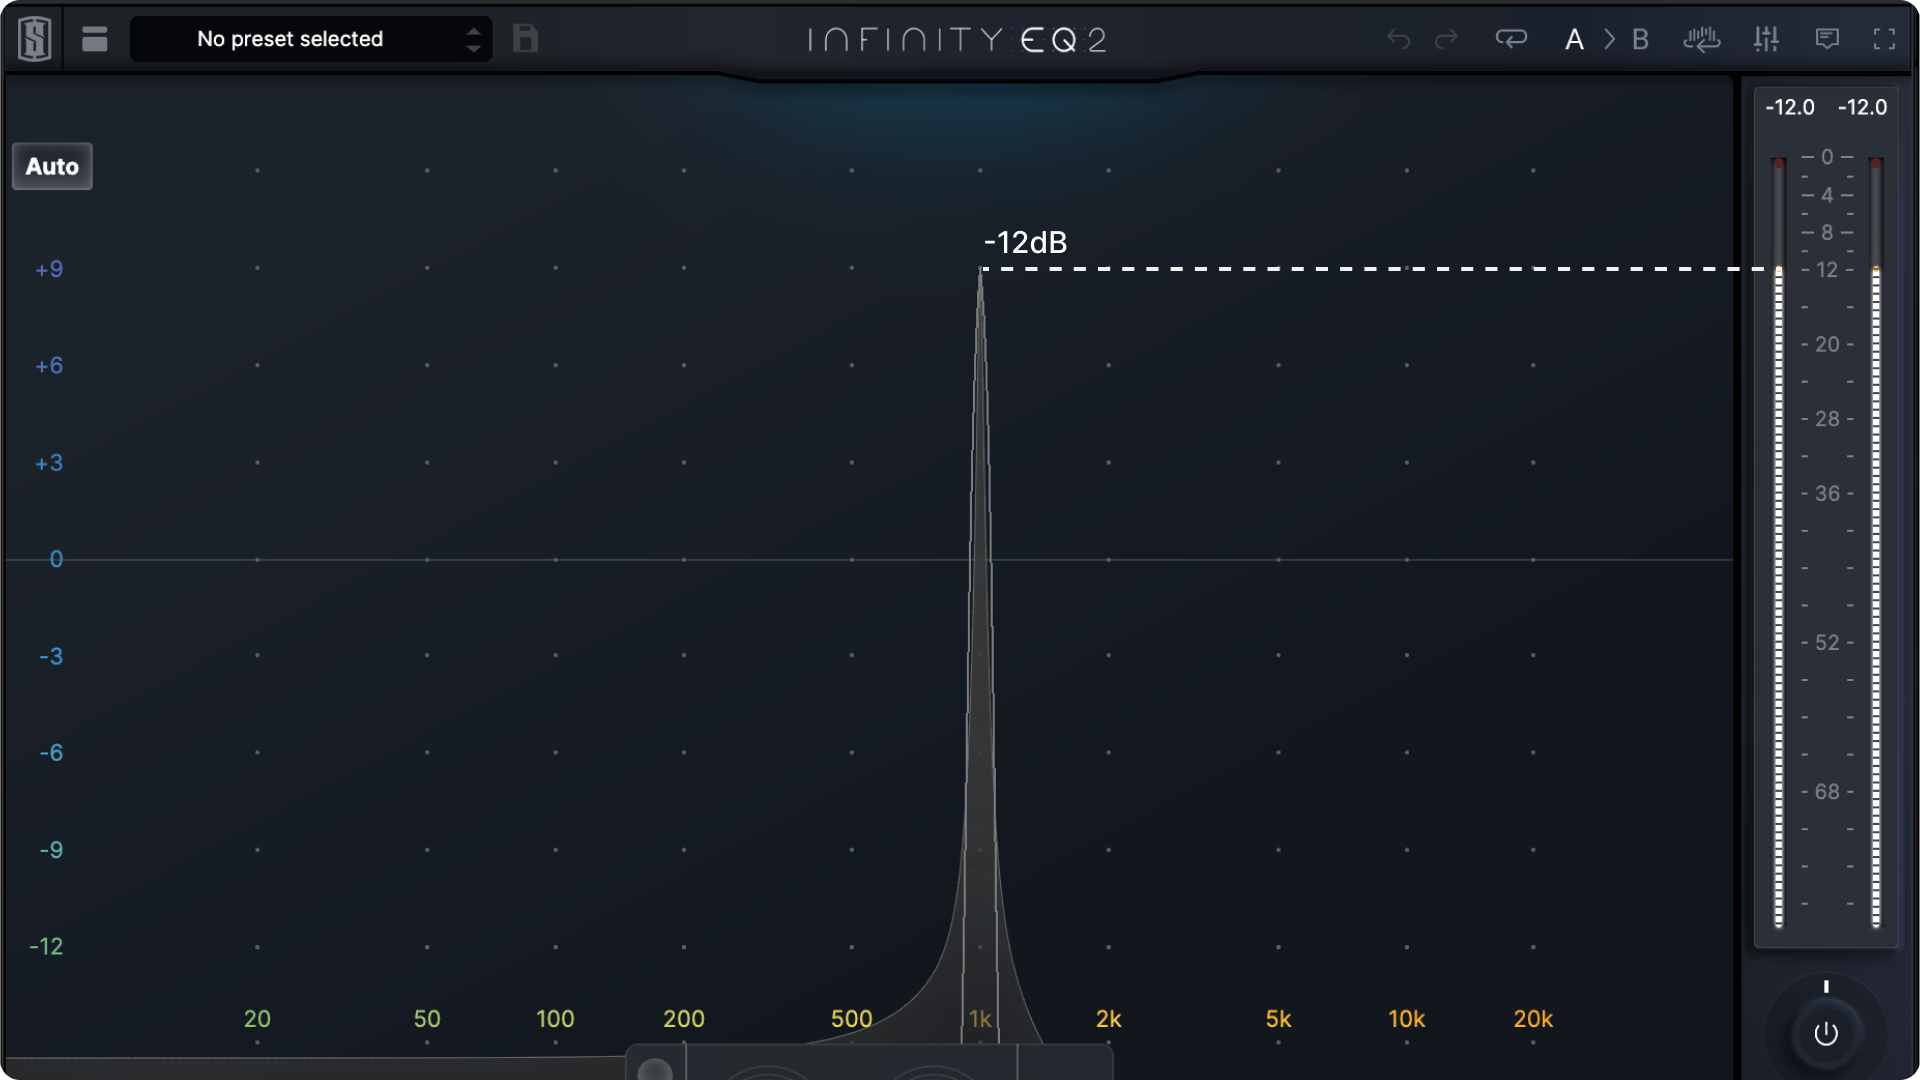
The Output Meter displays the Output Peak Level from -80dBFS to 0dBFS.
The Output Meter scale also corresponds to the Analyzer level, so you can correlate them:
The Clip Indicator displays the highest Output Peak Level value, even if the value exceeds 0dBFS. It can be manually reset by clicking on the value and is automatically reset when soloing a channel.
When soloing a specific channel (L/R/M/S), the Output Meter follows the corresponding channel color.
Output Gain
The Output Gain control allows you to compensate for any volume changes introduced by the EQ. Its operational range is from -36dB to +36dB.
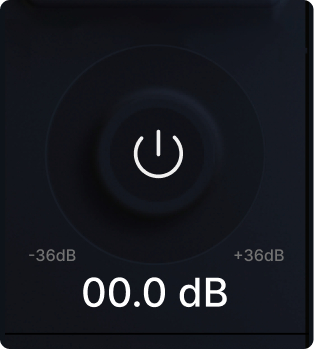
Please note that the control is shared with the global plugin On/Off in the middle of the knob—simply click the center of the knob to toggle the plug-in on and off.
Output Balance, Solo and Processing order
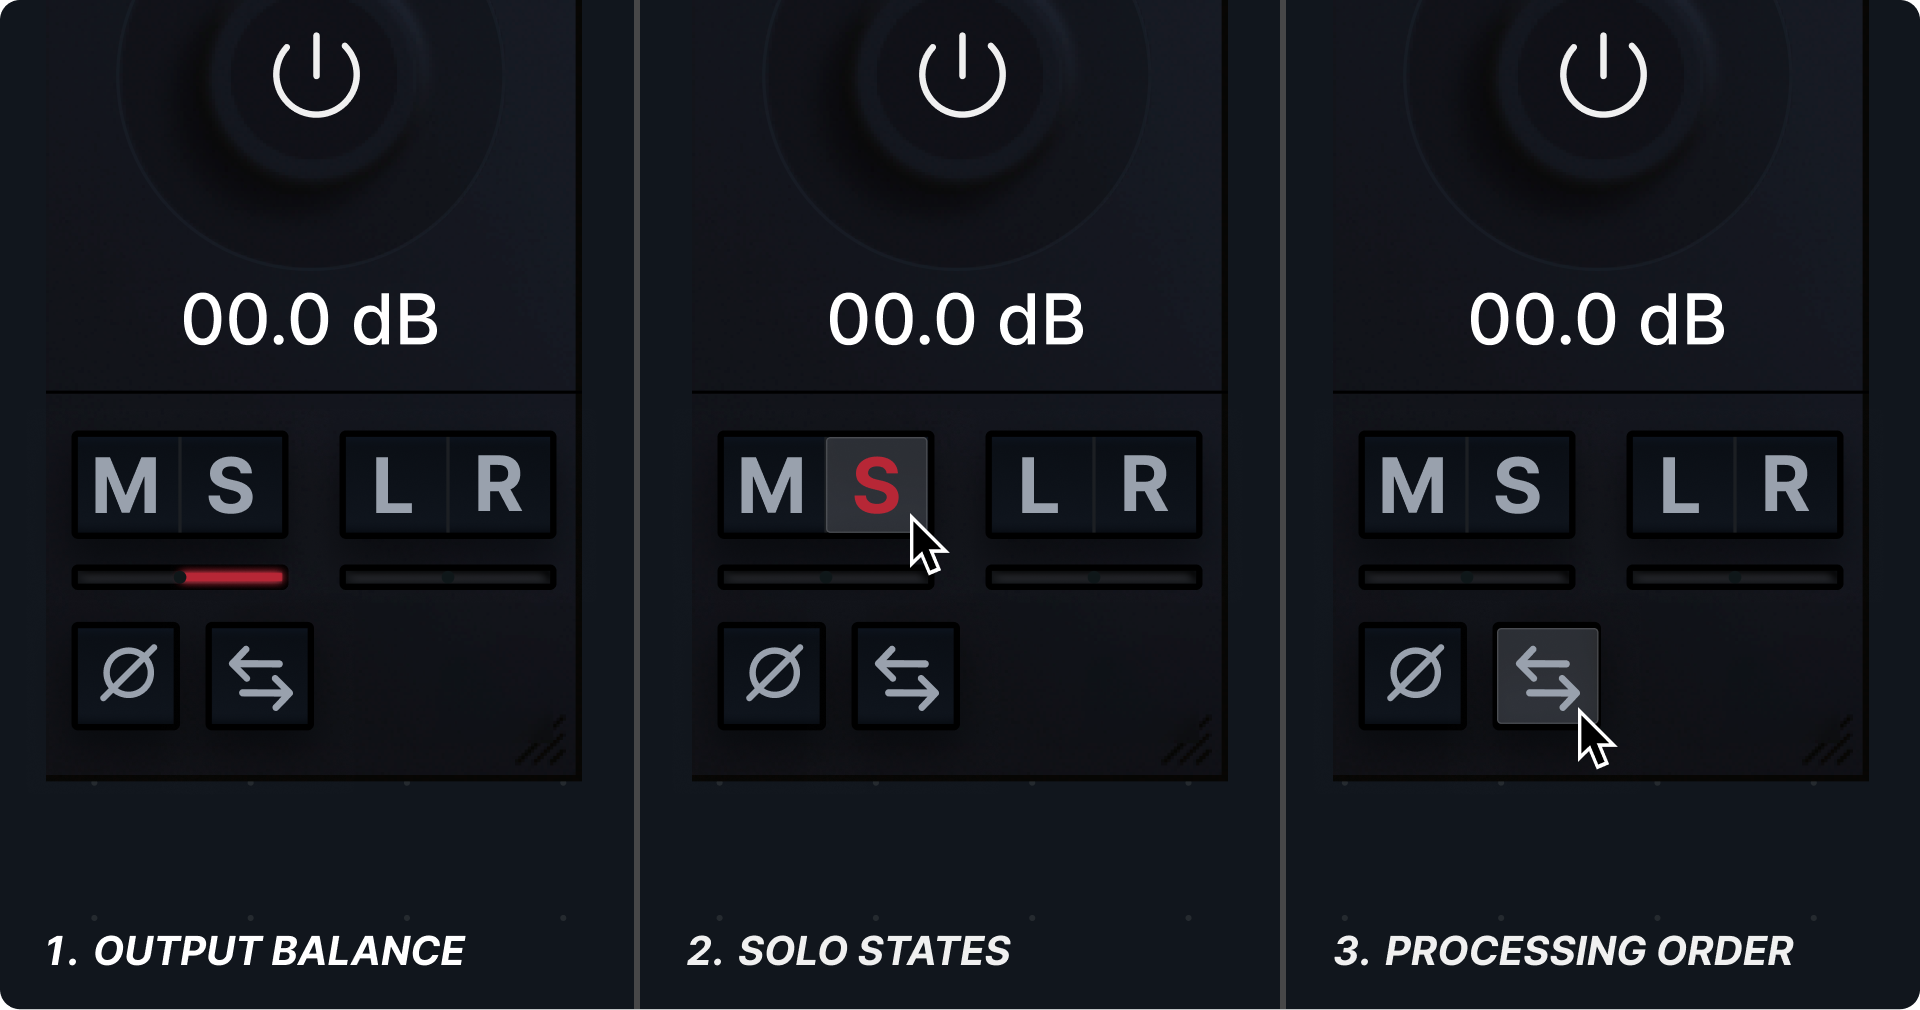
-
Output Balance: As Infinity EQ allows you to process Left/Right and Mid/Side channels independently, some volume variations can be introduced between these channels. To compensate for these variations, you can adjust the L/R and M/S balance sliders.
-
Solo: When adjusting an EQ Band on a specific channel, you may want to isolate this channel to better understand what is currently being adjusted.
By clicking on L, R, M or S buttons, you exclusively listen to the corresponding channel and the Analyzers displays this channel only. Please note that the signal is switched to mono when activating Solo.
- Processing Order: As Infinity EQ allows you to process Left/Right and Mid/Side channels inside the same insert, the question of processing order is mandatory. The plugin can be seen as two inserts: one L/R EQ and one M/S EQ. By default, L/R EQ is first in the chain, but you can invert this order by clicking on the arrow. In this case, M/S EQ will be first.
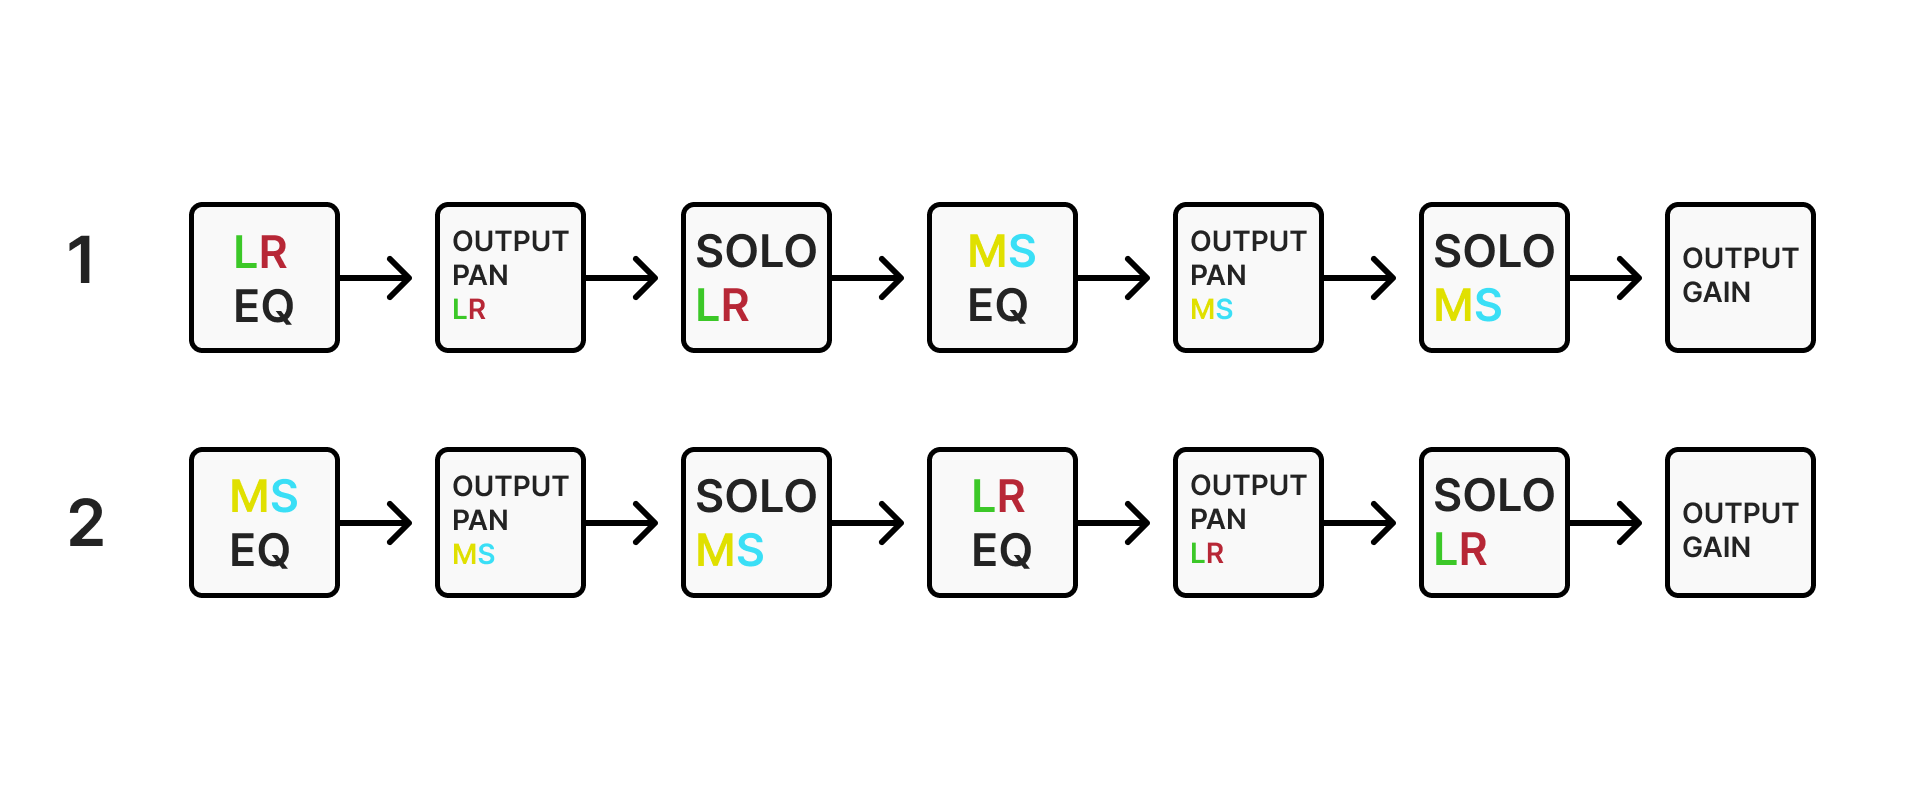
So your question might be, what is my first task?
Do I want to fix L/R issues first and then potentially apply M/S EQ? (1)
Or do I want to fix M/S issues first and then potentially apply L/R EQ? (2)
Depending on this answer, you may want to invert the processing order.
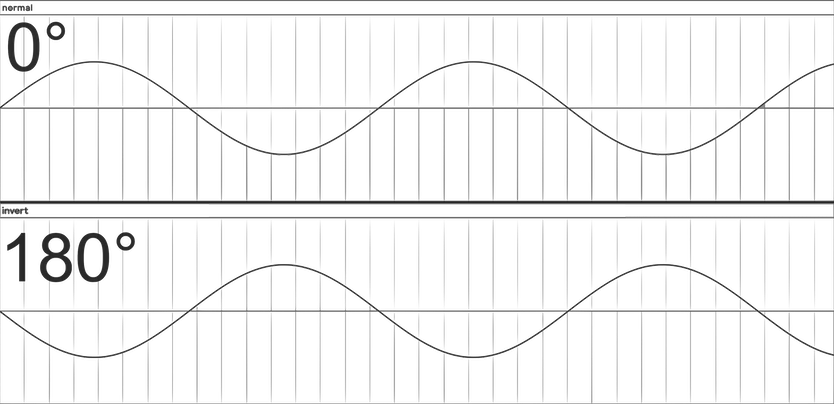
Phase Reverse
Enable the Phase Reverse button to flip the signal polarity by +180°.
Keyboard Shortcuts List
| Feature | macOS | Windows |
|---|---|---|
| Modify Horizontal Slider | Mouse wheel | Mouse wheel |
| Modify Vertical Slider | ⇧ + Mouse Wheel | ⇧ + Mouse Wheel |
| Fine adjustments | ⌘ + Drag Or Right Click + Drag | ⌘ + Drag Or Right Click + Drag |
| Reset value to default | ⌥ + Click Or Double-click | Alt + Click Or Double-click |
| Select all bands | N/A | Ctrl + A |
| Add a band to selection | ⌘ + Click | Ctrl + Click |
| Delete selection | Delete Or Backspace | Delete Or Backspace |
| Drag several points with proportional gain modification | Click & Drag | Click & Drag |
| Drag several points with absolute gain modification | ⇧ + Click & Drag | ⇧ + Click & Drag |
| Exit full screen | Escape | Escape |
| Undo | N/A | Ctrl + Z |
| Redo | N/A | Ctrl + Y |
| Exclusive Gain and Frequency | ⌥ + Drag | Alt + Drag |
| Band Bypass | Double click on Band point | Double click on Band point |