MetaPitch
Introducing MetaPitch, a versatile vocal pitch-shifting plugin crafted for efficiency and ease of use. Tailored for monophonic sound sources such as voices or individual instruments, MetaPitch provides essential controls for Pitch and Formant adjustments within an intuitive interface.
Explore creative possibilities by employing the additional features like Widener, Drive and Filters seamlessly integrated with the Mix control for nuanced audio shaping. The specialized “Robotic” mode adds a subtle Vocoder-like touch, while the low-latency mode ensures real-time responsiveness during live tracking and monitoring.
Finally, MetaPitch enhances your experience with a convenient grouping feature. Assign your MetaPitch instances to Groups—changing one changes them all.
MetaPitch is included in the Complete Access subscription and is also available to users who have purchased a perpetual license through our Shop. You can install the plugin via the Complete Access Hub or by downloading the installer from our installers page.
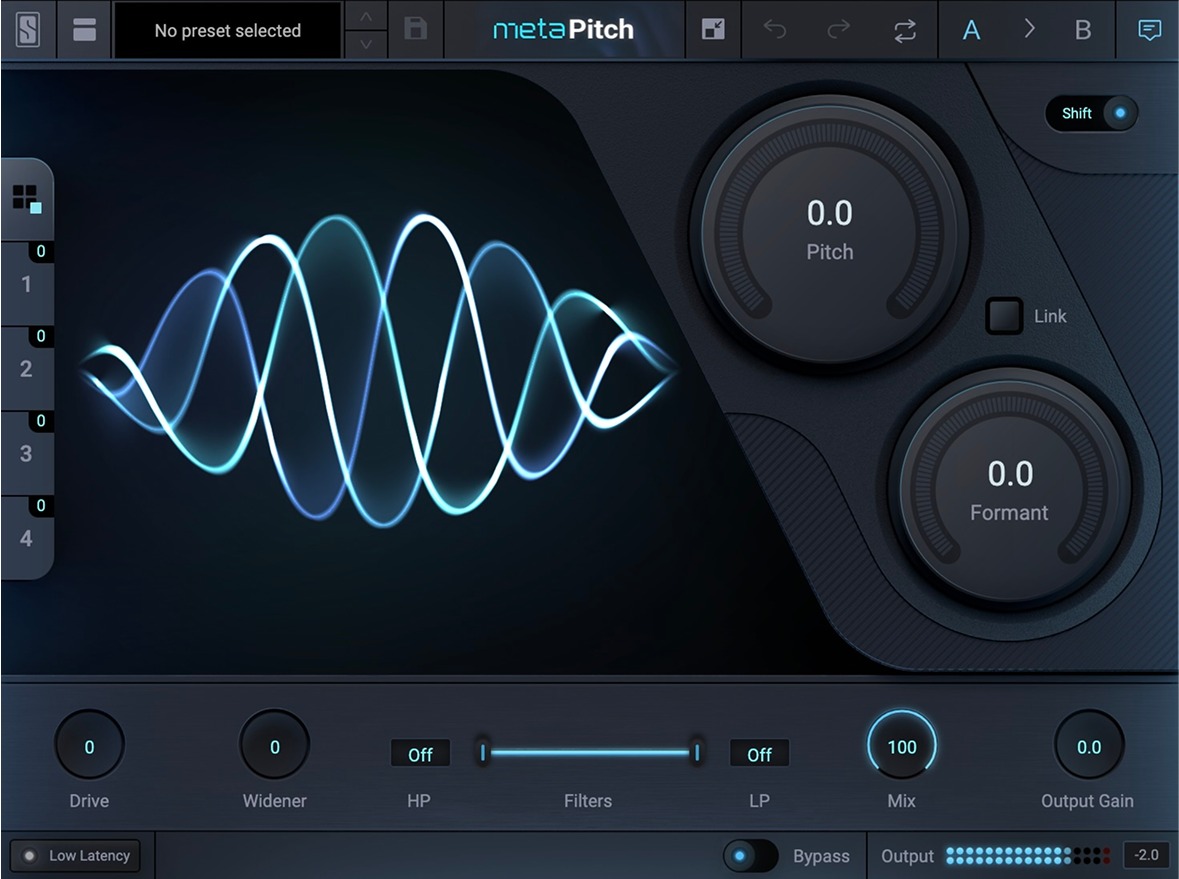
Primary Controls
Pitch and Formant
The Pitch control alters the pitch of the input signal. This control is stepped by default (it goes from 1 semitone to another) and continuous through fine adjustment mode (right-click + drag or cmd/ctrl + drag).
The Formant control alters the tonal character of the input signal by shifting the formants. A deeper explanation of this can be found later in this manual.
The Link button allows you to control Pitch and Formant together. You can also reset both controls at the same time when Link is enabled.
Audio Tips
| Get this effect… | By adjusting the knobs this way… |
|---|---|
| Chipmunk Vocals | Link On, turn up the pitch |
| Cookie-Monster Vocals | Link On, turn down the pitch |
| Parallel 5ths | Link Off, Pitch +7 semitones, mix 50% |
| Star Wars Droids | Robot, Pitch Down, Formant Up |
Modes
Switch between Shift and Robotic modes by clicking the toggle.
In Robotic mode, the audio signal is locked on a fixed pitch.
There are several ways to adjust the Note knob:
- Click and drag the knob to adjust the note and the octave
- Click and drag the note (for example C) to adjust the note without affecting the octave
- Click and drag the octave to adjust it without affecting the note. This allows you to go from a A3 to a A4 for example.
- Click once on the note or the octave to access value triggers
- Play MIDI Notes into MetaPitch
Secondary Controls
- The Drive control adds character and saturation.
- The Widener control lets you expand the stereo width of the signal.
- The High Pass and Low Pass filters shape your tone for quick warmth and clarity adjustments (12dB/oct slope).
- The Mix control adjusts the balance between the wet (processed) signal and the dry (unprocessed) signal.
- The Output Gain control adjusts the output level of the plugin.
Processing Chain

Low Latency
Low Latency mode is suitable for monitoring or live performances. It has been optimised for achieving very low latency at the cost of slightly degrading the pitch and formant shifting quality.
Groups
With MetaPitch, you can set your controls once, then quickly apply these same settings to any other instance of MetaPitch you open. This is a huge time-saver when processing a stack of background vocals, multiple lead lines, or ad libs. This feature behaves exactly like in MetaTune.
There are 2 ways to assign an instance of MetaPitch to a group: using Shortcuts or the Group Browser.
Shortcuts
Click one of the Shortcut buttons on the left.
That’s it! You’ve just assigned your instance of MetaPitch to a group. Now open up more instances of MetaPitch on your other audio tracks & assign them to the same group by clicking the same Shortcut number. As you assign more instances of MetaPitch to a group, the tiny number in the top-right of the Shortcut button will increase to show you the number of instances that belong to each Group.
hey will all inherit the same settings as your original instance, and when you change the settings in any instance, all instances will immediately inherit the changes.
Group Browser
You can also assign an instance to a group using the Group Browser. Click on the Preset & Groups browser bar at the top of MetaPitch and click the tab labeled “Groups”.
You’ll see your plugin instances listed here. Click and drag them into the Group you want to assign them to.
You can also rename the Group to something that makes sense for your track.
Now that you know how to assign an audio track to a Group, let’s take a closer look at how Groups work:
- When a plugin instance is ungrouped (default state), the instance uses its own settings
- When a plugin instance is grouped, then the plugin instance uses the group’s settings
- When a plugin instance joins an empty group, it keeps its settings and applies them to any other plugin instance that joins the group. The plugin keeps its own settings and applies them to the group.
- When a plugin instance joins an existing group that has at least one other instance in it, the new instance inherits the group’s settings.
- Use “Undo” to take a step back & recover your settings if you joined an existing group by mistake.
- When a plugin instance becomes ungrouped, then the instance keeps its settings from the group it just left but becomes independent from the group. Changing a setting will not have any impact on the other plugin instances that belong to the group it just left. It is now independent.
A Word about Automation
Like any plugin, you can automate the controls of MetaPitch in your DAW. The exact method will differ for each DAW.
All members of a Group will follow automation written to any track that belongs to it. For example, if Tracks 1, 2, and 4 all belong to the same Group, their instances of MetaPitch will all follow the automation changes written to any of these tracks.
If you’re not paying attention, you might accidentally try to automate the same control on 2 different tracks. If this happens, the automation in each track will conflict with the other one. Whenever one track sends a change to this parameter, it will override whatever the other track did.
To avoid this, we recommend writing automation changes to one track that belongs to a Group. That way, you can prevent conflicts and easily adjust your automation as necessary.
Two final notes about Groups:
- Currently, MetaPitch supports a maximum of four (4) Groups
- Your Group instances must share the same plugin format. For example, Grouping VST2 instances with VST3 instances won’t work, so be sure to use the same plugin format when Grouping!
‘Large’ and ‘Compact’ Views
MetaPitch includes two different views, Large and Compact, that you can choose depending on your preference and setup by clicking the following icon available in the top bar: ![]()
These two views include the exact same feature set.
With a small monitor or a lot of plugin user interfaces open at the same time, you might be pleased by the Compact view. The Large view might be more appealing to beginners and offer a better use of space.
Keyboard Shortcuts List
| Feature | macOS | Windows |
|---|---|---|
| Modify value | Mouse wheel | Mouse wheel |
| Fine adjustments | ⌘ + Drag Or Right Click + Drag | Ctrl + Drag Or Right Click + Drag |
| Undo | N/A | Ctrl + Z |
| Redo | N/A | Ctrl + Y |
| Adjust the HP and LP Filters together | Shift + Drag | Shift + Drag |
| Enable Automation Dialog (AAX and VST3 Formats only) | Ctrl + ⌥ + ⌘ + Click on parameter | Ctrl + Win + Alt + Click on parameter |
Deep Dive into Pitch and Formants
You’ve probably heard the term “pitch” before and likely associate it with the “note” being sung or played on an instrument. But what makes one voice sound different from another even if they’re both singing the same pitch?
Two voices singing the same pitch will sound different to our ears because each voice has a unique timbre. You can think of timbre as a sound’s “fingerprint”—it’s a collection of numerous properties that give a sound a unique “texture” or “color”. A big contributor to this fingerprint are harmonic overtones. These are additional frequencies created above the fundamental pitch (which is the lowest frequency of the sound) whose frequencies have an established mathematical relationship to the fundamental. Each person generates a unique series of these harmonics when they speak or sing, and the arrangement of those harmonics—their positions in the frequency spectrum and their amplitudes—are part of the sonic fingerprint.
Our heads and bodies have various cavities that resonate when we speak or sing. The bodies of acoustic instruments also resonate at certain frequencies. These resonances effectively amplify certain harmonics in the series, and that pattern of harmonic amplification is another part of what our brains use to identify the speaker or singer.
What’s interesting is that, while we may tighten or loosen our vocal cords to change the pitch at which we speak or sing, the resonant cavities in our bodies remain mostly unchanged when we speak and sing. We can speak or sing a different pitch, which generates new series of harmonic overtones, but the resonances of our bodies remain fixed—it will always be the same overtone frequencies that get amplified via resonances regardless of the fundamental pitch being spoken or sung.
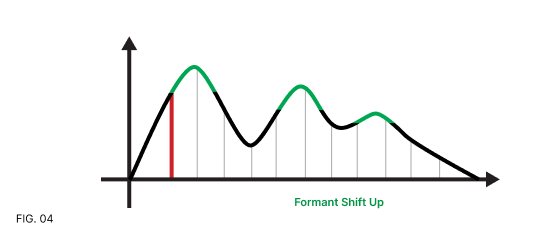
In the image below, we attempt to illustrate the relationship of pitches, harmonics, and formants:
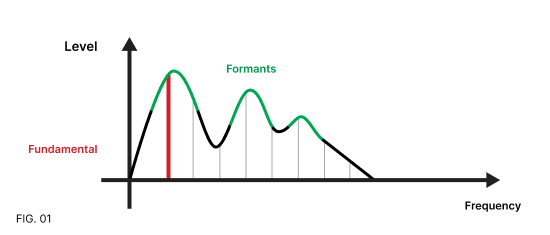
The fundamental frequency being played or sung is represented by the red vertical line at the left side of the graph. The individual grey lines to the right of the fundamental represent various overtone frequencies being generated. Which overtones exist and their spacing from one another is heavily dependent on the singer or instrument.
Above these vertical lines is a sort of “roller coaster” line under which all of the harmonic overtones are kept. The peaks in this line indicate where the various resonances happen in the singer’s or instrument’s body. Harmonics within these peaks will therefore be louder (taller) than harmonics that fall under the troughs (which are therefore shorter).
Therefore, the timbre of a voice or instrument is the combination of the harmonic series created by the singer or instrument along with a “shaping” curve imposed by the physical resonances of the body or instrument.
The critical thing to understand is that the harmonic series will move around while the singer’s or instrument’s pitch changes, but the shape of the formant curve will not move as pitch changes.
A voice or instrument therefore sounds “natural” to us when playing different pitches while respecting the singer’s or instrument’s fixed formant curve. When this anticipated arrangement is broken, your brain starts to judge the resulting sound as being unnatural.
You’ve probably heard this unnatural sound before when speeding up or slowing down the playback of someone speaking or singing. If you’ve ever manipulated the speed of a spinning record while it plays, then you’ve certainly heard this effect. If you increase the playback rate of a recording of someone speaking, they will speak faster, at a higher pitch, and it will also sound like their voice has changed into a cartoon-like “chipmunk” sound. Similarly, if you slow down the playback, they’ll speak more slowly, the pitch will drop, and it will also sound like their voice has changed into a monster from a horror movie. The original speaker will no longer sound like themselves, though you can still understand what they are saying.
The reason for this unnatural change is that, by simply changing the playback rate of the recorded audio, it causes both the pitch and formants to move by the same amount. But as stated earlier, our brains expect the formants to remain fixed even when pitch is changing, otherwise the results sound unnatural.
The image below shows what happens just by speeding up a recording; the fundamental pitch (the red vertical line) moves to the right, the harmonic series also moves to the right and becomes more separated from the others, and the shape of the formant curve “stretches” out to cover a wider area:
What makes a tool like MetaPitch so powerful is that it allows you to adjust the pitch and harmonic series independently from the formant curve. By changing the harmonic series being sung or played while constraining the shape of the series to a fixed formant curve, the results sound more natural to our ears. Intentionally adjusting these things in a way our brains don’t anticipate can be a great source of special effects.
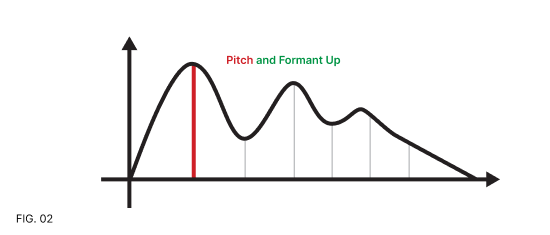
The image below shows what happens if you turn up the pitch while keeping the formants unshifted—the lines below the formant curve move around but the formant curve stays fixed in position:

This will make the pitch go up, but it will still sound like the same person singing at this new pitch.
Alternatively, this is what it looks like if you keep pitch the same and increase the formants—the vertical lines are still in their original locations so the pitch doesn’t change, but the formant curve stretches out causing those vertical harmonics to take on new heights. The result is that the singer’s voice will appear to change even though the pitch hasn’t changed. A male singer can be made to sound more female by shifting the formants up while a female singer can be made to sound more male by shifting the formats down—all while still singing exactly the same pitch:
If you link Pitch and Format together, the effect of MetaPitch will be like that of speeding up or slowing down a record—the pitch and formants will change (though the tempo will not). If you want to showcase that sort of sound, then enable the Link button in MetaPitch.
But if you want to change only pitches while keeping the singer or instrument sounding natural, then turn Link off and just adjust the Pitch knob.
Conversely, if you want to keep the pitches the same but alter the character or color of a voice or instrument, then leave Link off and just adjust the Formant knob.