MetaTune
Welcome to MetaTune!
MetaTune is an audio processor that lets you correct the pitch of an incoming signal either in real time or after you’ve captured your recording. MetaTune is built for monophonic sound sources, like a voice or instrument playing one pitch at a time. (Using the Groups feature, however, you can turn on multiple instances of MetaTune in your DAW. More on that later.)
MetaTune is included in the Complete Access subscription and is also available to users who have purchased a perpetual license through our Shop. You can install the plugin via the Complete Access Hub or by downloading the installer from our installers page.
Quick Start
If you’re already familiar with automatic tuning software, you’ll be amazed at how fast you’ll be up & running with MetaTune.
Load MetaTune as an insert effect on your audio track:
Select the key you want your audio to tune to from the Scale Display on the left.
Then play your track, adjusting the Speed and Amount knobs to get the sound you want:
99% of the time, this will give you the sound you’re looking for.
But don’t stop there! MetaTune has features that make it truly unique among tuning plugins. Once you learn how to integrate them into your workflow, you’ll be able to quickly build performances that knock harder & perfectly nail the tuning effect heard on award-winning records. Ready to dive in?
Finding and setting your Key
Start by setting your target key. This is the target you want the notes in your audio signal to be corrected to.
There are two ways to do it:
Through the Chord selector above the Keyboard:

Click on Major if you want to set a Major Key or Minor to set a Minor key. Then select your key by clicking the Piano Key you want on the Keyboard.
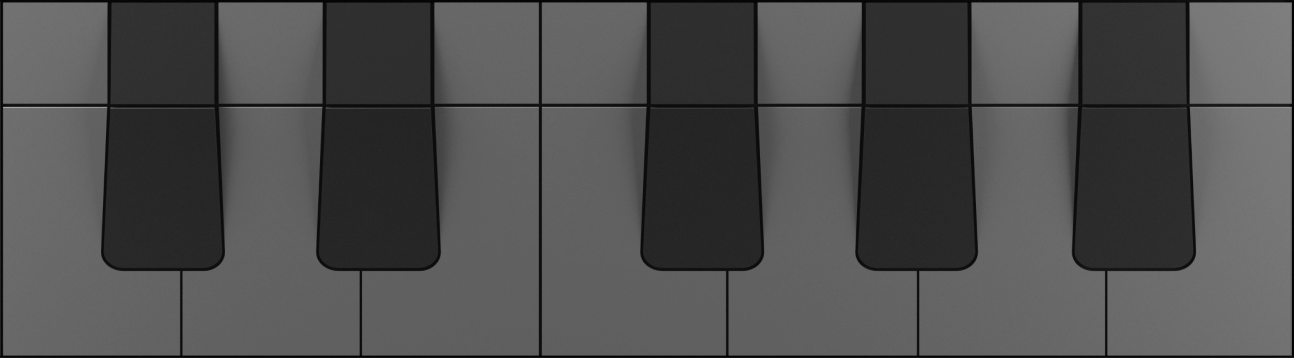
Be sure to click on the “black key” or “white key” you want, not the gray area above it which displays the letter name of each note:
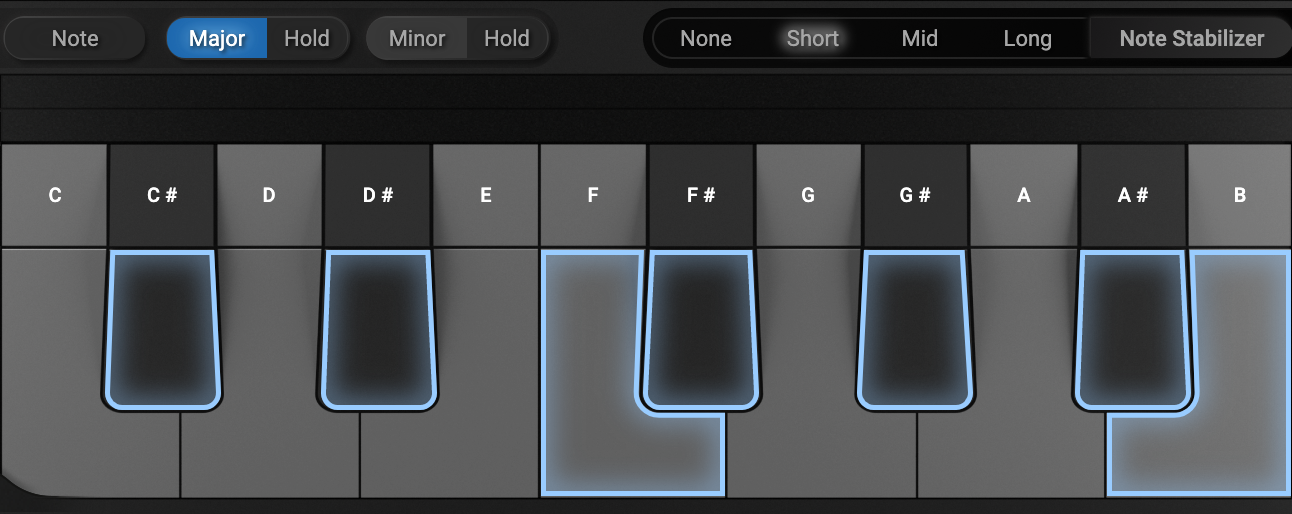
That’s it! You just selected a Major or Minor key for your audio signal. (After you select your key, the Chord Selector automatically switches back to Note, which lets you activate or deactivate individual notes from the key you just selected. This is great if you only want your audio to only tune to specific notes in a key.)
Not sure which key you need?
No problem. MetaTune has 3 different ways that make it easy to find your target key:
-
Play your audio back. While it’s playing, click on the letter names of the different keys—you’ll hear a simple tone for each to help you find your root note.
Then just select your Major or Minor key using the method above.
-
You can try applying different keys to your audio source by selecting the Hold button next to Major or Minor:
Play your audio back, and click on different piano keys until your audio fits the key of your song. When you’ve found your key, click Hold once more to deactivate it.

-
You can see which notes MetaTune is detecting in your source audio with the Detected Notes indicator.
When MetaTune adds a white line above notes in the Keyboard, that means it’s finding those notes in your original audio. If you know your musical scales, you can quickly identify your target key with this information.

If you already know the key of your song, you can set it with the Key / Scale selector menu on the left of the Keyboard:
- Hover the Scale display to open the menu
- Choose your Root Note
- Choose your Scale
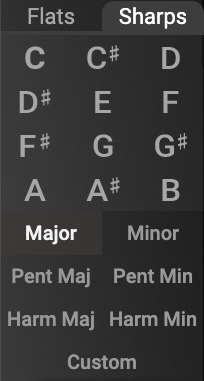
The Scale display will now show the scale you selected.
You can also change or transpose your Scale from one Key to another using this menu.
Tone
We added a simple tone generator to help you quickly find your key. Click on the letter name above any key while your audio source is playing back to hear a simple tone matching the pitch of that note.

Note that in Logic Pro X and GarageBand your audio must be playing for the Tone Generator to play a sound.
You can set the volume level of the tone with the Tone Volume control.
Chromatic toggle
The Chromatic button lets you compare the Scale you selected against a Chromatic scale, or all notes on the Keyboard:
Clicking on this button will make your audio correct to the closest note anywhere on the Keyboard. Click it again and MetaTune will return to the Scale you previously selected.
Chromatic toggle can help you hear the notes your original audio source is actually closest to.
Learning the controls
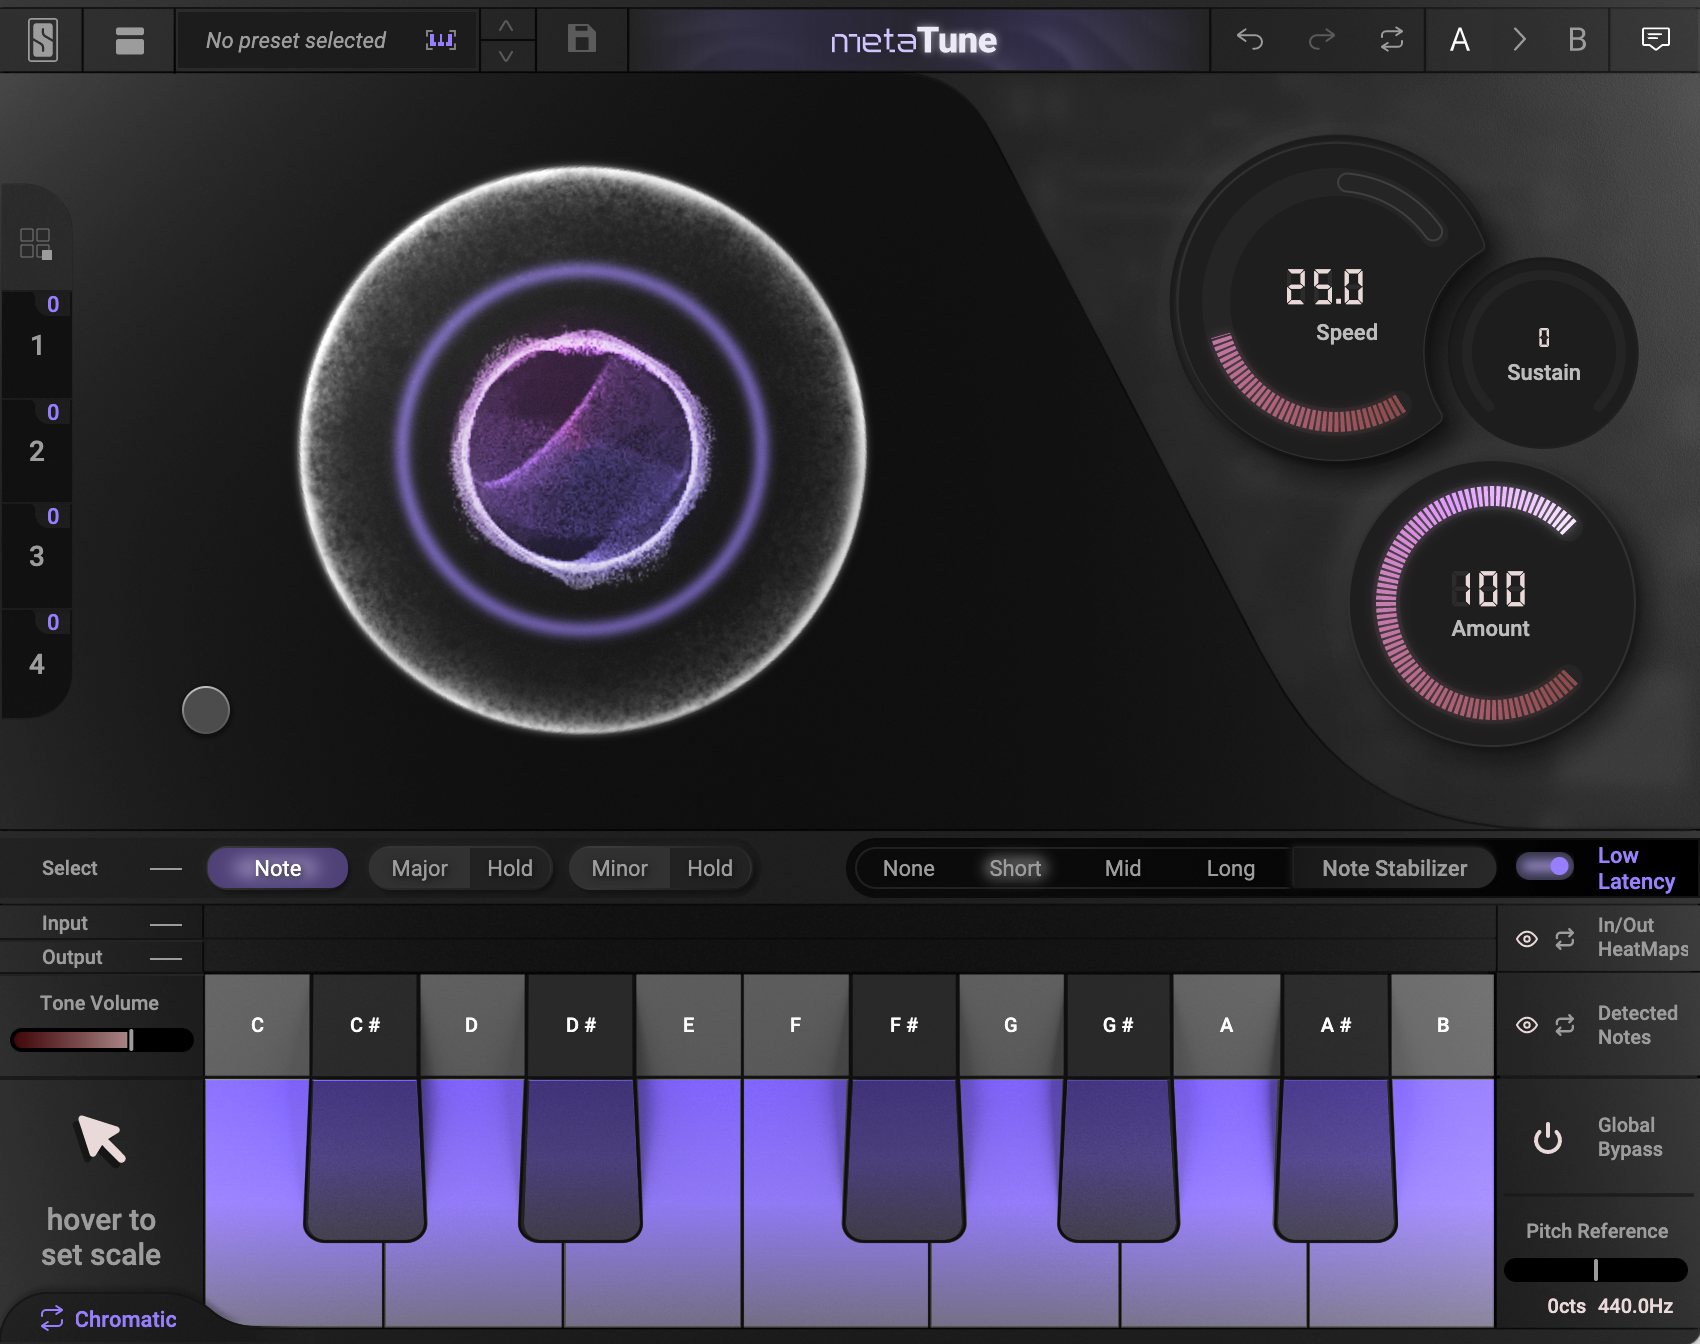
We designed MetaTune to be easy for producers, engineers, and recording musicians alike. To unlock the power of MetaTune, it’s important to understand its 4 main controls— Speed, Amount, Sustain and Note Stabilizer.
Speed
The Speed knob controls how fast pitch correction is applied to your audio, measured in milliseconds:
| This Speed setting… | …creates this effect |
|---|---|
| 200ms to 20ms | A natural pitch correction that isn’t necessarily meant to be noticed |
| 20ms to 0ms | The famous robotic vocal tuning effect heard on countless recordings |
| 0ms to -3ms | An even harder tuning effect beyond what’s available in any other tuning plugin. When used with Note Stabilizer (below), you’ll get a very hard tuning effect without fluttering during note changes |
You can either set the Speed from the main dial, or by clicking and dragging directly on the inner Orb.
Amount
Controls the strength of the pitch correction.
At 0% the pitch is not corrected at all. At 100%, the pitch is always fully corrected to the target note.
Setting the Amount to 80% will allow some tolerance in pitch correction to get a more transparent, natural result.
You can either set the Amount from the main Amount dial, or by clicking and dragging the outermost sphere of the Orb.
Sustain
Sustain increases or reduces the retune Speed based on how long a note is held. The amount of Sustain is shown on the Sustain control as well as the smaller gauge around the speed knob.
Note that the Sustain gauge around the Speed control moves as your audio is playing, and the exact Speed being applied is displayed on the Speed dial. This shows you in real time just how much Speed is being applied to your audio. Increasing Sustain makes your held notes retune faster, creating more vocal nuances and retuning effects.
You can also set Sustain to negative values, which makes your held notes retune slower. This can be useful for preventing retuning on longer-held notes.
| This Sustain setting… | …makes held notes retune |
|---|---|
| Positive | Faster |
| Negative | Slower |
Positive Sustain
Set the Sustain to positive values to get smooth note transitions while maintaining a stable pitch on long notes.
In this example, the Speed parameter goes from 60 ms to a faster speed of 10 ms when a note is held.
Negative Sustain
Set the Sustain to negative values to get the hard tuning effect while preserving the singer’s vibrato.
In this example, the Speed parameter goes from 2.0 ms to to a slower speed 25.0 ms when a note is held.
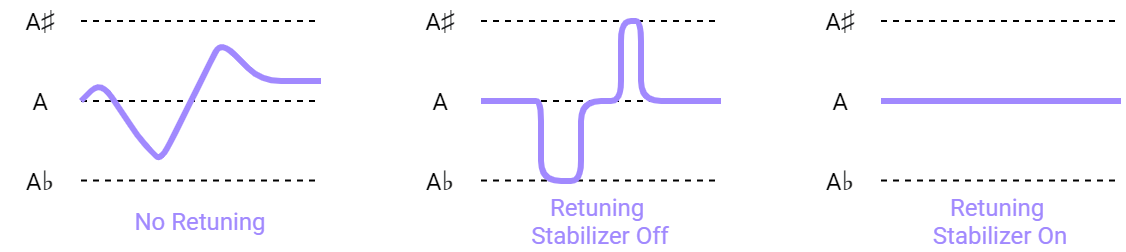
Note Stabilizer
If you’ve used automatic tuners before, you’ve probably encountered the dreaded “flutter” effect. It happens when you’re retuning at fast speeds to get that tight, modern vocal effect, but your tuner keeps overcorrecting your performance, tuning your audio to short notes you don’t want to hear. Fluttering happens for many reasons, including:
- Wide vibrato
- Small pitch variations between notes
- Running out of breath toward the end of a note (causing small pitch changes)
MetaTune solves fluttering with an innovative new feature called Note Stabilizer.

Note Stabilizer ignores the short notes (despite your Speed setting) and focuses on your longer notes instead:
| Note Stabilizer setting | Ignores notes shorter than |
|---|---|
| Short | 40 ms |
| Mid | 80 ms |
| Long | 200 ms |
Let’s say you turn your speed down to 10 ms for a tight, modern production. During playback, you hear unwanted fluttering happening on your singer’s short notes. If you turn Note Stabilizer on and select the Short setting, MetaTune will ignore notes shorter than 40 ms and only correct the longer ones:
The unwanted fluttering is gone.
To do this in other pitch correctors you would need a graphic editor to go through your audio note-by-note—a tedious business. Thanks to Note Stabilizer, MetaTune fixes these problems automatically.
Hip-Hop artists and rappers can produce incredible new creative effects with Note Stabilizer. Start with Note Stabilizer set to “Long” and see how MetaTune can transform your original performance by bringing out new variations & nuances.
Note that Note Stabilizer introduces 280 ms of latency & is therefore disabled if you select “Low Latency” (more below)
A word about Latency
MetaTune features a highly efficient Low Latency tuning algorithm that is great for tracking and live monitoring.
As mentioned, Note Stabilizer introduces a degree of latency. That’s why it is disabled when “Low Latency” is on. No other feature in MetaTune adds latency to your audio, so if you’re not using Note Stabilizer, we encourage you to set Low Latency to On.
Using the Keyboard
The Keyboard is made of two parts, the Tone Generator and the Piano Keys below it:
Tone Generator
The Tone Generator lets you play any of the following:
- single note
- major chord
- minor chord
Note that in Logic Pro X and GarageBand your audio must be playing for the Tone Generator to play a sound.
To play a single note, just click one of the note names. To play a major or minor chord, select Major or Minor then click a note name.
You can adjust the Tone Generator volume with the control on the left.
Piano Keys
You can click on one of the Piano Keys when setting your key as described above in “Finding and setting your key”. You can also select and deselect individual notes from your selected key by clicking the Piano Keys when the “Note” indicator is active:
Detected Notes & HeatMaps
MetaTune makes it easy for you to see the notes of your original audio source as well as the new notes they have been corrected to.
Detected Notes
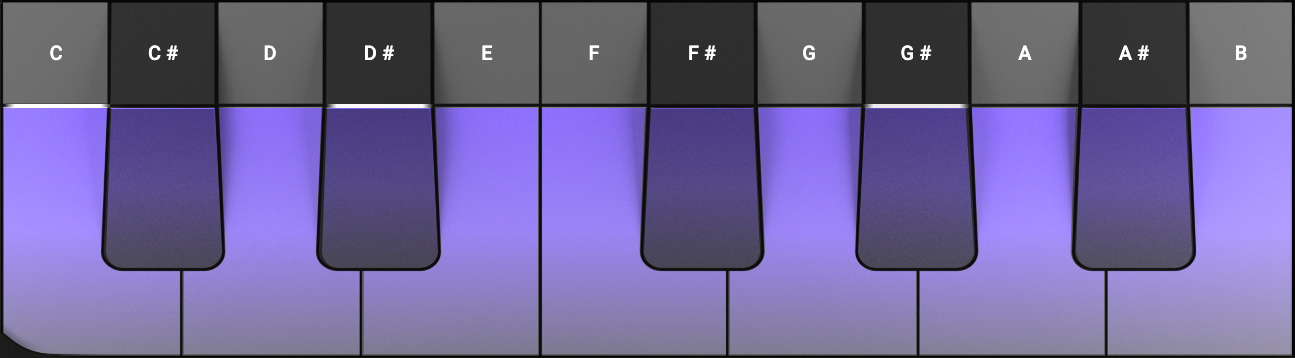
As your audio plays, MetaTune places white lines above the Piano Keys that most closely match the notes of your source audio. For example, after playing through an audio segment where the singer frequently hit the notes C, D# and G# MetaTune would look something like this:
This can help you identify the key and/or notes to correct your audio to. Detected Notes shows you the final output of your audio after MetaTune has processed it. If you want to see what notes are most commonly occurring in your source audio, use the Chromatic toggle feature described above.
To disable Detected Notes, click on the eye symbol over on the right. Clicking it again will re-enable Detected Notes.
HeatMaps
HeatMaps are a powerful way to see both the incoming pitch of your source audio, and also the corrected pitch produced by MetaTune.

HeatMaps are located directly above the Tone Generator section of the Keyboard.
-
The Input HeatMap shows the average pitch of the original, uncorrected notes
-
The Output HeatMap shows the average pitch of the new, corrected notes
Whereas Detected Notes shows you the final keyboard note of your processed audio, HeatMaps show you the precise pitch of your original audio and your processed audio. With HeatMaps, you can see not only that a singer hit a high D note, but exactly where in that D note they landed.
Taken together, Detected Note and HeatMaps give you powerful new ways to visualize pitch.
You can disable HeatMaps by clicking the eye symbol over on the right. Clicking it again will re-enable HeatMaps.
Pitch Reference
By default, MetaTune uses a standard concert pitch of A440. You can change this to any other reference pitch you like to pitch correct sources that have a different tuning, such as A432.
Values can be entered as a pitch deviation (in cents) or as a frequency (in Hz), with a maximum of one semitone in either direction.
Next level stuff
Now that you’ve learned the basics, it’s time to check out two of MetaTune’s most exciting features: the Doubler and Grouping.
Doubler
The Doubler replicates your corrected, tuned audio into two new voices, creating an ultra-realistic doubled effect that adds thickness and width to your vocals.
The Width parameter opens up the stereo field. At 100%, the two added voices are totally on the Left and on the Right.
The relative levels of the wet & dry signal can be changed using the Wet / Dry slider.
| At this setting… | …you’ll hear this |
|---|---|
| 0% | Only your original signal (C) |
| 50% | All 3 voices at the same volume (L, C and R) |
| 100% | Only the 2 new voices (L and R) |
Set the Width and Dry / Wet Doubler value by pulling the Doubler Dot from the button-left part of MetaTune.
Dragging it horizontally increases the Width of the Doubler effect, while dragging it vertically increases the amount of Doubler present in your mix.
Groups
How many times have you had to open up multiple instances of your tuning plugin and set them to the same values?
No more.
Because with MetaTune you can set your controls once, then quickly apply these same settings to any other instance of MetaTune you open. This is a huge time-saver when processing a stack of background vocals, multiple lead lines, or ad libs.
There are 2 ways to assign an instance of MetaTune to a group: using Shortcuts or the Group Browser.
Shortcuts
Click one of the Shortcut buttons on the left.
That’s it—you’ve just assigned your instance of MetaTune to a group. Now open up more instances of MetaTune on your other audio tracks & assign them to the same group by clicking the same Shortcut number. As you assign more instances of MetaTune to a group, the tiny number in the top-right of the Shortcut button will increase to show you the number of instances that belong to each Group.
They will all inherit the same settings as your original instance, and when you change the settings in any instance, all instances will immediately inherit the changes.
Group Browser
You can also assign an instance to a group using the Group Browser. Click on the Preset & Groups browser bar at the top of MetaTune and click the tab labeled “Groups”.
You’ll see your plugin instances listed here. Click and drag them into the Group you want to assign them to.
You can also rename the Group to something that makes sense for your track.
Now that you know how to assign an audio track to a Group, let’s take a closer look at how Groups work:
- When a plugin instance is ungrouped (default state), the instance uses its own settings
- When a plugin instance is grouped, then the plugin instance uses the group’s settings
- When a plugin instance joins an empty group, it keeps its settings and applies them to any other plugin instance that * joins the group. The plugin keeps its own settings, and applies them to the group.
- When a plugin instance joins an existing group that has at least one other instance in it, the new instance inherits the group’s settings.
- Use “Undo” to take a step back & recover your settings if you joined an existing group by mistake.
- When a plugin instance becomes ungrouped, then the instance keeps its settings from the group it just left but becomes * independent from the group. Changing a setting will not have any impact on the other plugin instances that belong to the * group it just left. It is now independent.
A word about Automation
Like any plugin, you can automate the controls of MetaTune in your DAW. (The exact way will differ for each DAW.)
All members of a Group will follow automation written to any track that belongs to it. For example, if Tracks 1, 2, and 4 all belong to the same Group, their instances of MetaTune will all follow the automation changes written to any of these tracks.
If you’re not paying attention, you might accidentally try to automate the same control on 2 different tracks.
If this happens, the automation in each track will conflict with the other one. Whenever one track sends a change to this parameter, it will override whatever the other track did.
To prevent this, we recommend writing automation changes to one track that belongs to a Group. That way, you can prevent conflicts and easily adjust your automation as necessary.
Two final notes about Groups:
- At present, MetaTune supports a maximum of 4 Groups
- Your Group instances must share the same plugin format. For example, Grouping VST2 instances with VST3 instances won’t work, so be sure to use the same plugin format when Grouping!
Using the Preset Browser
By default, the Preset Browser is hidden. Use the “Show/Hide Presets & Groups” button to open it & make sure that you’re on the Preset tab.
If the name you give your Preset is long, you can increase the size of the Preset Browser by clicking & dragging on the right side.
Create a Preset
There are two ways to create a Preset:
- The “New preset…” button. In this case a Preset is created in the root folder.
- Hovering over Preset Folder and clicking on the “+” icon. In this case a Preset is created inside the hovered folder.
Modify a Preset
To modify a Preset, use the Save button in the Top Bar.
Please note that only User Presets are editable and can be overwritten. Factory Presets (indicated with a lock icon) cannot be overwritten but you can edit & save them as new User Presets.
Create a Folder
To create a Folder, use the “New folder…” button.
Move a Preset
Presets are sorted alphabetically inside a Folder, but a Preset can be moved to another Folder via drag and drop.
Delete a Preset Folder
To delete a Preset or Folder, hover over the item you want to delete & click the Trash button.
Keep My Scale
Presets include scales. Use the Keep My Scale feature if you don’t want to lose your modified scales when loading presets.
Note Stabilizer / Low Latency
Remember, Note Stabilizer is a great way to prevent MetaTune from retuning to short, passing notes in your performance. Turning Note Stabilizer on takes MetaTune out of its default, low latency mode and adds 280 ms of latency.
Latency isn’t changed when loading presets. Set Note Stabilizer to None if the feature isn’t required in your preset. Also, the setting None allows you to compare Note Stabilizer without any latency change during playback.
What the Top Bar does

| Widget | What it does |
|---|---|
| Slate Digital Logo | Opens the About Panel with additional links to User Guide, Welcome Tour and Online Support. |
| Show/Hide Presets & Groups | Toggle Browser display. |
| Current Preset | Display the current loaded Preset. |
| Keep My Scale | When active, your selected Scale is kept when switching between presets. When inactive, the Scale from the preset is loaded. |
| Save Preset | Use this button to save/override the current loaded Preset. |
| Undo/Redo | Cancel or restore any last actions inside the plugin. Limited to last 20 actions. |
| Reset All | Reset every parameter. |
| A/B Snapshots | Toggle Browser Two slots to easily compare different settings. The plugin is always operating on one of the two Snapshots, A or B, the current Snapshot being highlighted. Clicking on the arrow between A/B will copy the current Snapshot to the other. |
| Show/Hide Tooltips | Toggle Tooltips display. |
Keyboard Shortcuts List
| Feature | macOS | Windows |
|---|---|---|
| Modify value | Mouse wheel | Mouse wheel |
| Fine adjustments | ⌘ + Drag Or Right Click + Drag | Ctrl + Drag Or Right Click + Drag |
| Reset value to default | ⌥ + Click Or Double Click | Alt + Click Or Double Click |
| Edit values | Double Click then Enter | Double Click then Enter |
| Undo | N/A | Ctrl + Z |
| Redo | N/A | Ctrl + Y |
| Lock onto one axis when dragging Doubler dot | ⌥ + Drag | Alt + Drag |
| Enable Automation Dialog (AAX and VST3 Formats only) | Ctrl + ⌥ + ⌘ + Click on parameter | Ctrl + Win + Alt + Click on parameter |