Rotary SD-147
Introduction
The Rotary SD-147 recreates the sounds and behaviors of a classic rotary speaker and gives you full control over its performance and how its sound is captured.
If you just want to get started quickly, just load the plug-in onto a track and start playing with the speed switch—Slow/Stop/Fast—to immediately give your sound that characteristic rotary speaker quality. The position of the speed switch will be recorded as automation in your DAW, allowing you to choose exactly when speed changes should occur in the song, capturing it exactly as you perform it.
But Rotary SD-147 allows you to go extremely deep as detailed in the sections below.
Cabinet Configuration
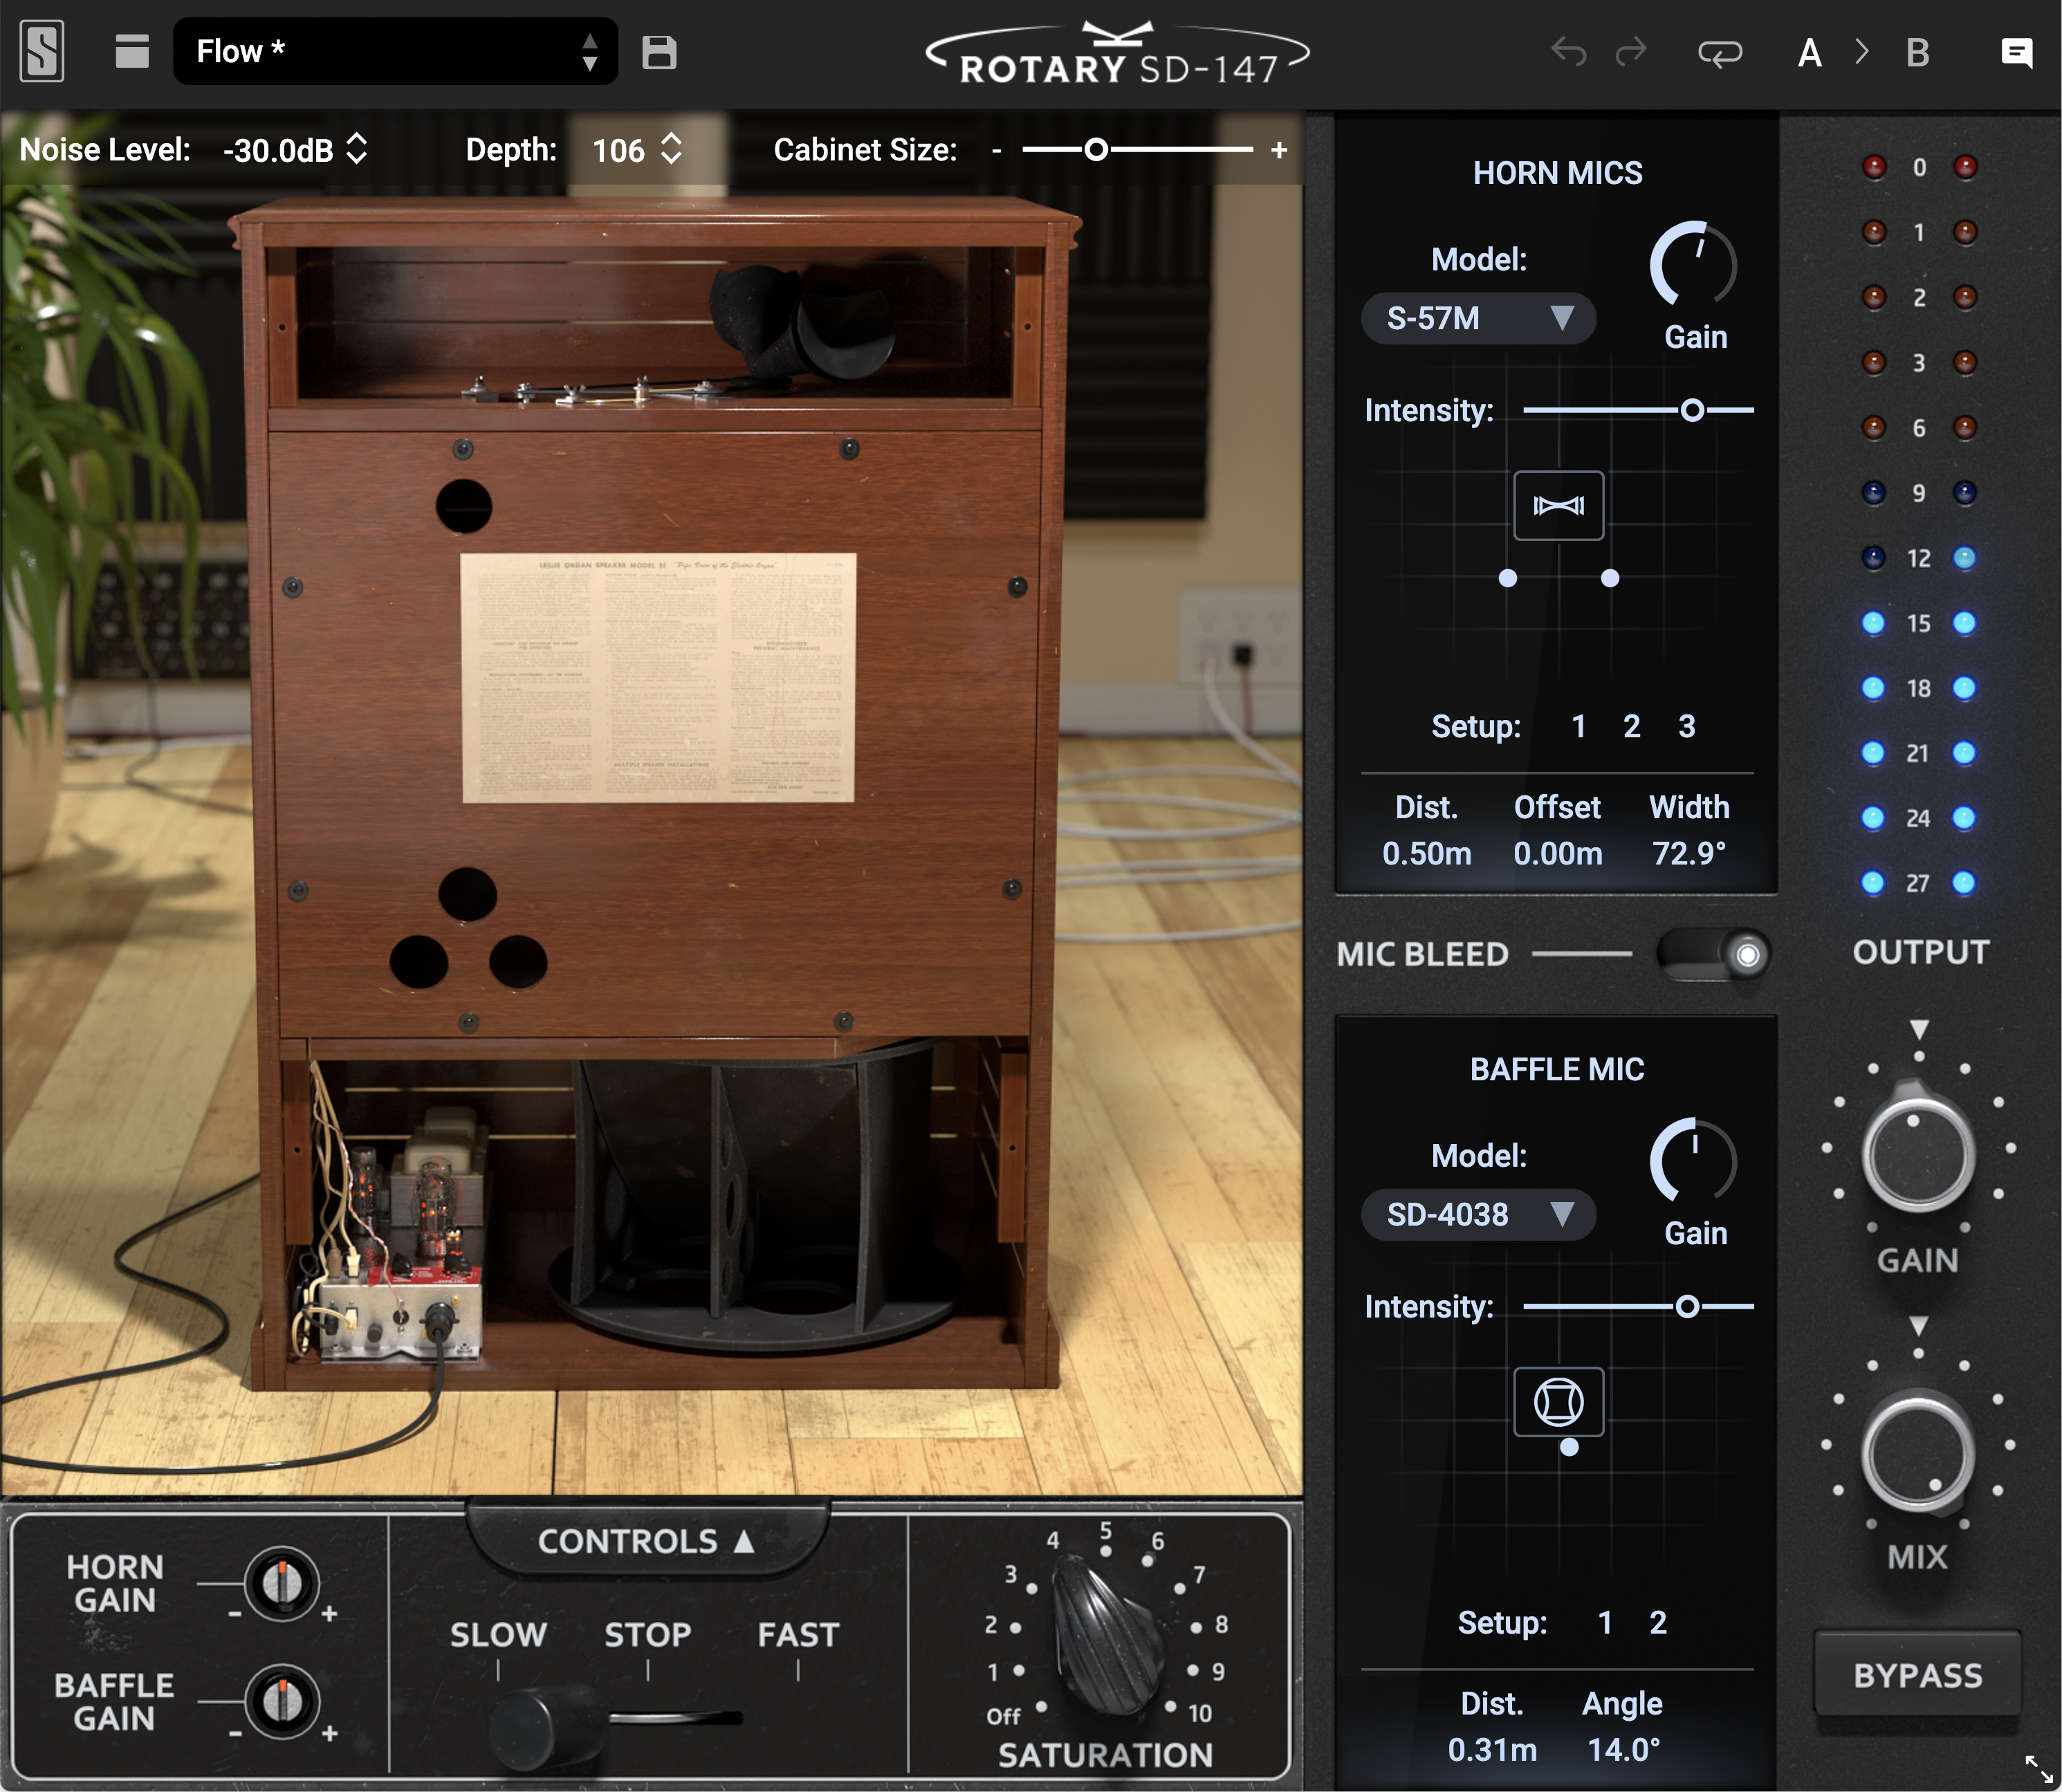
Across the top of the plugin you’ll find options for configuring some physical aspects of the speaker.
Noise Level
This value determines how much of the mechanical and amplifier noise is picked up by the microphones—even completely removing these sounds if you’re looking for just the doppler effects of the speaker while keeping everything clean.
Depth
Increasing this control causes the sound output from the Horn and Baffle to be more directionally focused which will, in turn, make pitch modulations more pronounced.
Cabinet Size
This changes the physical dimensions of the speaker cabinet, thus affecting the delay times of the sounds as they bounce off the internal surfaces of the cabinet—it can be made smaller or larger than the original.
Basic Performance Controls
Across the bottom are the main controls that make the most obvious changes to the speaker’s output.
Horn Gain & Baffle Gain
These controls allow you to adjust the volume of the horn (the top rotating element) and the Baffle (the low rotating surface) to create a good tonal blend between mids/highs and lows.
Speed Switch
The original speed switch, which is normally attached to the corner of an organ, provided Slow (Chorale) and Fast (Tremolo) settings—Rotary SD-147 also provides a Stop position which turns off the motors and causes the horn and baffle components to stop rotating.
Saturation Knob
Turning up the Saturation knob will add grit and distortion, often used to add critical “bite” to the sound going through the speaker.
Advanced Speaker Controls
Right above the Speed Switch is the Advanced button which, when clicked, exposes a set of additional parameters for deep tweaking of the speaker’s behavior.
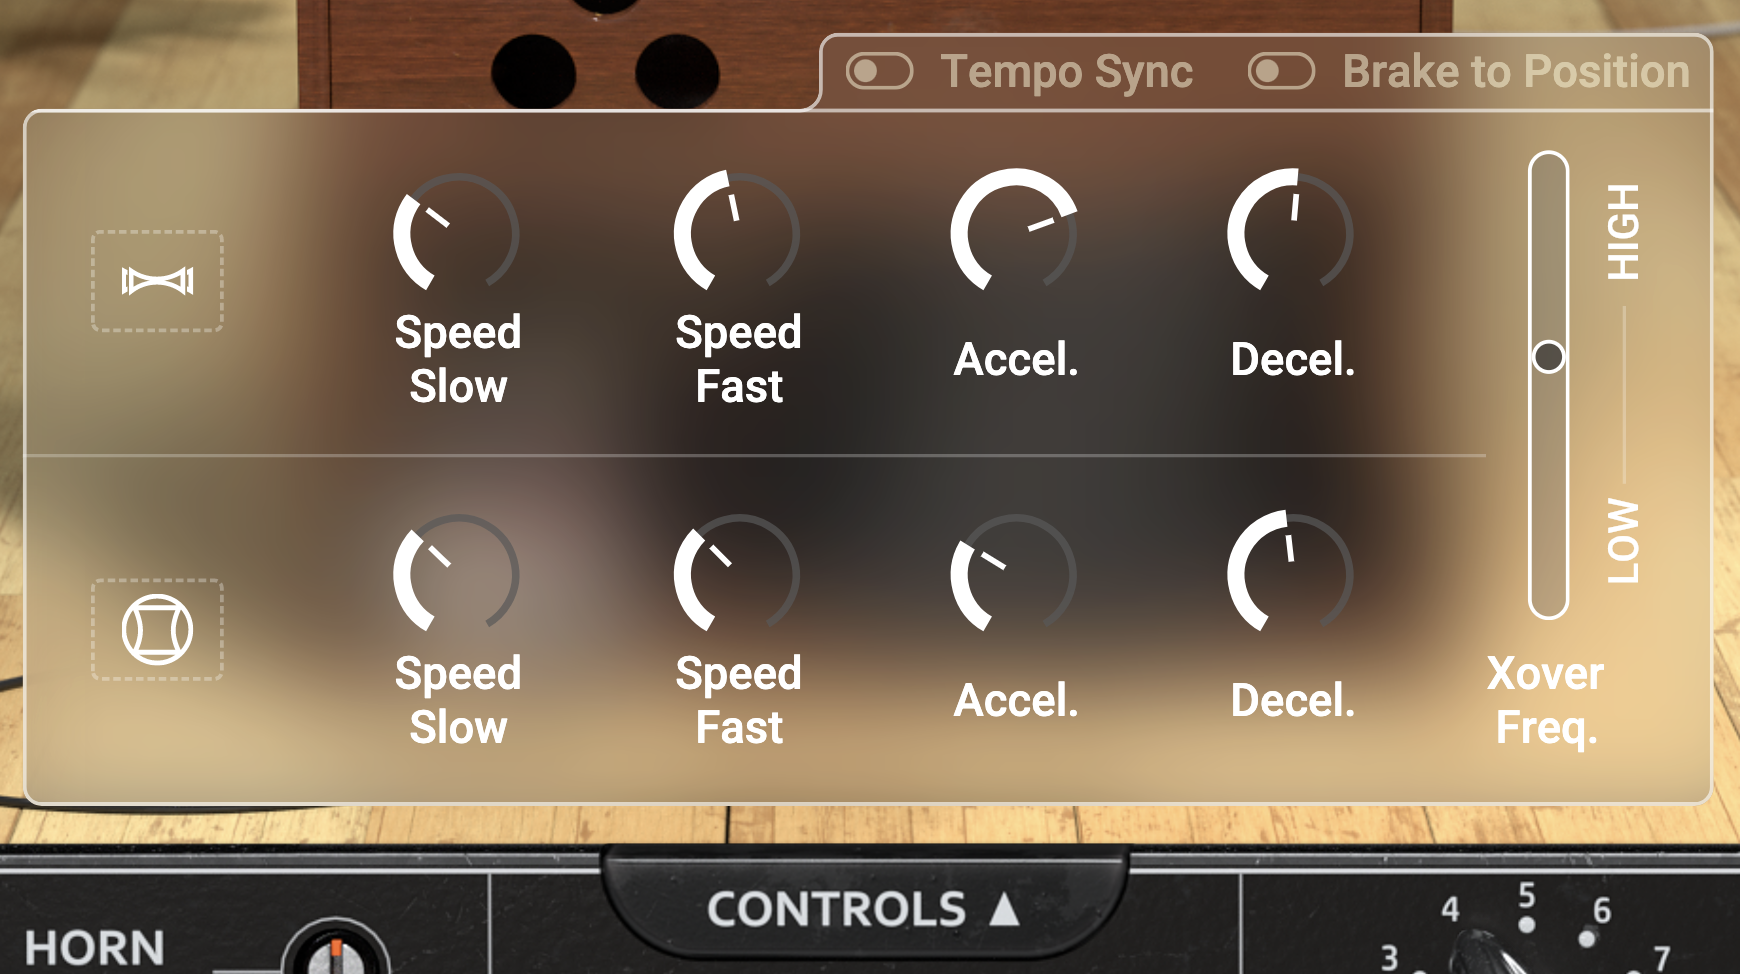
Speed Slow and Speed Fast Knobs
There are two Speed Slow controls, one for the Horn and another for the Baffle, that determine the rotation speeds of the two components when the Speed Switch is set to the “Slow” position. There are also two Speed Fast controls—again each for the Horn and Baffle—that set their rotation speeds when the Speed Switch is set to the “Fast” position.
Acceleration and Deceleration Knobs
The Horn and Baffle also have their own Accel and Decel knobs. The Accel knobs determine how quickly (or not) each component speeds up when the rotation speed is increased with the Speed Switch. The Decel knobs determine how quickly (or not) the components slow down to match the setting of the Speed Switch. With these knobs turned fully clockwise, the speeds will change almost instantaneously in response to changing the Speed Switch
Brake to Position
At the top of the Advanced Panel is a “Brake to Position” switch. When this switch is off, the horn and baffle will naturally decelerate when the Speed Switch is set to Stop, meaning that the two components can end up pointing in essentially random positions once they come to a stop.
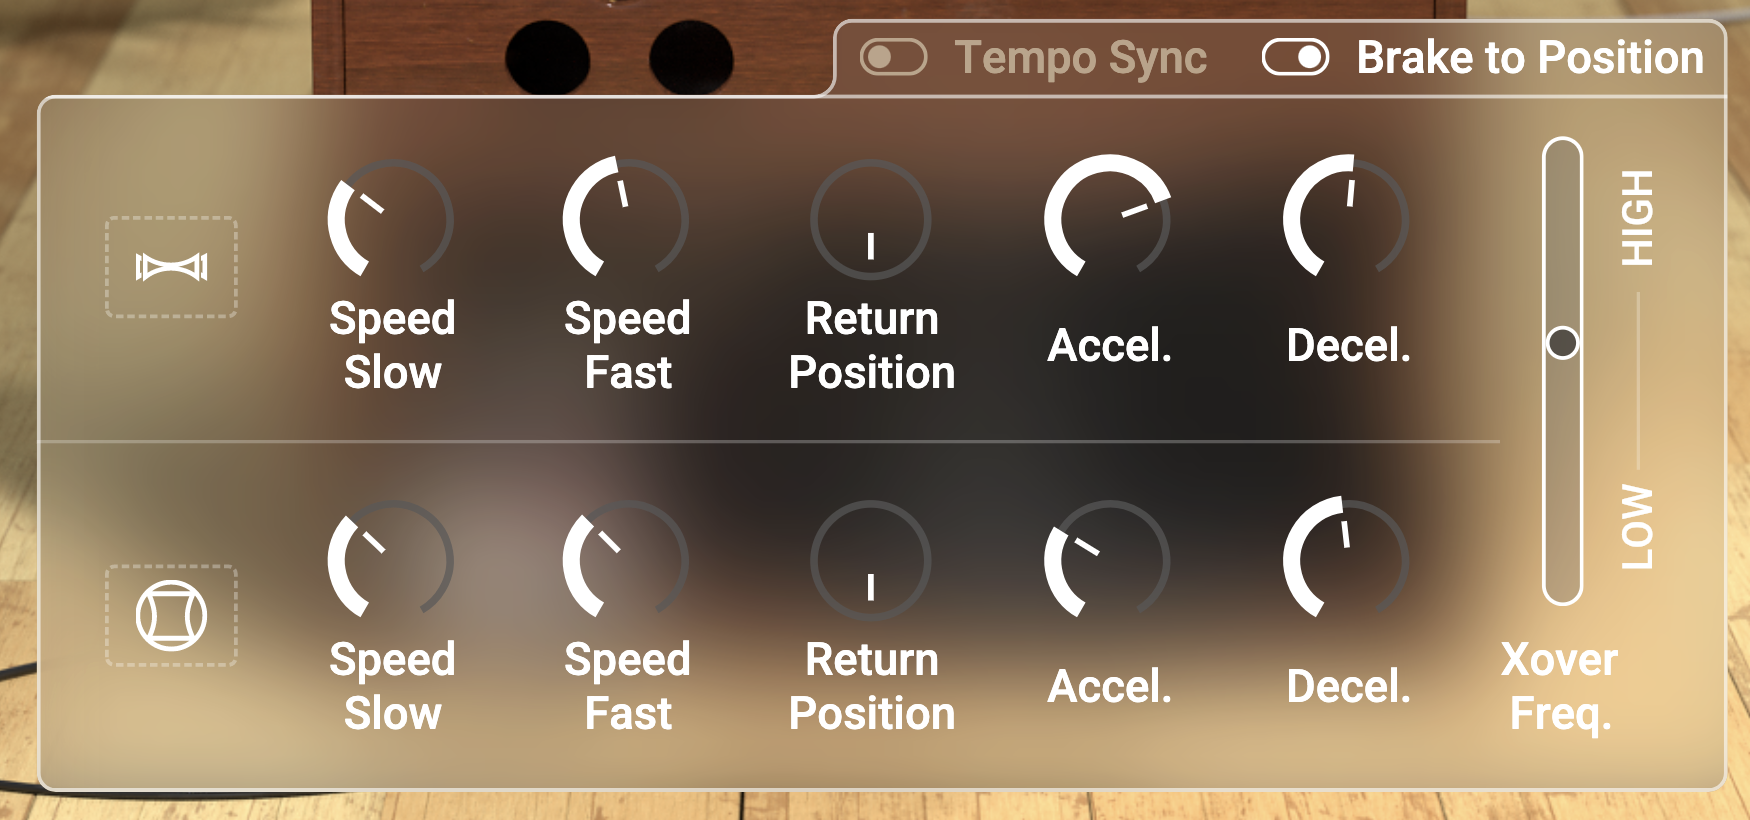
With the “Brake to Position” switch turned on, this adds two more knobs to the Advanced Panel labeled “Return Position”. These knobs set the direction you wish for the components to be pointing when they finally come to rest. The deceleration behavior will be tweaked slightly when the Speed Switch is moved to the “Stop” position to ensure that the components are pointing in the desired directions once they stop moving.
Also, once the components have stopped moving, you can turn the “Return Position” knobs to manually adjust the orientation of the two parts to point in any direction you like. As with the other controls, this can be automated in the DAW to allow precise movements of the sound at the exact moments in the song.
Tempo Sync
The Tempo Sync switch at the top of the Advanced Panel is normally off, allowing the horn and baffle to rotate at their normal rates.
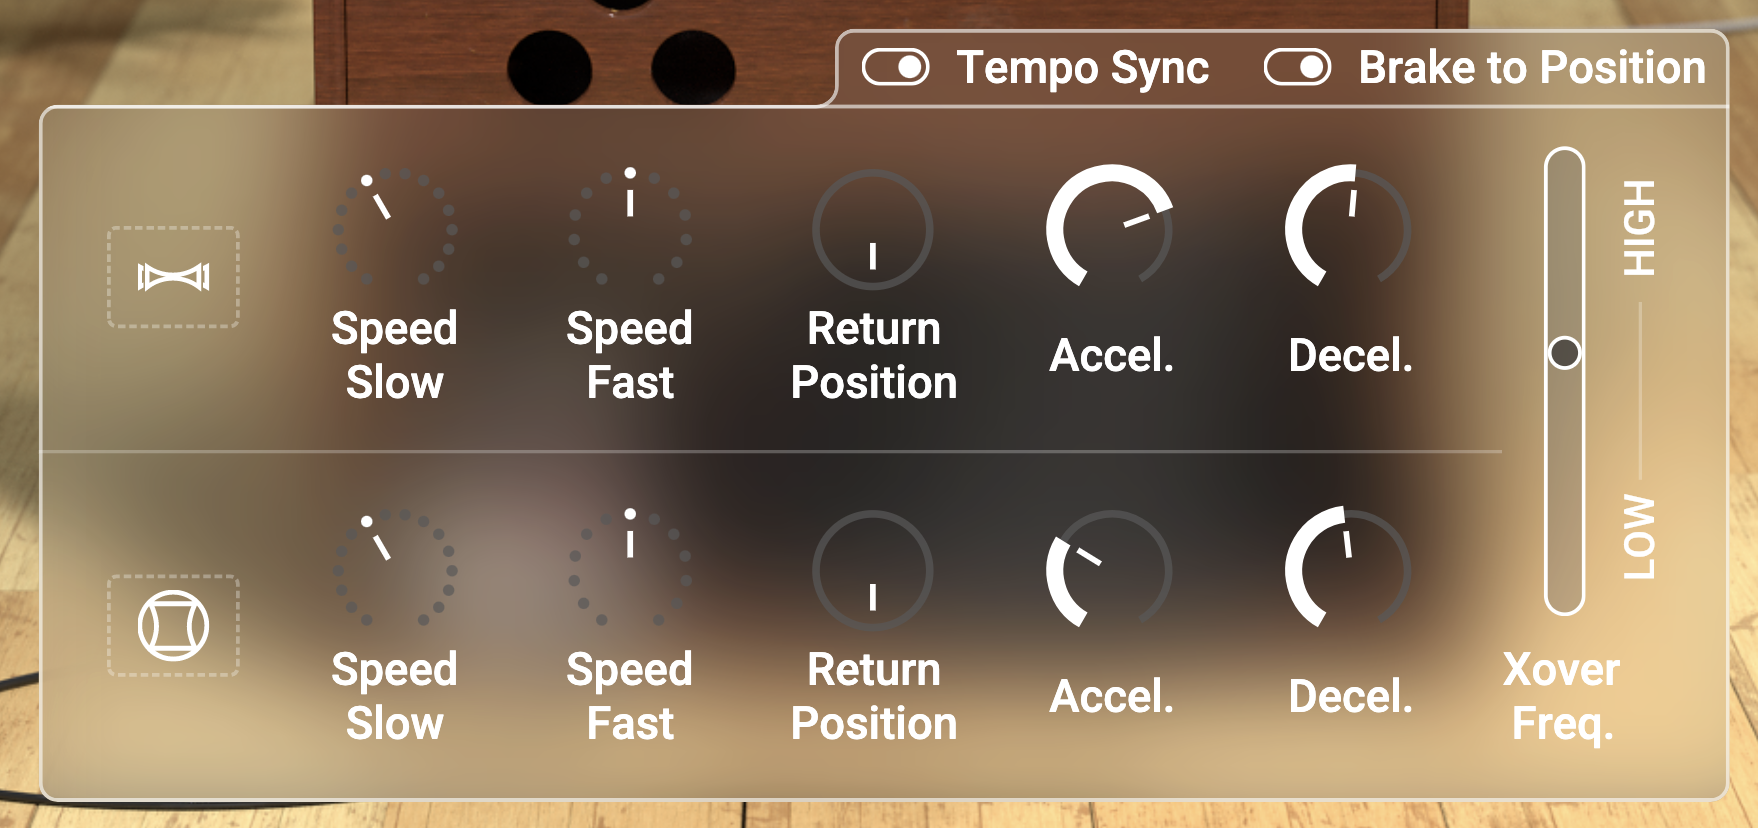
However, when Tempo Sync is turned on, now the rotation will be synchronized to the project tempo of the host DAW. The Speed Slow and Speed Fast knobs then show their rates as multipliers or divisors of the project tempo.
Crossover Frequency
The two-channel amplifier splits the incoming audio signal into an upper band that is fed to the horn and a lower band that is fed to the baffle. The Xover Freq slider allows you to move the frequency where this split occurs. Moving the slider upwards will cause more of the mid and high frequencies to be fed to the baffle, while moving the slider downward will cause more of the mids and lows to be fed to the horn.
Microphone Configuration
Along the right side of the plug-in are the controls for the microphone setup as the microphones and their positioning are also an integral component to the overall sound of the rotary speaker.
Horn Mics Positions
Rotary speakers are typically recorded with two microphones pointing towards the horn. This is because the mid and upper frequencies are more directional compared to the low frequencies output from the baffle.
Three preset mic setups are provided as quick starting points. Setup number 1 places the two mics at a 90˚ angle from one another while pointed towards the horn. Setup number 2 places the two mics on opposite sides of the horn—180˚ apart for the widest sound possible. Setup number 3 puts both mics in the same location if you want to capture the Rotary SD-147 in mono.
You can also manually adjust the distance, offset, and angular width values of the microphones allowing you to create almost any mic setup you want. Distance moves the mics further away from the cabinet, offset will slide the mic setup left and right (thus moving the sound of the speaker within the stereo image), and width allows you to set the angular spread between the mics to anywhere between mono (0˚) and full width (180˚).
Note that it’s not possible to place the microphones inside the cabinet so, with very short distance values, the microphones may “crawl around” the outside of the cabinet as the offset and width are changed.
Baffle Mic Positions
The lower baffle section of the rotary speaker is normally recorded with a single microphone since the low frequencies it creates tend to be less directional. The two preset mic setups for the baffle place the mic either right in front of the rotating baffle (Setup number 1) or off at the corner of the cabinet (Setup number 2).
As with the Horn Mic, the Baffle Mic also allows manual setting of the distance of the mic from the baffle as well as its position around the cabinet.
Microphone Models
The sound of the original rotary speaker was captured with Slate Digital’s ML-1A microphones. Thanks to the underlying Virtual Microphone System technology, this allows you to choose from 10 different mic models to use for capturing the Rotary SD-147. You can choose any of the 10 for the horn and for the baffle—when selecting a model other than the ML-1A, you can adjust the Intensity of the mic model with the slider, just like in the Virtual Microphone System plug-in.
Note that you don’t actually need to own any of the microphones from the Virtual Microphone System to take advantage of this feature—they are all built right into Rotary SD-147.
Mic Gain Knobs
These two knobs adjust the gains of the Horn mics and the gain of the Baffle mic, allowing you to create the appropriate mix of levels between these two sets of mics.
Mic Bleed
When recording a rotary speaker, the two upper Horn Mics do pick up some amount of signal emitted from the rotating baffle at the bottom of the speaker; conversely, the lower Baffle Mic picks up some amount of signal output from the rotating horn at the top of the cabinet. This is microphone bleed.
By default, the Mic Bleed switch is in the “on” position to preserve this natural behavior of of recording the speaker. Flipping this switch to “off” removes this bleed such that the Horn Mics only pick up the sound from the rotating horn and the Baffle Mic only picks up the sound from the rotating baffle.
Output Section
The output section is along the right side of the window and controls the general output of Rotary SD-147.
Gain Knob
Adjusts the overall output level of the entire plug-in. This can be boosted by rotating clockwise or reduced by rotating counter-clockwise.
Mix Knob
This knob sets the balance between the output of SD-147 and the incoming “dry” signal.
Normally, this knob is set fully clockwise so you only hear the output of the rotary speaker. However, turning this knob counter-clockwise will add more and more of the original, unprocessed input signal allowing you to create a blend of the two signals.
Bypass Button
This button toggles SD-147 off and on. It can be used to compare the original signal with the processed signal, or can be automated so that the rotary speaker effect is only added at specific points in the song.